A mini greenhouse is the piece of kit I keep recommending to balcony growers up here, and the one most people misuse within a week of buying it. The pitch on the box is seductive: a glasshouse you can carry up the stairs and stand in the corner of a Swedish balcony, season extension without a garden. The reality is more interesting and a lot more conditional. I have run a couple of these tiered zip-front units across several Nordic seasons now, alongside my cold frame, and the short version is that a mini greenhouse is a brilliant tool for three narrow jobs and a quiet disaster the moment you treat it like a real greenhouse. This guide is the buyer’s version of everything I wish someone had told me before the first one blew off the railing.
What a mini greenhouse actually is
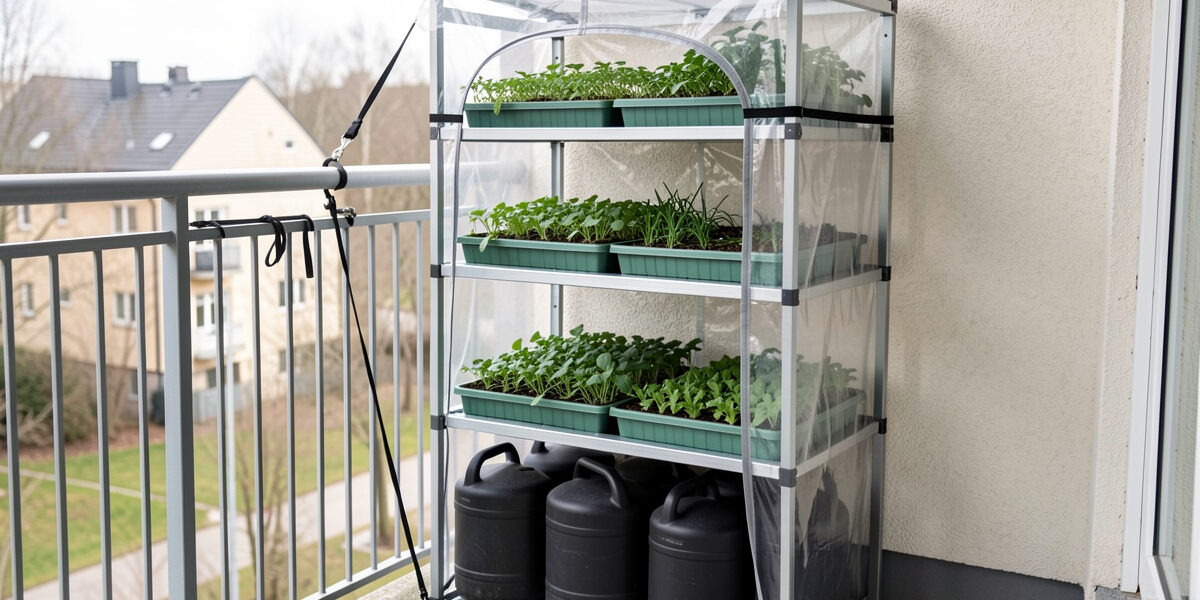
Strip away the marketing and a balcony mini greenhouse is a lightweight steel or resin frame, usually two to five shelves stacked vertically, sheathed in a clear or frosted polyethylene cover that zips shut at the front. That is the whole machine. There is no glazing, no thermal mass, no automation — just a skin that traps the sun’s heat during the day and holds a pocket of still, humid air around your plants. The good ones use a reinforced PE cover with a roll-up, tie-back front panel; the cheap ones use a thin film that goes brittle and yellow after one season of UV.
The vertical, shelved design is the part that suits a balcony. It gives you a surprising amount of growing area in a footprint smaller than a doormat — a four-tier unit is maybe 70 cm wide and 50 cm deep but holds four full shelves of trays. For an apartment grower fighting for every square metre, that vertical stacking is the entire point. It is the same logic I lean on with a stacked-pot strawberry tower: when you cannot grow outward, you grow upward.
What it is not is a sealed, insulated structure. The cover is a single thin layer. It has the thermal performance of a plastic bag, which is to say almost none once the sun goes down. Understand that one fact and you will use the thing correctly. Miss it, and you will cook your seedlings on a sunny April afternoon and then freeze them solid the same night.
The three jobs a mini greenhouse does well
I have stopped thinking of these as greenhouses and started thinking of them as a season-extension appliance with three settings. Each one is genuinely useful, and none of them is “grow tomatoes to harvest in here.”
1. Spring propagation
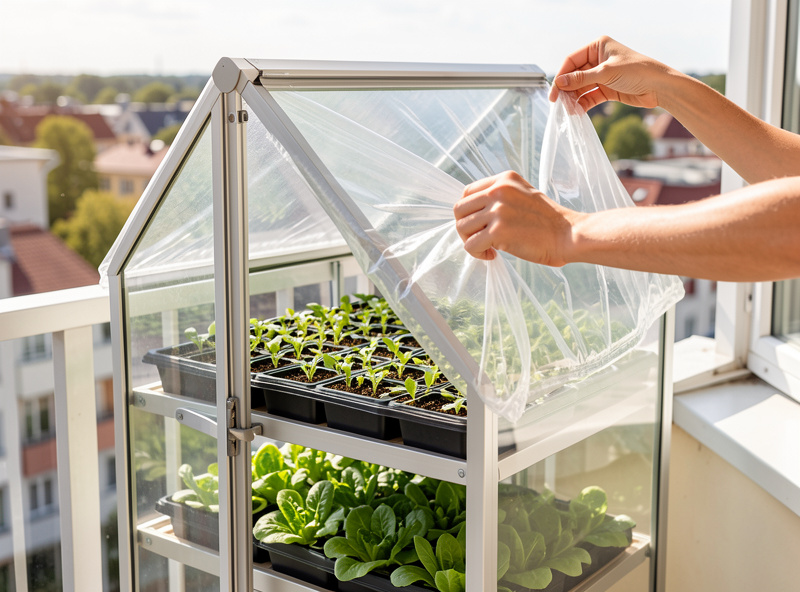
This is the headline use and the one it earns its keep on. From late March into May, a mini greenhouse parked against a sheltered wall gives you a warm, humid, draught-free box to harden off indoor starts and push along direct-sown trays. The trapped daytime heat wakes seeds up faster than open balcony air, and the still environment around the cover protects tender seedlings from the wind that would otherwise shred them. I move my seedling trays out of the apartment and into the greenhouse a couple of weeks earlier than I could ever leave them on a bare shelf, which buys real time on a short Nordic season. If you are still raising your starts indoors, the handoff from a light shelf to the greenhouse is the whole point of owning one.
2. Seedling overflow
Every spring my indoor light shelf hits capacity. There is only so much bench you can put under a grow-light bar before the trays at the edges go leggy reaching for the centre. The mini greenhouse is where the overflow goes — the hardy stuff that can tolerate cooler nights once it has a few true leaves. Brassica starts, leaf lettuce, peas, anything I have already hardened off lives in the greenhouse while the heat-lovers keep the indoor shelf. It effectively doubles my propagation capacity without adding a single watt of lighting or a square metre of apartment floor.
3. Autumn wind-break and heat trap
The job nobody mentions on the box. In September and October, when the season is winding down but the light is still decent, the greenhouse becomes a wind-break and a daytime heat trap for the last harvests. Cut-and-come-again greens, late herbs, and a few stubborn chillies finishing off all get a few extra usable weeks because the cover blocks the wind that does most of the autumn damage and holds a few precious degrees of warmth past the point the open balcony has given up. It will not protect against a hard frost on its own — more on that below — but as a wind-break alone it extends the shoulder season meaningfully.
The honest limits — read this part twice
Here is where most buyers get burned, so I am going to be blunt about the failure modes I have actually hit.
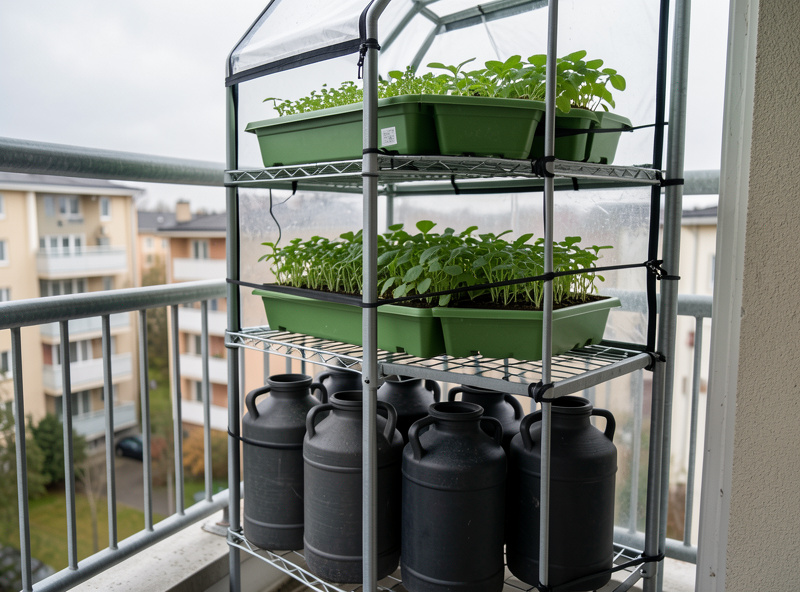
It loses heat fast overnight. A single layer of PE film traps heat beautifully while the sun is on it and surrenders it almost completely the moment the sun is gone. On a clear night the temperature inside the greenhouse drops to within a degree or two of the outside air, sometimes lower under a radiative-cooling sky. The cover is not insulation. If you are relying on it to keep frost off tender plants overnight, you will lose them. The fix is thermal mass: I load the bottom shelf with a few black-painted jugs or bottles of water. They soak up heat all day and bleed it back overnight, and they genuinely flatten out the temperature swing — but they buy you a few degrees, not a heated room. Treat the mass as a buffer, not a furnace.
It is light, so it must be anchored. An empty four-tier unit weighs a couple of kilos. A gust funnelling down a Nordic balcony will pick it up and post it over the railing without ceremony — I have watched it happen to a neighbour’s, and I nearly lost my first one the same way. Anchoring is not optional up here, it is the single most important thing you will do. Bungee the frame to the railing, weight the base shelf with water jugs or paving slabs, and if the cover has guy points, use them. A mini greenhouse that has gone over the rail is no longer your problem; it is the problem of whoever is four floors down.
It bakes on sunny days if you do not vent it. The same trapped heat that helps in March will cook everything inside it on a clear, still day even in spring. A closed mini greenhouse in direct sun can run twenty degrees hotter than the air outside. I have steamed a tray of lettuce seedlings into limp green soup by zipping it shut on a deceptively mild but sunny morning and going to work. The discipline is simple and non-negotiable: unzip or roll the front up on any sunny day, and zip it back down before the evening. If you cannot be there to manage the cover, prop it open and accept slightly less heat retention. A baked seedling is a dead seedling; a slightly cool one just grows a touch slower.
Mini greenhouse vs cold frame vs hoop house
People ask me constantly which of these to buy, and the honest answer is they do different jobs. Here is how I split them on a balcony.
| Feature | Mini greenhouse (zip-front) | Cold frame | Balcony hoop house |
|---|---|---|---|
| Footprint | Tiny — vertical, stacked shelves | Low and wide, sits on the floor | Covers a raised bed or trough |
| Best job | Propagation, seedling overflow, wind-break | Overwintering hardy crops, season start | Protecting an existing planting in place |
| Overnight heat hold | Poor — needs thermal mass | Good — ground contact + mass | Moderate — depends on cover and sealing |
| Wind resistance | Poor unless anchored | Excellent — low and heavy | Moderate — large sail area |
| Vertical capacity | Excellent — 3–5 shelves | None — single layer | None — bed height only |
| Vent management | Critical daily in sun | Lift the lid on warm days | Roll up the sides |
| Cost / portability | Cheap, light, packs flat | Heavier, more permanent | Cheap, but fiddly to anchor |
The way I run it: the mini greenhouse is my vertical seedling factory in spring and a wind-break in autumn, the cold frame is the heavy, ground-hugging unit that actually holds heat overnight and overwinters my hardiest greens, and a hoop house is what I reach for when I want to protect a raised bed exactly where it already stands. They are complementary, not competitors. If I could only own one on a tight balcony and my main job was raising starts, I would buy the mini greenhouse every time — for sheer propagation throughput per square metre, nothing else comes close.
Sizing it for a balcony
The temptation is to buy the biggest unit that fits. Resist it. The right size is set by two things: how much sheltered wall you have, and how much weight you are willing to anchor. On a typical apartment balcony I run a four-tier unit roughly 70 cm wide, 50 cm deep, and a bit over a metre and a half tall. That gives me four shelf-widths of trays — plenty for spring propagation — while still being short enough that it does not act like a giant sail in the wind. The taller five- and six-tier units look like more growing space, but every extra shelf above shoulder height is a shelf the wind can grab and a shelf you cannot easily reach to vent or water.
Match the shelf width to your standard tray, too. A unit sized for 10×20 propagation trays means every shelf is fully used; one that is an awkward in-between width wastes space on every level. And mind the bottom shelf — that is where your thermal-mass water jugs live, so you want it solid and close to the floor where the weight does the most good for stability.
Anchoring and siting — the part that decides everything
I cannot overstate this: where you put it and how you tie it down matter more than which unit you buy. Site it against a sheltered south or south-east facing wall if you possibly can. The wall does three jobs at once — it blocks the prevailing wind, it re-radiates daytime heat back at the cover through the evening, and it gives you a solid surface to anchor against. A mini greenhouse standing free in the middle of an exposed balcony is asking to be relocated by the next storm.
For anchoring, I use a belt-and-braces approach: bungee cords or webbing straps from the frame to the railing at two heights, a few water jugs on the base shelf for ballast, and the cover’s own tie-down points pegged or clipped wherever the design allows. The goal is that a strong gust finds nothing loose to grab. It takes ten minutes the day you set it up and it is the difference between a season of use and a single dramatic afternoon. Whatever you spend on the greenhouse, spend a little more on proper anchoring hardware — it is the cheapest insurance in small-space growing.
As an Amazon Associate I earn from qualifying purchases — the links below go to current listings so you can compare covers and anchor kit. A reinforced PE mini greenhouse with a roll-up cover is the type to look for, and a set of heavy-duty greenhouse anchor stakes and straps is the upgrade I would not skip on an exposed Nordic balcony.
How it fits the season-extension picture
A mini greenhouse is one tool in a kit, not the whole answer. It buys you propagation throughput and shoulder-season wind protection; it does not buy you a heated growing space or true frost protection on its own. Paired with thermal mass and disciplined venting, it is one of the highest-value pieces of gear a small-space grower can own, precisely because it does so much in so little footprint. Use it for what it is good at — starting and overflowing seedlings in spring, breaking the wind in autumn — and lean on a cold frame or proper covers for the jobs it cannot do, and you will get weeks of extra season out of a balcony that the calendar says should already be closed.
Frequently asked questions
Will a mini greenhouse protect plants from frost overnight?
Not reliably on its own. A single-layer cover loses heat almost as fast as open air once the sun is gone, dropping to within a degree or two of outside. Add dark water jugs for thermal mass to buy a few degrees, but use cold frames or covers for real frost protection.
How big a mini greenhouse should I get for a balcony?
A four-tier unit around 70 cm wide and 50 cm deep suits most apartment balconies. It gives four shelves of trays without becoming a giant sail in the wind. Taller five and six-tier units add wind risk and shelves you cannot easily reach to vent or water.
Why does my mini greenhouse overheat on sunny days?
A closed cover traps sun heat and can run twenty degrees hotter than the air outside, cooking seedlings even in spring. Unzip or roll the front panel up on any sunny day, then close it before evening. If you cannot manage it, prop it open and accept slightly less heat retention.
How do I stop a mini greenhouse blowing off the balcony?
Anchoring is essential up north. Site it against a sheltered wall, bungee the frame to the railing at two heights, weight the base shelf with water jugs or slabs, and use any tie-down points on the cover. An empty unit weighs only a couple of kilos and goes over the rail easily.
Can I grow tomatoes to harvest in a mini greenhouse?
Realistically no, not in a Nordic climate. A mini greenhouse is a propagation and wind-break tool, not an insulated growing space. Use it to start and harden off seedlings in spring and to extend the shoulder season in autumn, then move plants into containers for the main season.
Related guides
- Season extension guide — the hub that ties all of this together for a short Nordic season.
- Cold frame gardening — the heavy, ground-hugging unit that actually holds heat overnight.
- Grow lights for vegetables — where your seedlings start before they ever reach the greenhouse.
- Growing plants from seed indoors — the indoor half of the propagation handoff.
- Balcony vegetable garden — fitting all of this onto a small apartment balcony.
- Fabric vegetable planters — light, balcony-friendly containers for what comes out of the greenhouse.