A 50-watt solar panel, a 12V 7Ah battery, and a small submersible pump can water 15 balcony containers automatically for under $120 — and run for 3 cloudy days before the battery taps out.
You do not need a homestead or a grid-tied inverter to get solar irrigation working. For where automated drip fits among hand watering, soaker hose, ollas, and wicking, see my complete garden watering guide. You need the right match between your garden’s water load, your panel’s wattage, and your battery’s capacity.
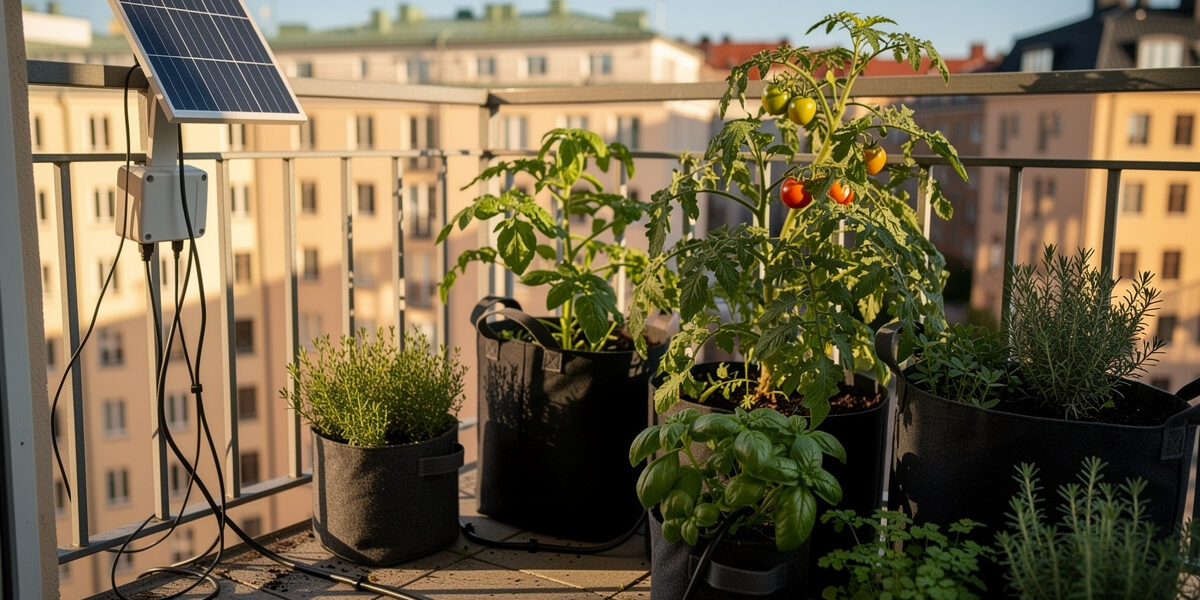
On my Stockholm balcony, a Renogy 50W panel powers the same pump that watered last season’s tomatoes — the panel has outlasted three Swedish winters strapped to a south-facing railing. For a balcony grower in a Nordic climate, solar drip irrigation is not a luxury. It is the difference between July tomatoes and wilted July tomatoes. When the sun is high enough to run the panel, the plants are also at peak transpiration — the two track each other. The challenge is sizing the system to bridge the cloudy stretches without overspending on panels that produce more power than the pump can use.
As an Amazon Associate I earn from qualifying purchases.
Why Solar-Powered Drip Irrigation Makes Sense for Urban Gardens
Solar drip irrigation matches supply to demand in a way that no timer-based system does. A 20-watt panel delivers roughly 1.5 amps at 12 volts under full sun, which is enough to drive a small submersible pump rated between 5 and 15 watts. When clouds roll in, panel output drops and so does evaporation from the plants — the system naturally slows down when your containers need less water.
A mains-powered timer waters the same volume every day regardless of weather. On a cool, overcast Tuesday with saturated soil, that is a recipe for root rot and fungus gnats. On a hot, dry Saturday, it may not run long enough. The solar approach eliminates the timer — simpler electronics, one less failure point, and the garden gets water when the sun is actually pulling moisture out of the soil.
The barrier for most urban gardeners is the battery. A solar panel alone cannot run a pump — the voltage sags when partial cloud passes over the panel, stalling the motor. Even a passing cloud can drop a panel’s output sharply for as long as it lingers, which makes battery buffering a requirement for any load that has to stay steady through that flicker. A small sealed lead-acid or LiFePO4 battery acts as a buffer, storing enough energy to keep the pump steady through cloud flicker and run a final cycle near dusk when the panel output dies but the plants are still warm. The sizing math for that battery is where most guides get hand-wavy and where the cross-domain handoff to battery-storage sizing becomes editorially required — the same Wh-to-Ah math that runs a backup-power rack also runs a garden pump, just scaled down to 12V and a 5-watt load.
How Much Water Your Container Garden Actually Uses
A mature indeterminate tomato in a 5-gallon fabric pot drinks 1 to 2 liters per day in full sun. A row of 15 containers — tomatoes, peppers, basil, kale — can pull 20 to 30 liters on a hot Nordic summer day, roughly 7 gallons. That is the number you size the pump and panel around: not what the pump can deliver when you plug it into a wall outlet, but what the plants actually use.
Drip emitters rated at 2 liters per hour per container make the math straightforward. For 15 containers, you need 30 liters per hour total flow. Drip irrigation is far more efficient than overhead watering because it puts water straight into the root zone instead of losing it to evaporation and runoff — Colorado State University Extension rates drip systems at over 90 percent efficiency against 50 to 70 percent for sprinklers. A small submersible pump rated at 300 liters per hour sounds like overkill — but that rating is at zero head height. Lift the water from a reservoir on the balcony floor to a container 80 cm up and you lose roughly 30% of flow. The 300 L/h pump delivers closer to 200 L/h at head height, which means the system needs to run about 10 minutes to deliver 30 liters.
Ten minutes of pump runtime is the load the solar panel and battery need to cover, once or twice per day depending on temperature. On a balcony in Stockholm in July, one 10-minute run in the early afternoon covers it. On a 30-degree day in August, run it at 11 a.m. and again at 3 p.m. — 20 minutes total. Knowing your plant count and container count before buying any hardware is where you start: start with a plant list, calculate evaporative demand, then size the components. If you are still figuring out which containers to use, get that sorted first — the irrigation design flows from the container layout.
Sizing the Solar Panel for Your Pump
The pump in my setup hums at a frequency you stop hearing after a week — a low electric murmur from the balcony corner, followed by the sound of water drops hitting soil. A 12V submersible pump drawing 1 amp consumes 12 watts while running. A 20-watt solar panel delivers that comfortably in direct sun with headroom to charge the battery simultaneously. A 10-watt panel barely covers the pump at peak output and leaves nothing for the battery — the system browns out on every cloud pass.
The panel wattage rule of thumb: multiply the pump’s running wattage by 1.8, then round up to the nearest available panel. For the 12-watt pump, that is 21.6 watts, so a 20-watt panel works in most conditions and a 30-watt panel gives breathing room for partly-cloudy days. Avoid the temptation to buy a 50-watt panel for a 12-watt pump — without a charge controller to regulate voltage, the panel will push current into the battery faster than the battery chemistry can accept it, and the pump does not benefit from the extra power. Sizing is a match, not a maximization problem.
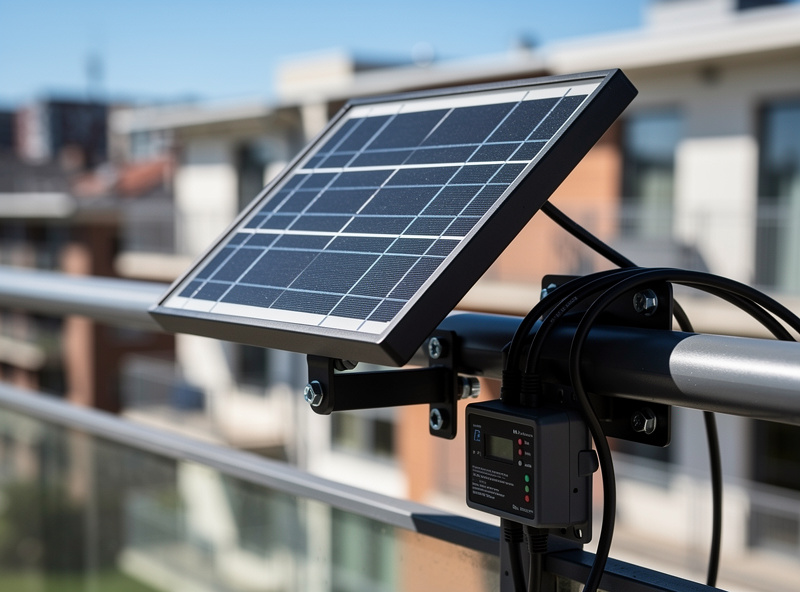
Panel placement matters more than panel wattage on a balcony. A panel tilted toward the equator at roughly the site’s latitude gathers meaningfully more annual energy than one lying flat against a railing — the US Department of Energy notes that a surface tilted at an angle equal to the latitude maximises annual production and evens out the seasonal swing. In Stockholm that means a steep south-facing tilt clearly beats flat-mounting on a rail. A panel angled at 30 degrees facing southwest in summer trades peak noon output for more total watt-hours over the full afternoon — better for a system that needs to run at 11 a.m. and 3 p.m. rather than noon only. The 15-minute afternoon cloud that passes over a railing panel will not kill the pump — the battery handles it — but a panel permanently shaded by the building from 2 p.m. onward will never deliver enough total energy for that second run.
Choosing a Battery for Overnight and Cloudy-Day Operation
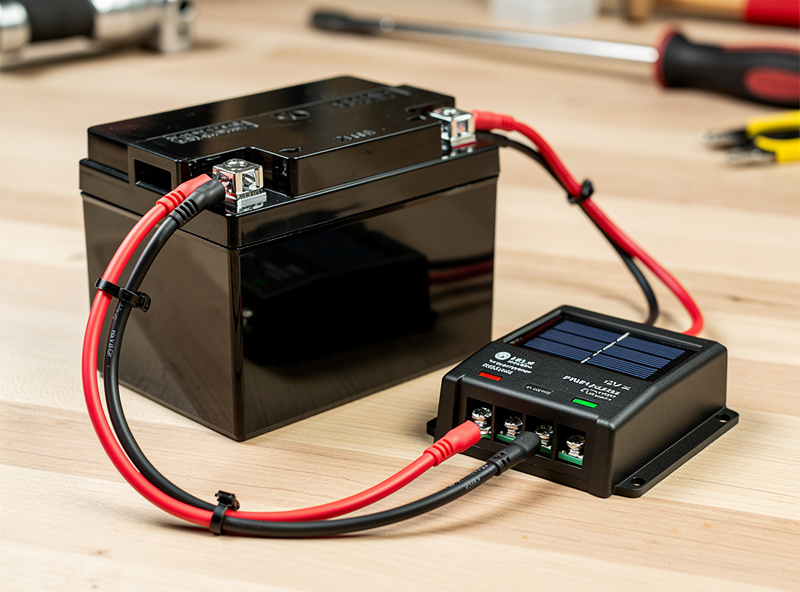
A 12-volt, 7-amp-hour sealed lead-acid battery stores roughly 84 watt-hours total, of which about 42 watt-hours are usable if you stay above 50 percent depth of discharge. The 12-watt pump running for 20 minutes total per day uses 4 watt-hours. That leaves enough headroom for three cloudy days. A smaller 3.5 Ah battery would cover one day but drain below the safe threshold on day two of overcast weather — and deep-discharging a lead-acid battery repeatedly kills it within a season.
LiFePO4 batteries change the math entirely. A 12V 6Ah LiFePO4 pack usable to 90 percent depth of discharge delivers about 65 watt-hours — enough for 16 runs of the 4 Wh per session pump, or roughly 8 days without sun. They also weigh half as much as the equivalent lead-acid. The tradeoff is cost: a 6Ah LiFePO4 runs $25 to $35, whereas the 7Ah SLA is $15 to $20. For a balcony system that will freeze in winter and sit idle for months, the lead-acid is the practical choice. For a year-round greenhouse pump that cannot afford to die, the LiFePO4 pays for itself in replacement cycles. The full battery-sizing math — depth-of-discharge derating, capacity loss at cold temperatures, serial vs parallel cell configuration — is covered in detail in the guide to sizing a battery storage system, which uses the same physics whether you are running a house or a drip pump.
A small PWM solar charge controller — $12 to $18 for a 5-amp unit — sits between the panel, battery, and pump. It prevents overcharging the battery during long sunny stretches and cuts off the pump if battery voltage drops below the safe discharge floor. The pump connects to the “load” terminals on the controller, which switches on when the battery voltage is above the cut-off threshold. Skip the charge controller and you are relying on the panel’s open-circuit voltage staying below the battery’s maximum charge voltage — it rarely does on a 20-watt panel in full sun, and the battery cooks.
Drip Irrigation Layout: Tubing, Emitters, and Zones
A single 13-millimeter mainline from the pump to a manifold splits into 4-millimeter micro-tubing branches, one per container — a standard drip irrigation kit has the tee fittings, elbows, and drippers you need. Each branch terminates in a pressure-compensating dripper rated at 2 liters per hour, screwed or pressed into the micro-tubing. Pressure-compensated drippers matter because the container nearest the pump sees higher pressure than the one at the end of the line — a non-compensated dripper at position 1 delivers twice the flow of position 15, overwatering the close plants and starving the far ones.
For 15 containers on a single pump, cut the 13 mm mainline to run along the row of containers, insert a tee or elbow at each container position, and run a 50 cm length of 4 mm micro-tubing from each tee to the dripper staked into the soil. The mainline needs an end plug or a flush valve at the last container — leave the line open-ended and water pressure vanishes at the far end, another silent failure mode that kills the containers you check least often.

Zone the system if different containers have different water needs. A tomato in a 5-gallon fabric pot drinks 2 liters per day; a rosemary in a terracotta pot drinks half a liter. Running both on the same 2 L/h dripper over-waters the rosemary. Split the mainline into two zones with a manual ball valve or a small solenoid, and run each zone on its own dripper rating. The pump does not care — it delivers its rated flow regardless of how many emitters are downstream, as long as the total emitter flow rate stays below the pump’s output at head height. For more on matching container types to plant water needs, the soil-and-drainage guide covers which mixes hold moisture and which drain fast — the irrigation layout follows from the soil choice.
Installing and Maintaining Your Solar Drip System
Mount the panel where it sees unobstructed sun for at least 4 hours midday — south-facing balcony railing, clamped with stainless steel L-brackets and backed with a wind-baffle if you are above the third floor. Run the panel cable through a weatherproof gland or drill a small hole in the railing bracket and grommet it. Zip-ties degrade in UV within one season and the cable drops, shorts against the railing, and the whole system goes dark.
The reservoir — a 20-liter bucket or a rectangular storage tote — sits below the lowest container to prevent the pump running dry and siphoning backwards when off. Fill it every 2 to 3 days in peak summer depending on usage, and add a tablespoon of hydrogen peroxide every other fill to suppress algae in the lines. Algae is the silent pump killer: once the barb fittings clog with green slime, flow drops and the pump works against increased resistance, overheats, and burns out. A simple inline sediment filter between the pump outlet and the mainline — a $4 mesh strainer — catches what the algae bloom releases and extends the system’s life by a season or two.
After the growing season, drain the lines, pull the pump, and store the battery indoors above freezing. A lead-acid battery left on a balcony through a Nordic winter self-discharges, freezes, and cracks the case — replacement required in spring. A LiFePO4 battery stored at 50 percent charge survives winter fine but should not be charged below 0 degrees Celsius — the BMS prevents it, but the charge controller on the balcony does not know the BMS has tripped and may sit there cycling power into a locked-out battery until it damages something.
What This Setup Actually Changed for Me
Solar-powered drip irrigation is the project that freed me from the daily July watering obligation on my balcony. A small panel on the railing charges a 12-volt battery that runs a submersible pump, and the pump draws from a reservoir tote and pushes water through the drip lines to every fabric pot. It fires for about ten minutes in the early afternoon when the sun is highest and the plants are transpiring hardest, and the containers get close to what they need without me standing over them with a can. On the hottest August days I add a second short run, and on cool overcast stretches the panel simply produces less, the pump runs less, and that tracks the plants’ lower demand almost exactly — which is the whole reason a solar system suits this better than a fixed mains timer. The honest caveat is that it is a summer tool up here: the battery and pump come indoors before the first freeze, and the whole rig goes back up in spring.
Frequently Asked Questions
Can a solar-powered drip system run on a completely cloudy day?
Yes, if the battery is sized correctly. A 12V 7Ah SLA battery stores enough energy to run a 12-watt pump for 20 minutes daily through 3 consecutive cloudy days before hitting the 50% depth-of-discharge floor. Beyond 3 days without sun, plug the pump into a USB power bank as a manual backup until the sun returns.
What size solar panel do I need for a balcony with 10 containers?
A 20-watt panel is sufficient for 10 containers with a 12W pump. Multiply pump wattage by 1.8 — a 12W pump needs about 22W, so a 20-30W panel covers it with margin. Panel placement angle matters more than wattage in a balcony setting with partial building shade.
How do I prevent the drip lines from clogging?
Install a $4 inline mesh sediment filter between the pump outlet and mainline tubing. Add 1 tablespoon of hydrogen peroxide to the reservoir every other fill to suppress algae. At the end of the season, flush the lines with clean water and drain completely before storage.
Is a charge controller really necessary for a 20-watt panel?
Yes. Without a PWM charge controller, the panel’s open-circuit voltage can exceed the battery’s maximum charge voltage in full sun, overcharging and damaging it. A 5-amp PWM controller costs $12 to $18 and also protects the pump by disconnecting the load if battery voltage drops too low.
Can I use a USB power bank instead of a lead-acid battery?
It works for short-term backup but not as the primary battery. Power banks are not designed for the continuous discharge-recharge cycling of a daily solar pump schedule and typically lack low-voltage disconnect protection. A sealed lead-acid or LiFePO4 battery with a charge controller is the right long-term solution.
Will a solar drip system work on a north-facing balcony?
No. A north-facing balcony in the northern hemisphere receives diffuse light only, which produces roughly 10 to 15 percent of a panel’s rated output — not enough to run a pump and charge a battery. A south-, southeast-, or southwest-facing exposure with at least 4 hours of direct sun is required.