The Gardena balcony watering system delivers consistent drip irrigation to 10-20 pots from a single tap connection, cutting daily watering to a once-weekly reservoir check. On my Swedish balcony, I set up a Gardena Micro-Drip system after losing three pots of basil during a two-week summer holiday — the plants my neighbour forgot to water were brown sticks by the time I returned, while the single drip line I had tested on one tomato pot kept that plant healthy the entire time. This guide covers the components, layout, and setup steps I use now. For the wider picture, see my complete raised beds and planters guide and my complete garden watering guide.
As an Amazon Associate I earn from qualifying purchases.
Understanding the Gardena Balcony System
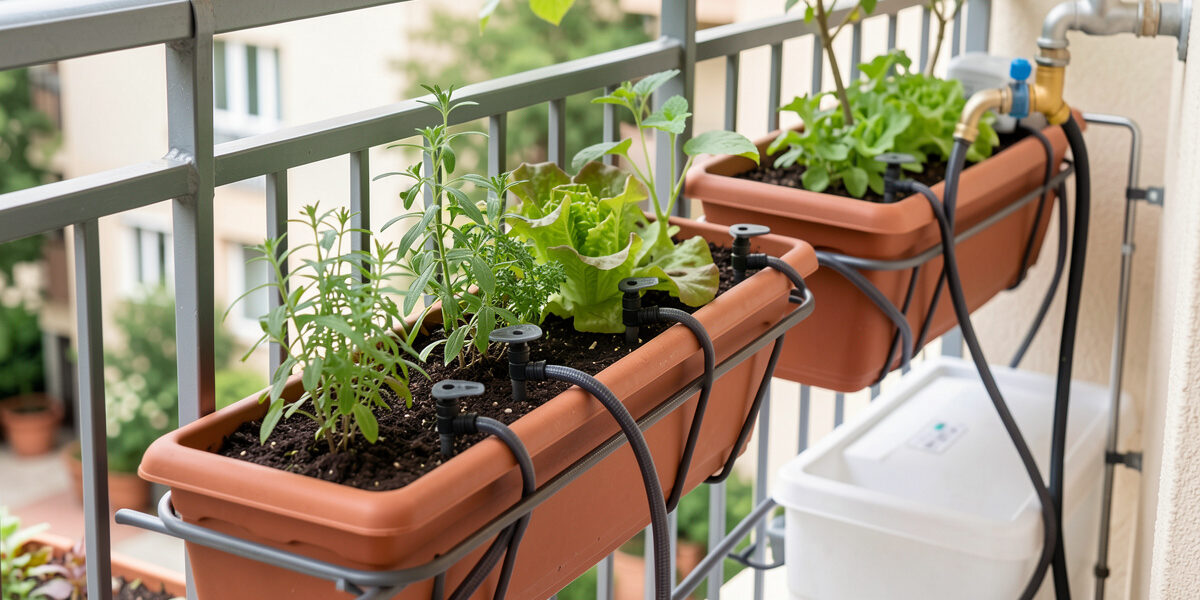
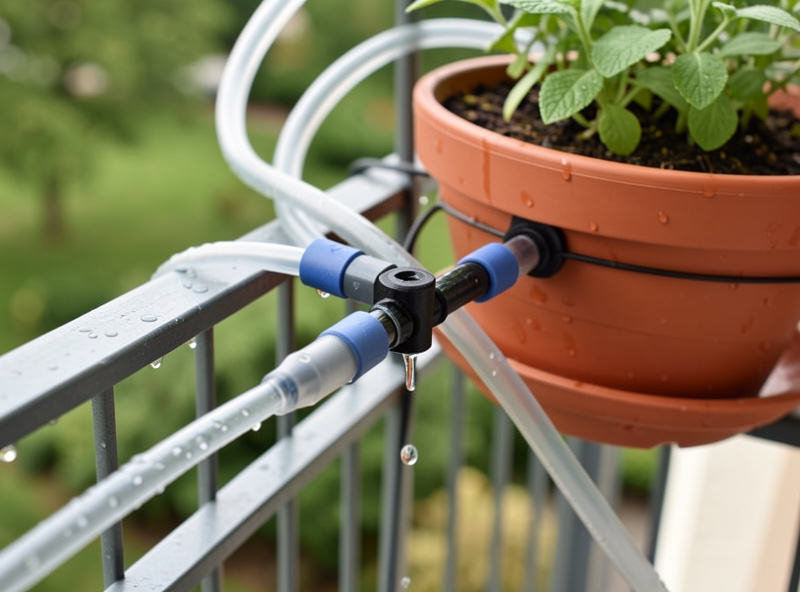
Gardena balcony watering consists of modular components you assemble based on your specific needs. The core pieces are a water controller (battery or mains-powered timer controlling water release), a water supply connection (to tap, rain barrel, or reservoir), 1/4-inch distribution tubing carrying water to plant zones, drippers or micro-sprayers as delivery endpoints at each plant, fittings and connectors (tee joints, elbows, end caps) for customizing layouts, and a pressure regulator maintaining consistent flow across elevation changes.
Balcony applications predominantly use micro-drip configurations — individual drippers at each plant pot for precise delivery and minimal waste. Spray systems using micro-sprayers cover broader areas for grouped plants, and combined systems mix drippers and sprayers for varied arrangements. For most balcony growers, micro-drip is the right choice: it targets each container individually, avoids wetting foliage (which invites fungal problems), and uses a fraction of the water that hand-watering wastes to runoff.
Planning Your Installation
Water Source
Gardena systems connect to several water source types. An outdoor tap is preferred — it delivers consistent pressure (typically 30-80 psi) and unlimited supply, though it requires a weatherproof timer and may need a pressure reducer for optimal micro-drip performance. A reservoir or tank (5-20 gallon capacity is typical for balconies) offers portability and flexible positioning but is gravity-fed at lower pressure and requires manual refilling. A rain barrel is the eco-friendly option but needs appropriate filtration and may require a pump for adequate pressure. On my balcony, I run from a tap through a Gardena Micro-Drip system and Water Computer — the simplest reliable configuration for anyone with an outdoor spigot.
Zone Mapping
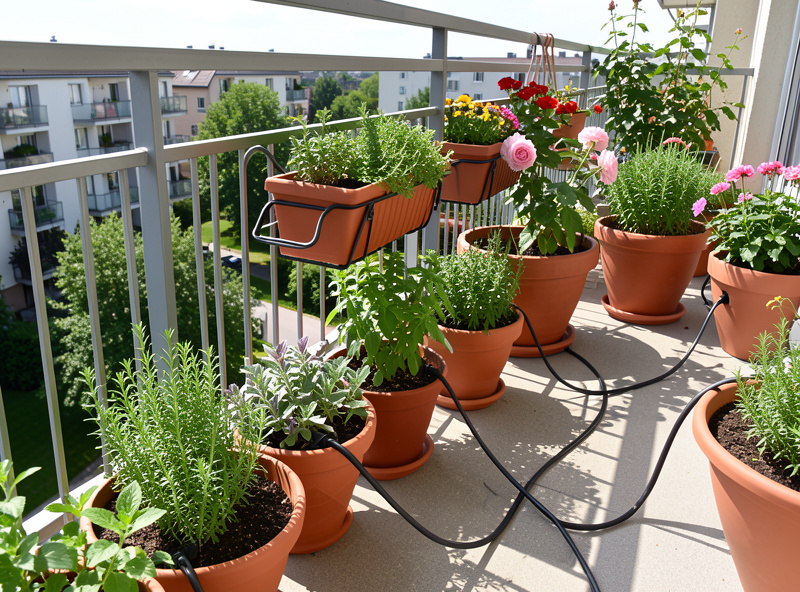
Before purchasing components, map your balcony. Count total containers needing irrigation, group them by water needs (Mediterranean herbs that prefer to dry between waterings versus leafy greens and tomatoes that want consistent moisture), note any elevation changes affecting water flow, and identify the optimal controller placement near the water source. Plan tubing routes that minimize visibility along railing undersides or behind containers. Sketch a simple diagram showing plant positions, water source, and proposed tubing runs — five minutes of planning saves an hour of re-routing tubing later.
Water Requirements
Different plants need varying daily water volumes. Herbs typically need 0.5-1 litre per day, leafy greens 1-2 litres, tomatoes and peppers 2-4 litres, and flowers 1-3 litres depending on variety. Calculate your total daily requirement and ensure your supply source and delivery capacity meet the need. The controller allows scheduling multiple short cycles rather than a single long watering — this prevents runoff and ensures each dripper delivers its full volume before the water drains past the root zone.
Step-by-Step Installation
Component Assembly
Lay out all components before starting. Verify you have the controller unit with fresh batteries, the master unit connecting to your water source, sufficient tubing length (add 20% extra for routing and mistakes), the correct number of drippers or micro-sprayers, adequate fittings and connectors, a pressure regulator if your system needs one, and end caps for line terminations. Test all connections for tight seals before final installation.
Controller Setup
Position the controller near the water source to minimise connection length, protected from direct weather (under an eave or in a weatherproof box), and accessible for programming adjustments. For tap connections, remove the aerator from the tap, install the Gardena tap adapter, connect the controller to the adapter, and test manual operation before programming the schedule.
Main Line Installation
Route the 1/4-inch supply tubing from the controller to the first plant area. Secure it with tubing clips every 12-18 inches along the railing underside or behind containers. Avoid kinks that restrict flow, allow slight slack for thermal expansion (the tubing contracts in cold weather and expands in heat), and use elbow fittings for clean directional changes. Cut tubing with sharp scissors or a tubing cutter for clean ends that seat properly in connectors — a ragged cut leaks.
Zone Distribution
At each plant cluster, cut the main line at the appropriate point, insert a T-connector to create a branch, run the branch line to individual containers, position dripper stakes at each plant base, adjust dripper flow rates if adjustable, and cap line ends securely. The number of plants per zone depends on water pressure — typically 5-10 drippers per zone maximum before flow becomes inconsistent. If you have more than 10 containers, split into two zones with separate branch lines.
Programming the Controller
Set the current time, select watering frequency (daily is typical during the Nordic growing season), set start times (early morning is preferred — 5-7 AM — because plants take up water before the day’s heat increases transpiration), set duration per zone (typically 5-15 minutes depending on dripper flow rate and container size), and enable the rain sensor if equipped. Multiple start times allow splitting watering into shorter sessions that prevent runoff from saturated soil.
Testing and Adjustment
Run a complete test cycle observing every dripper. Check that all emit water, that flow rates appear consistent across the zone, that there are no leaks at connections, that each container’s soil receives adequate moisture, and that there is no overspray wasting water on the balcony floor. Adjust individual dripper flow rates if plants show differing needs — increase duration for large containers, decrease for small ones.
The Nordic Watering Reality
The thing about automated watering in a Nordic climate is that the system works hardest exactly when you are most likely to be away. The peak growing season — June through August — is also peak holiday season, and the 18-hour daylight that drives explosive plant growth also drives explosive water loss from container soil. Before I installed the drip system, I lost more plants to holiday-week drought than to any pest, disease, or frost. The Gardena timer solved that problem completely: I set it to water at 6 AM every morning for 8 minutes per zone, and the plants I came home to after two weeks away were the same healthy plants I had left.
One Nordic-specific detail: the system needs winterising. I drain all lines, remove the controller, and store everything indoors by late October. Frozen water in micro-tubing splits the fittings and cracks the drippers — a mistake you only make once. Reactivation in spring takes about fifteen minutes: flush the lines with fresh water, replace the controller batteries, test each dripper, and adjust the schedule for the cooler weather. The whole system has now run four seasons without a component failure, which is the reliability I need from anything that stands between my plants and death by drought.
Optimization and Troubleshooting
Balancing Water Pressure
Elevation changes affect water pressure significantly. At high points in your system, reduced pressure may require longer watering times. At low points, excess pressure causes misting rather than dripping — install pressure regulators to balance the flow. Zone plants by elevation, use pressure-compensating drippers that deliver consistent output regardless of line pressure, and install inline pressure regulators where needed.
Common Issues
Clogged drippers are the most frequent problem — mineral buildup or debris in the water gradually restricts flow until a dripper stops emitting entirely. Flush lines monthly by removing end caps and running clean water through the system, and soak clogged drippers in vinegar to dissolve mineral deposits. Uneven watering usually means pressure variations or kinked lines — check the full tubing run for bends, install a pressure regulator, and balance zone loads. Leaks at connections come from improper insertion or worn O-ring seals — re-seat connections firmly and replace O-rings that have flattened or cracked.
Seasonal Maintenance
Weekly: visually inspect for leaks or damage, check controller operation and battery level, verify all drippers are functioning, and monitor soil moisture to adjust duration. Monthly: flush lines by running clean water through the system, clean filter screens if equipped, inspect tubing for UV damage or cracks, and adjust programming for seasonal changes. At season’s end: drain and store all components, replace batteries, deep-clean drippers, and check all connections before winter storage.
Cost and Value
A basic Gardena balcony system runs roughly $120-220 total: the controller at $40-80, a balcony watering kit with 15 metres of tubing, 15 drippers, and fittings at $60-100, plus additional components for customisation at $20-40. For active gardeners, the system pays for itself within one to two growing seasons through saved time alone — daily hand-watering of 10-20 containers takes 15-30 minutes, which adds up to hours over a season. The reduced plant losses from consistent moisture are a bonus that compounds the value.
For context on drip irrigation efficiency versus other watering methods — hand watering, ollas, wicking beds — the fundamental advantage of drip delivery is that every drop goes directly to the root zone instead of splashing off foliage or evaporating from the surface. Wisconsin Extension’s container vegetable guidance covers the soil-moisture fundamentals that underpin why consistent, targeted watering outperforms intermittent flooding. My own experience tracks with that: the drip system uses noticeably less water than hand-watering did for the same plants, because the water reaches the roots instead of running off the balcony.
What I Would Do Differently
If I were starting the Gardena system over from scratch, three things would change. First, I would buy pressure-compensating drippers from the start rather than the standard adjustable ones that came in the starter kit. Standard drippers deliver different volumes depending on their position in the line — the dripper closest to the tap gets more pressure and emits more water than the one at the end. Pressure-compensating drippers cost a few pounds more each but deliver identical output regardless of position, which eliminates the constant adjustment cycle of checking each container individually.
Second, I would lay the main supply tubing before buying the drippers, not the other way around. I underestimated the routing distance around my railing by about 20%, ran out of tubing halfway through the installation, and had to wait a week for a reorder. Measure twice, order once — the tubing is cheap but the wait is annoying.
Third, I would add a simple mechanical timer as backup to the electronic controller. The Gardena Water Computer is reliable, but batteries die and electronics fail at the worst possible moment — usually the first day of a two-week holiday. A $15 mechanical tap timer set to run daily as a failsafe gives me peace of mind that even if the electronic controller dies, the plants still get watered. Redundancy in a watering system is cheap insurance against coming home to a balcony full of dead basil.
Connecting to Complete Balcony Automation
Automated watering integrates with broader balcony gardening strategies. Learn container fundamentals in my small balcony garden guide. For plant selection matching automated care, see my balcony vegetable guide. Comprehensive equipment recommendations appear in my equipment guide. And for the complete framework covering container sizing, soil mixing, and seasonal planning, see my balcony gardening complete guide.
Related Articles
- Balcony Gardening: The Complete Guide
- How to Create a Small Balcony Garden
- Growing Vegetables on Your Balcony
- 12 Balcony Herb Garden Ideas
- Best Plants for Apartment Balconies
What is the Gardena balcony watering system?
Gardena balcony watering systems are modular drip irrigation kits designed for balcony containers. They connect to a tap or reservoir and deliver water directly to each planter on a timer schedule, eliminating daily hand-watering.
How do you install a Gardena balcony watering system?
Connect the timer to your tap, run the main tubing along the balcony railing, attach drip emitters to each planter, and set the timer for your desired schedule. Installation takes 30-60 minutes depending on the number of containers.
How much does a Gardena balcony watering system cost?
A complete basic system costs $120-220 depending on the number of containers. The controller is $40-80 and starter kits with tubing and drippers run $60-100. The investment typically pays for itself within one to two growing seasons through saved time.