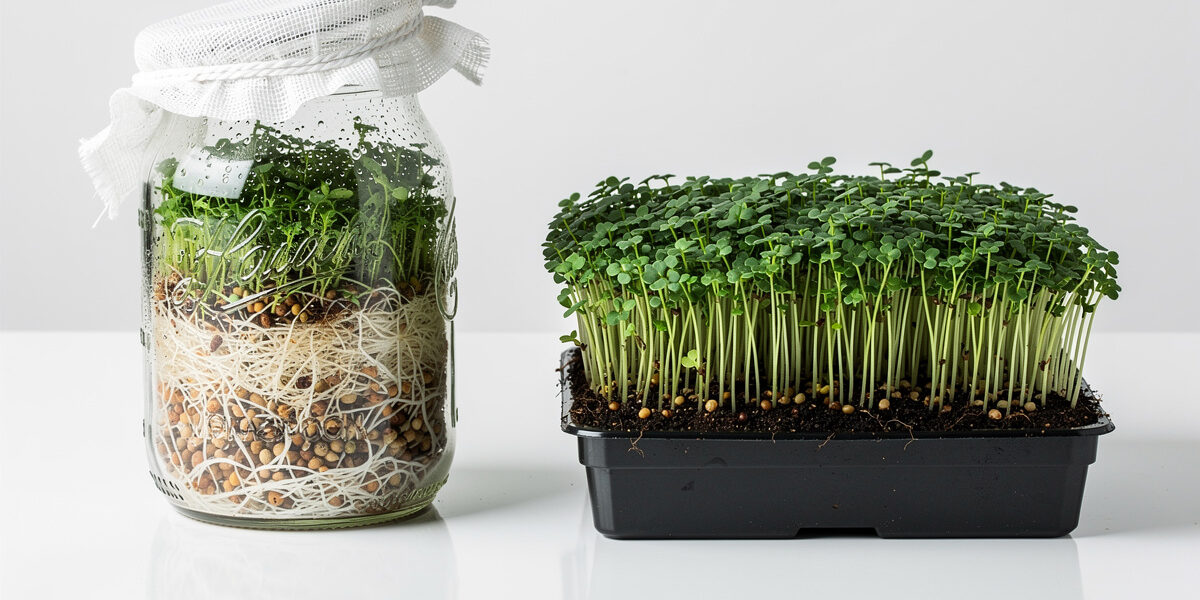
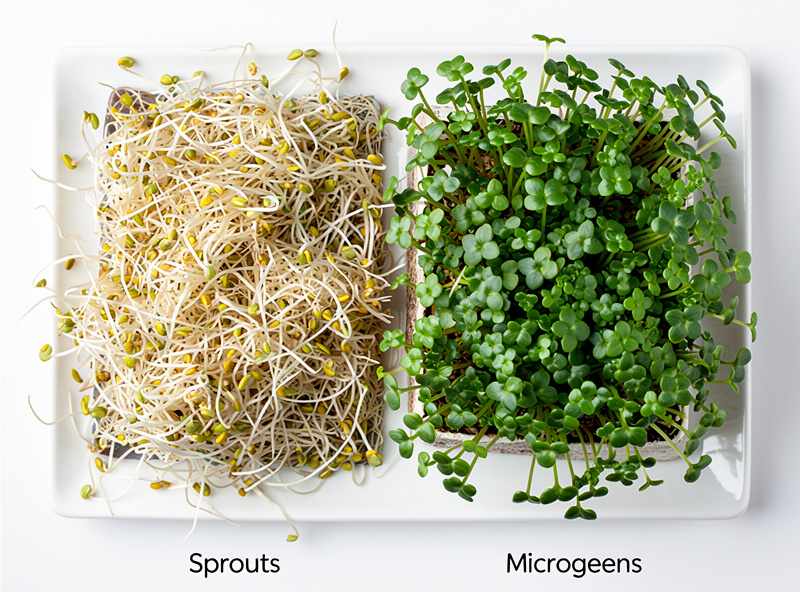
Sprouting vs microgreens: Sprouts are germinated seeds eaten root, seed, and shoot, usually grown in water in the dark. Microgreens are young plants grown in soil or a medium, eaten as cut stems and leaves (no roots), and require light to photosynthesize. They differ in taste, equipment, time, and texture.
For a complete overview of all sprouting methods and seeds, see our complete sprouting guide.
In the world of urban gardening, these two terms are often used interchangeably. But asking a gardener “Are these sprouts?” when they are growing microgreens is like asking a baker if their sourdough is a pancake. They are related, but distinct disciplines with different techniques, equipment needs, and culinary applications.
This guide will help you decide which one fits your lifestyle, budget, and taste buds. We will cover the biological differences, practical considerations, flavor and texture differences, and help you choose the right method for your home growing setup.
Definition and Biology
The fundamental distinction between sprouts and microgreens lies in their developmental stage, growing medium, and energy source — and that difference creates entirely different flavor and culinary uses. Sprouts are the infant stage (2-5 days), germinated hydroponically in water without light, where the plant consumes stored seed energy and you eat 100% of the organism including root, seed, stem, and embryonic leaf. Microgreens are the toddler stage (7-21 days), cultivated in soil or growing medium under light, where photosynthesis generates energy and you harvest only stem and leaf while composting roots.
Sprouts (The Infant Stage)
- Age: 2-5 days old.
- Growth: Germinated in water (hydroponic).
- Environment: Mostly dark. High humidity.
- Edible parts: 100% (root, seed, stem, leaf).
- Energy source: Stored seed reserves.
Sprouts are essentially seeds that have just begun their life journey. The seed coat cracks, a tiny root (radicle) emerges, and sometimes small embryonic leaves (cotyledons) appear. At this stage, the plant is living entirely off the stored energy in the seed.
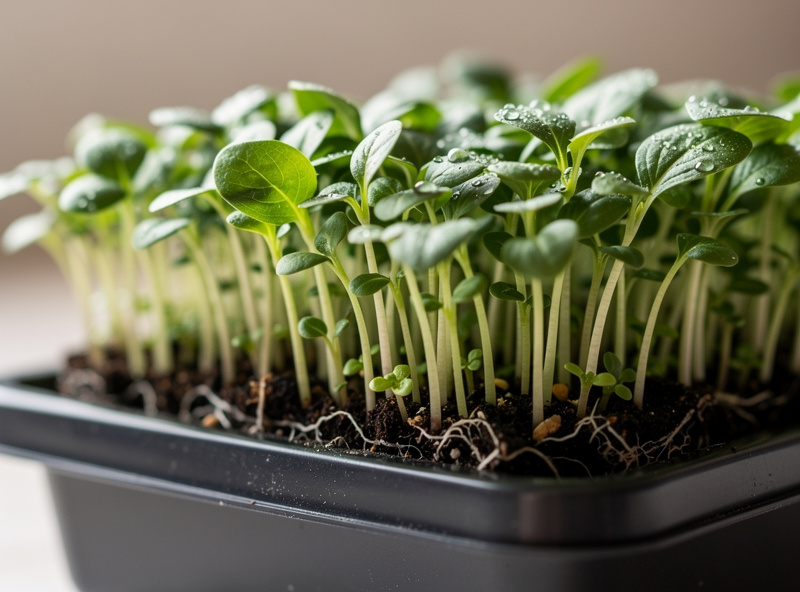
Microgreens (The Toddler Stage)
- Age: 7-21 days old.
- Growth: Grown in soil, coco coir, or hemp mats.
- Environment: High light (sun or LEDs). Good airflow.
- Edible parts: Stem and leaf (cut above the soil). Roots are composted.
- Energy source: Photosynthesis.
Microgreens have developed their first true leaves and are actively photosynthesizing. They have established root systems anchored in a growing medium. The transition from seed energy to solar energy creates a different flavor and texture profile than sprouts can match.
Comparison Table: The Practical Differences
Practical decision-making comes down to a few operational factors. Sprouts demand minimal equipment (jar + mesh lid, $0-15), no light source, 2-5 day turnaround, and provide 3-5 day refrigerated shelf life — ideal for beginners seeking immediate results with minimal investment. Microgreens require trays + growing medium + light source ($20-50+), 7-21 day cycles, and deliver 7-10 day storage with superior visual presentation and stronger flavor per leaf. Sprouts need twice-daily rinsing but no light; microgreens need daily watering but no rinsing. Space requirements differ too — sprouts occupy a 4-inch jar footprint while microgreens need tray surfaces and vertical light clearance.
| Feature | Sprouts | Microgreens |
|---|---|---|
| Equipment | Jar + Lid ($5) | Trays + Soil + Light ($50+) |
| Space | 4 inches (Counter) | 10×20 inches (Shelf) |
| Time to Harvest | 2-5 days | 7-21 days |
| Maintenance | Rinse 2x Daily | Water daily/mist |
| Safety Risk | Medium (Bacteria) | Low (Dry foliage) |
| Yield per tbsp | High (eats whole plant) | Medium (roots waste) |
| Skill Level | Beginner | Intermediate |
Flavor and Texture Comparison
Sprouts and microgreens taste entirely different even when grown from the same seed. A sprouted radish seed tastes like a raw radish with a peppery edge — you are eating the seed, root, and just-emerging shoot all together. A radish microgreen tastes like a radish leaf — greener, grassier, with the same root-flesh heat but spread across a larger, more substantial bite.
Sprouts (3-7 days): Mild to peppery, crunchy but light, watery. Sprouts add texture to a dish more than flavor. They are supporting characters — the crunch in a sandwich, the freshness on a bowl of soup, the bulk in a salad. They dissolve into whatever they are paired with.
Microgreens (7-14 days): Intensely flavored, substantial enough to be the main ingredient in a salad. A radish microgreen tastes more like a radish bulb than a radish sprout does, paradoxically — the flavor concentrates as the true leaves develop. Microgreens are the star of the plate, not the garnish.
Why the Difference: Sprouts are harvested before the first true leaves appear. Microgreens are harvested after the first true leaves, once photosynthesis has built more complex flavors and textures. The extra week on the grow mat is what separates crunch from substance.
Cost Analysis Breakdown
Financial analysis over one year of daily production shows sprouts offering superior value for individuals while microgreens achieve economies of scale for families or commercial producers. Sprout startup requires $0-15 (jar + mesh lid), with annual operating costs under $20 (seeds only) and indefinite equipment lifespan (glass jars last decades). Microgreen startup demands $20-50+ (trays + growing medium + grow lights), with annual seed costs comparable but equipment replacement every 2-3 years adding $7-17/year amortized expense. Yield efficiency actually favors sprouts—because you eat the whole seedling instead of cutting the stem above the roots, a given weight of seed returns noticeably more edible food as sprouts than as microgreens, which lowers the per-pound cost for high-volume users. Microgreens win on price per pound at market, not on biomass per seed. Break-even analysis: individual consumers eating 1-2 cups weekly find jars most economical; families consuming 4+ cups weekly or restaurants achieve faster ROI with trays despite higher initial investment.
Let us look at the economics of 1 lb of Broccoli Seeds ($25).
- As Sprouts: You eat the seed. You get about 10 lbs of edible food. Cost: $2.50 per lb.
- As Microgreens: You cut the stem. You lose the root weight and seed weight. You get about 5-6 lbs of edible food. Cost: $4.50 per lb (plus soil cost).
Winner: Sprouts are cheaper and have zero waste. However, microgreens command premium prices at farmers markets ($25-50 per lb), making them viable for small business ventures.
Safety Considerations
Food safety differs significantly between these two methods. The warm, dark, wet conditions inside a sprouting jar are exactly what Salmonella and E. coli need to multiply, which is why the FDA Sprout Safety Alliance and university extension services (see the Clemson Extension factsheet) are consistently more cautious about sprouts than about microgreens. Microgreens, grown in lighter, drier, better-ventilated conditions and cut above the soil line, present a lower — but not zero — bacterial risk.
Sprout Safety Concerns
Sprouts grow in warm, moist, dark conditions — the same conditions bacteria love. Outbreaks of Salmonella and E. coli have been linked to commercial sprout operations, and the FDA explicitly advises that children, older adults, pregnant women, and people with weakened immune systems avoid raw sprouts entirely. To minimise risk for healthy adults:
- Buy seed sold specifically for sprouting (pathogen-tested).
- Rinse thoroughly and frequently (twice daily, three times in hot weather).
- Maintain good drainage to prevent standing water.
- Refrigerate immediately after harvest; consume within 3-5 days.
- Cook sprouts thoroughly for anyone in a higher-risk group.
Microgreen Safety Profile
Microgreens are not risk-free — they have been linked to occasional outbreaks too — but the better-ventilated, better-lit, drier-foliage growing environment makes bacterial growth harder than in a sprout jar. The same hygiene rules apply: clean trays between batches, source clean seed, water from below to keep foliage dry, and refrigerate the harvest promptly.
Flavor and Culinary Use
Culinary applications highlight distinct textural and flavor profiles. Sprouts deliver crunchy, water-filled texture with mild, nutty, or peppery flavor depending on seed type — lentil and mung bean sprouts add satisfying crunch to sandwiches, wraps, and stir-fries; alfalfa and clover provide delicate salad toppings; radish sprouts contribute peppery heat. Microgreens offer developed flavor complexity with tender-firm texture and concentrated taste intensities — basil microgreens deliver intense herbaceous notes, sunflower shoots provide substantial crunchy greens for salads, pea shoots offer sweet, delicate flavors for garnishes. Visual presentation heavily favors microgreens: vibrant colors, varied textures, and height diversity. Sprouts are better raw; microgreens tolerate light cooking better while sprouts turn mushy when heated.
Sprouts are generally milder, crunchier, and watery. They are texture enhancers. Think: Pad Thai, Sandwich crunch, Salad bulk, Stir-fries, Spring rolls.
Microgreens are flavor bombs. Because they have developed true leaves and started photosynthesizing, they taste like intense versions of the adult plant:
- Radish Microgreens: Spicy pepper kick
- Cilantro Microgreens: Intense citrus and herb notes
- Basil Microgreens: Sweet licorice and pesto flavors
- Sunflower Microgreens: Nutty and substantial
- Pea Shoots: Sweet, fresh pea flavor
Which Should You Start With?
Start with Sprouts If:
- You have zero budget or minimal investment available
- You have no natural light in your kitchen
- You want food in 3 days or less
- You want to eat sprouting lentils or beans (which are rarely grown as microgreens)
- You are testing whether home growing is for you
- You have very limited counter space
Start with Microgreens If:
- You are a foodie or chef and care about presentation
- You want to grow herbs (Basil, Cilantro, Dill)
- You are worried about the mold risk of sprouts
- You have a shelf and some grow lights
- You want to explore selling at farmers markets
- You prefer stronger, more complex flavors
Can I Grow Sprout Seeds as Microgreens?
Yes! In fact, most microgreen seeds are just bulk sprouting seeds. You can plant your alfalfa or radish sprouting seeds in soil, and they will grow into microgreens.
However: You cannot grow all microgreens as sprouts. Large seeds like Sunflower and Pea produce huge root systems that tangle in jars. They thrive in trays with room for their roots to spread.
Step-by-Step Microgreen Quick Guide
If you want to try the soil method:
- Put 1 inch of soil in a plastic takeout container.
- Sprinkle seeds densely on top.
- Mist with water.
- Cover to keep dark for 3 days (Blackout Phase).
- Uncover and put in a sunny window for 7 days.
- Cut with scissors when 3 inches tall.
Common Mistakes to Avoid
Success in either method requires avoiding method-specific failure patterns that waste seeds, time, and equipment investment. Sprout failures typically stem from: inadequate rinsing frequency (once daily instead of twice, causing bacterial fermentation), poor drainage (standing water creating anaerobic rot zones), overcrowding seeds (limiting airflow and promoting mold), and delayed consumption (storage beyond 5 days increasing spoilage risk). Microgreen failures commonly result from: insufficient light (causing leggy, pale, weak stems), overwatering (triggering damping-off disease and root rot), sparse seeding (wasting tray space and reducing yield efficiency), and delayed harvest (greens becoming tough, fibrous, and bitter beyond optimal maturity). Prevention focuses on protocol adherence—sprouts need disciplined rinse schedules and drainage angles; microgreens require adequate light (4-6 hours direct or 10-12 hours LED), moderate moisture, dense planting, and harvest timing (when first true leaves appear).
Sprout Mistakes:
- Not rinsing frequently enough (leads to mold)
- Poor drainage (causes fermentation)
- Using old or dead seeds
- Keeping sprouts too long before eating
Microgreen Mistakes:
- Not enough light (causes leggy, pale greens)
- Overwatering (leads to damping off disease)
- Planting too sparsely (wastes tray space)
- Harvesting too late (greens become tough)
Frequently Asked Questions
What’s the main difference between sprouts and microgreens?
Sprouts are germinated seeds eaten whole (seed, root, and shoot) within 2-7 days, grown in water without soil. Microgreens are young seedlings grown in soil or growing medium for 7-21 days, harvested by cutting just above the soil line—only the stem and leaves are eaten.
How do sprouts and microgreens differ in flavor?
Sprouts are eaten whole — seed, root, and shoot together — which gives them a more concentrated, often spicier flavor than microgreens, where you harvest only the stems and leaves. Sprouts taste seed-forward and crunchy; microgreens taste leafy, vegetal, and closer to the mature plant. Use sprouts for crunch and heat, microgreens for leafy flavor and visual punch.
Are sprouts or microgreens easier for beginners?
Sprouts are easier for beginners—they require no soil, no light, minimal equipment (just a jar), and are ready in 2-5 days. Microgreens need growing medium, proper lighting, and take 1-3 weeks, making them slightly more involved.
Can I grow sprouts and microgreens from the same seeds?
Many seeds work for both, including broccoli, radish, sunflower, and pea. However, some seeds are better suited for one method. Alfalfa and mung beans are classic sprout seeds, while basil and cilantro work better as microgreens.
Do microgreens need sunlight?
Microgreens need 4-6 hours of direct sunlight or 10-12 hours under grow lights daily. Without adequate light, they become leggy and pale. Sprouts grow fine without any light source at all.
Which has a longer shelf life: sprouts or microgreens?
Microgreens last longer—7-10 days refrigerated versus 3-5 days for sprouts. Microgreens’ developed cell structure slows moisture loss. Both should be stored in breathable containers in the refrigerator.
Can I eat sprouts and microgreens raw?
Both can be eaten raw. Sprouts are almost always eaten raw on sandwiches and salads. Microgreens are commonly used raw as garnishes and in salads. Cooking sprouts thoroughly is the only way to eliminate bacterial risk for higher-risk groups (pregnant, elderly, immunocompromised, young children).