
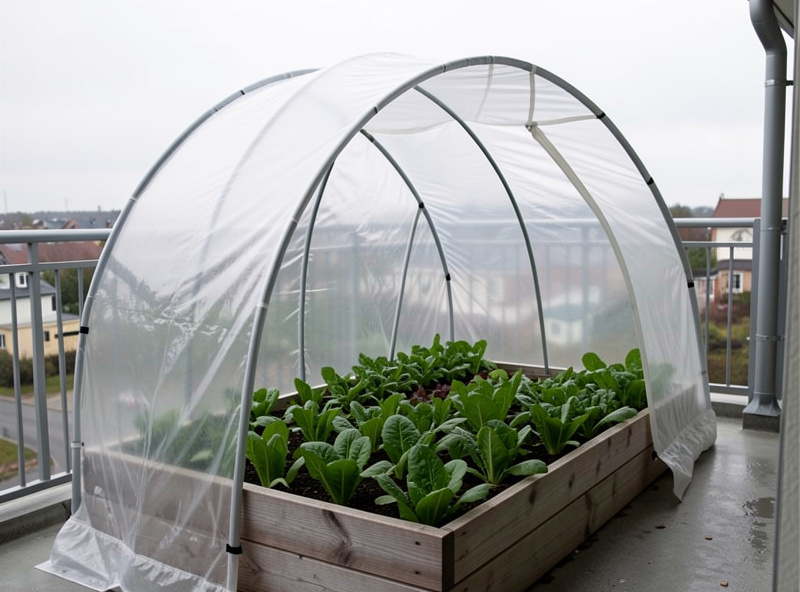
A hoop house is the moment season extension stops being about protecting a plant or two and starts being about covering a whole bed. It’s the simplest idea in the toolkit and, square metre for square metre, the cheapest: a row of flexible hoops bent over a planter or raised bed, with a sheet of cover stretched across them and clipped down. Picture a low tunnel — tall enough to slide a watering can under, curved so snow slides off instead of pooling and crushing it. On my balcony it’s the thing I reach for when a single cloche or a flat row cover stops being enough, and across a Nordic season it does more work for less money than anything else I run.
This guide is the build I’ve settled on after a few seasons of getting it wrong — what a low hoop house actually is, how to bend and space the hoops, how to anchor and clip the whole thing so a balcony gust doesn’t launch it over the railing, how to vent it so it doesn’t cook on a bright day, and how to choose between clear poly and heavy fleece for the cover. It sits inside my broader season extension guide, which lays out how the hoop house fits alongside cold frames, mini greenhouses, and the lighter row covers it grows out of.
A hoop house is a row cover that grew up
If you’ve already draped a row cover or cloche over a few plants, you understand a hoop house — it’s the same principle scaled to a whole bed and given some headroom. A flat row cover laid straight onto the crop works, but the fabric sits on the leaves, holds them down, and traps moisture against them. The instant you lift that cover onto hoops you get an air gap, and that air gap is the whole upgrade. Plants grow into the space instead of being pinned by it, you can water and harvest without un-tucking the whole thing, and the trapped layer of air under the cover holds warmth far better than fabric pressed flat.
The tunnel shape earns its keep up north specifically because of snow. A flat or sagging cover collects wet snow, pools it, and eventually collapses under the weight — I’ve lost a cover that way, woken up to a flattened bed of crushed greens. A taut curve sheds it. Get the arc right and the snow slides off the sides on its own, which means the hoop house keeps working through exactly the weather that defeats a flat cover. That’s the difference between a gimmick and a tool you trust to hold a bed of winter kale unattended for a week.
The DIY build: hoops, spacing, and the arc
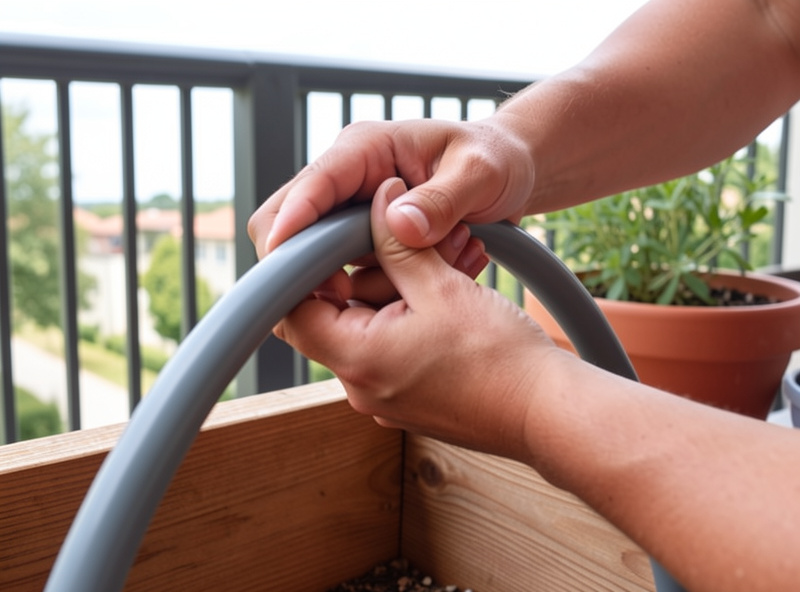
The hoops are the heart of it, and you’ve got two cheap routes I’ve both run. The first is rigid PVC piping — the grey or white conduit and plumbing pipe from any hardware store, in the 16 to 20 mm range. It bends into a clean arc, holds its shape, and slots over short stakes or rebar pins driven either side of the bed. The second is alkathene (the blue MDPE water pipe) or any flexible polyethylene tubing, which bends even more willingly and is what I tend to grab for the rounder beds. Both are cheap, both outlast the cover, and both beat buying a kit unless you want the convenience. If you’d rather not cut and fit anything, a set of pre-bent grow tunnel hoops takes the guesswork out and clips straight onto a planter edge.
Spacing is where people under-build. The hoops are what hold the arc against wind and snow load, so closer is better than you’d think — I run mine roughly 45 to 60 cm apart along the bed, tighter than that at the ends where the cover takes the most strain. On a short balcony planter that might be just three or four hoops; over a couple of raised beds it’s a row of them marching down the length. The arc itself wants to be tall enough to walk a watering can under without scraping the cover — for me that’s around 40 to 50 cm of clearance at the peak over the soil line. Too shallow and you’re back to a row cover pressing on the leaves; too tall and you’ve built a sail.
To anchor each hoop, the simplest method on a balcony is to slot the pipe over short lengths of rebar or sturdy stakes driven into the bed at each side, or — in a hard-bottomed planter where you can’t drive a pin — to clamp small pipe brackets to the rim and seat the hoops in those. The point is that each hoop foot is fixed, not just resting, because the next problem is wind.
Anchoring and clipping against balcony wind
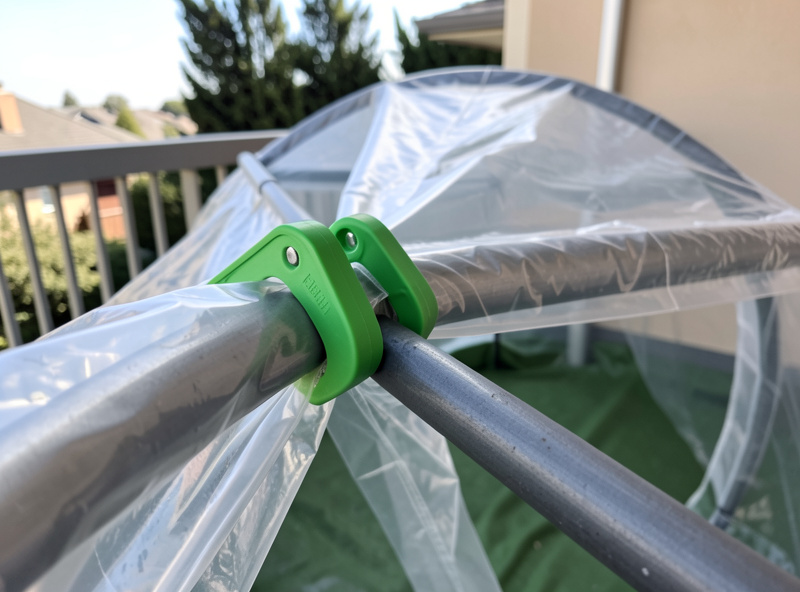
A balcony is a wind tunnel, and a hoop house is, until you secure it, a kite. This is the part the warm-climate guides skip entirely, and it’s the part that actually decides whether your build survives the first storm. Two things have to be locked down: the hoops and the cover.
The hoops you’ve already fixed at the feet. The cover is the harder problem, because anywhere it can lift, the wind will find it and peel the whole sheet off — usually at the worst possible moment. The single best tool here is a proper set of snap clips: the curved spring clips that pinch the cover onto the hoop pipe. I run several per hoop, not one — one at the apex and one low on each side at minimum — so the cover is held to the frame along its whole arc and can’t balloon. Cheap spring clamps from the hardware store work too, but the purpose-made hoop clips grip the pipe diameter properly and don’t chew the fabric.
Then you have to deal with the bottom edges, which is where most failures actually start. The long sides of the cover want to be weighted or buried so wind can’t get under the skirt: a length of timber laid along each side, a row of bricks, or the cover edge tucked into the soil all work. The ends are the weak point — I gather each end, twist it, and tie it off to a stake, leaving enough slack that I can open one end for access and venting. Get the skirt and the ends sealed against lift and the clips holding the middle, and the tunnel rides out weather that would have shredded a loose cover.
Venting so it doesn’t cook
The mistake that kills more plants in a hoop house than any frost is heat. A sealed clear-poly tunnel on a bright day — even a cold, bright Nordic day in March — turns into an oven inside. Sun pours through the poly, the trapped air has nowhere to go, and the temperature under the cover can climb twenty or thirty degrees above outside in an hour. A few hours of that and tender crops wilt and scorch under a sheet that’s nominally there to protect them.
The fix is built into how you closed the ends: leave them openable. On a sunny mild day I untie one or both ends and let the tunnel breathe, then close it again before the temperature drops at dusk to trap the day’s warmth for the night. Clear poly needs this discipline far more than fleece does — poly is a sealed greenhouse skin with no breathability, so on a sunny day it absolutely will cook if you leave it shut, whereas breathable fleece forgives a missed vent. If you’re away during the day and running poly, that’s the strongest argument for fleece, or for leaving the ends permanently cracked and accepting a little less heat gain. A tunnel you have to babysit is one you’ll eventually forget to vent.
Cover choice: clear poly vs heavy fleece
The cover is the other half of the decision, and it comes down to what you’re trying to do. Clear polythene is a true greenhouse skin: it transmits the most light and traps the most heat, so it gives the biggest temperature lift and the earliest spring start. The cost is zero breathability — it cooks without venting, it sweats condensation inside, and it offers no frost buffer of its own beyond the trapped air. Heavy horticultural fleece (the thick 30+ gsm grades) does the opposite: it breathes, so it forgives a missed vent and won’t cook; it gives genuine frost protection of a few degrees from the fabric itself; but it transmits less light and lifts the temperature less, so your spring start is slower.
The way I split it: poly for the spring head-start and autumn heat-grab when I’m around to vent, fleece for unattended winter holding and frost insurance when I’m not. Some seasons I run poly through the shoulder months and swap to fleece for the deep-winter hold. Whichever you choose, buy more than you think you need — the cover has to reach the soil on both long sides plus enough at each end to gather and tie. A roll of greenhouse poly or row cover fabric is cheap enough that I keep both on hand and switch by season.
A couple of the affiliate links above are Amazon search links — if you buy through them I may earn a small commission at no extra cost to you, and it helps keep the site running.
How it compares to the other whole-bed options
Once you’re protecting more than a plant or two, the hoop house is the natural graduation from individual cloches and flat row covers — and it’s worth seeing where it sits against the other ways to cover a bed. The honest summary: the hoop house wins on cost per square metre and on coverage, the cold frame wins on overnight heat retention and durability, and a flat row cover wins on nothing but sheer simplicity for a single short stint.
| Method | Cost per m² covered | Headroom for crops | Snow / wind handling | Best for |
|---|---|---|---|---|
| Low hoop house | Lowest of all | Good — walk a can under it | Sheds snow if arc is taut; needs anchoring against wind | Covering a whole bed cheaply, shoulder seasons and winter holding |
| Flat row cover | Low | None — sits on the leaves | Sags and collects snow; pins flat in wind | A quick frost night over low crops, no headroom needed |
| Cold frame | High per m² | Low, fixed box height | Excellent — rigid, holds heat overnight | Hardening off, propagation, a small dense holding space |
| Mini greenhouse | Highest per m² | Tall, but small footprint | Good if anchored; tippy in wind | Vertical pot stacking in a tiny floor space |
The takeaway is that the hoop house and the cold frame aren’t really competitors — they do different jobs. The frame is a small, dense, durable box for propagation and hardening off; the hoop house is the cheap way to throw protection over a large area of growing crops. If I had to extend a couple of raised beds on a budget, the hoop house is where every krona goes furthest.
Scaling it from a planter to a couple of beds
The build scales smoothly, which is part of why I rate it. At the smallest end, three short hoops over a single fabric planter or window box gives you a covered micro-tunnel for a tray of greens — barely any materials, a few minutes to build. Step up to a single raised bed and it’s a row of five or six hoops down the length with a sheet of cover. Two beds side by side and you can either run separate tunnels or, if they’re close, bridge a wider span of cover across taller hoops to make one big covered run — though the wider you span, the more the wind load grows, so I keep the spans modest and the hoops closer on a balcony.
Whatever the scale, the constraints that matter on a balcony stay the same: weight, wind, and venting. The piping and cover weigh almost nothing, which is exactly why the hoop house suits a balcony where a glass-lidded frame might be too heavy or too exposed. It’s the most space-efficient, cost-efficient way I know to put a whole bed under cover up north — and once you’ve graduated from fussing over individual plants under cloches, it’s the build that finally lets you protect the lot in one go.
Where the hoop house fits in the season
Across a Nordic year I use the tunnel in three windows. In late winter and early spring I throw clear poly over a bed of direct-sown hardy greens to warm the soil and bring them on weeks ahead of open ground. Through the shoulder seasons it shelters transplants and buys frost insurance on the unpredictable nights. And in the dark months I switch to fleece and use it as a holding cover over cold-tolerant crops — kale, mâche, winter-hardy lettuce — keeping them croppable through weather that would have finished them in the open. It doesn’t beat the deep-winter darkness any more than a cold frame does; nothing unheated does. But for stretching both ends of the season over a whole bed, on a budget, on a balcony, the low hoop house is the tool I’d hand a beginner first.
Keep building your cold-season setup
- Season Extension Gardening: Stretch a Cold-Climate Season — the hub that ties the hoop house in with every other cover.
- Row Covers and Cloches — the lighter tools the hoop house grows out of.
- Cold Frame Gardening — the durable box for propagation and hardening off.
- Mini Greenhouse for Small Spaces — when you want to stack pots vertically in a tiny footprint.
- Raised Beds and Planters Guide — what to put under the hoops in the first place.