Sprouting in mason jars is the one piece of “indoor gardening” I’d tell anyone to start with, because it’s the one I’ve never stopped doing. Here in Sweden, nothing grows outdoors from November to March, the light is gone by mid-afternoon, and the fresh greens in the shop are tired and expensive. A row of mason jars on my kitchen counter fixes all of that — they don’t care that it’s dark, they take up four inches of space, and they turn a tablespoon of seed into a jar of fresh, living greens in a few days. All you need is a wide-mouth jar, a breathable lid, water, and seeds.
This is how I actually run mine — the jars, the lid I settled on after the plastic ones let me down, the rinse routine, and the handful of things that aren’t worth trying to sprout in a jar. For the wider view of every method and seed, see my complete sprouting guide.
A quick note: some links below are affiliate links — if you buy through them I may earn a small commission at no extra cost to you. I only point to the gear I actually use on my own counter. Details on my disclaimer page.

The Anatomy of a Sprouting Jar
The whole system is three things: a jar, a breathable lid, and a way to keep it draining at an angle. That’s it. You can do it for free with stuff in your kitchen, or spend ten dollars and make it nicer. Here’s what each part actually needs to do.
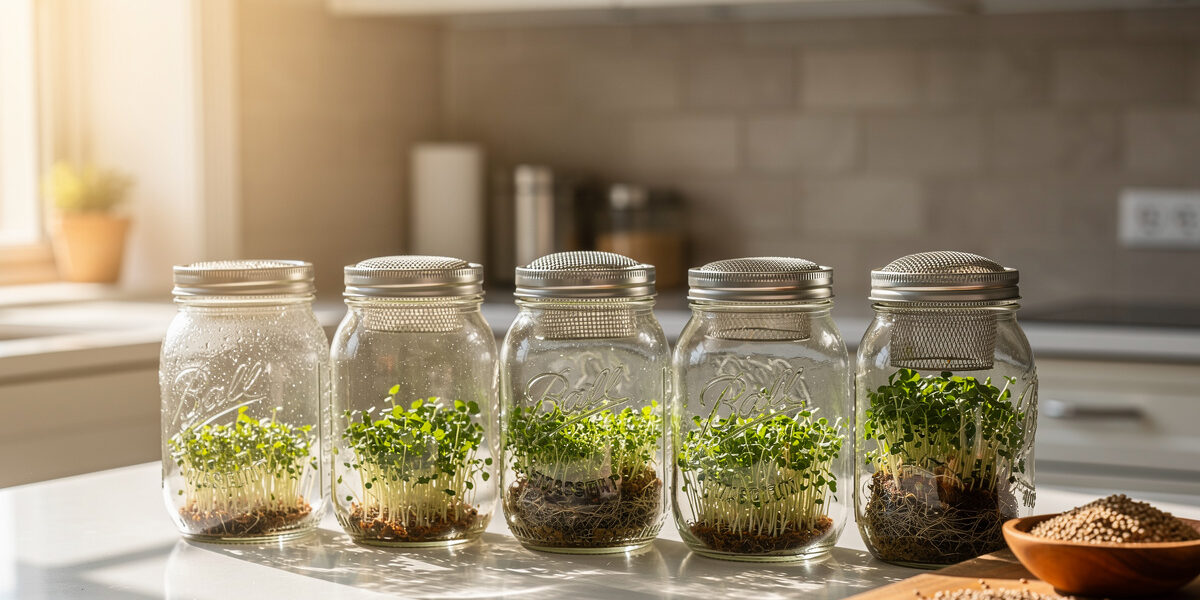
1. The Jar
Size: a quart (32oz) is my default. Pint jars are too small for anything but a test batch, and half-gallon jars are great for fluffy stuff like alfalfa but let beans heat up in the middle. Shape: wide-mouth is non-negotiable. I learned this the annoying way — a standard-mouth jar narrows at the top, and getting the sprout “cake” out without crushing it is a genuine wrestling match. Wide-mouth quart jars are cheap and you’ll use them for a hundred other things; a case of them lasts forever.
2. The Lid (the part that actually matters)
There are three routes, and I’ve used all of them:
- Cheesecloth + rubber band: the old-school free option. It works, but it stains, holds onto bacteria, and drains slowly. Fine for a first try, not for the long run.
- Plastic mesh lids: the colourful sets you see everywhere. They won’t rust and they’re easy to rinse, but the holes are often too big for small seeds — my first batch of alfalfa half-escaped through one.
- Stainless steel mesh lids: what I use now and won’t go back from. They’re durable, you can boil them sterile, and they drain perfectly with fine and coarse seed alike. A set of stainless sprouting lids runs about ten dollars and is the single upgrade I’d make first.
3. Keeping It Draining
The jar has to sit mouth-down at an angle so water runs out and air gets in. I leaned mine in a cereal bowl for years and it works absolutely fine — don’t let anyone tell you that you need a special stand. Dedicated wire stands look tidier on the counter and are a bit more stable if you’re running several jars, but the bowl is free. If you’d rather start with everything in one box, a complete mason jar sprouting kit bundles the jars, lids, and stand together.
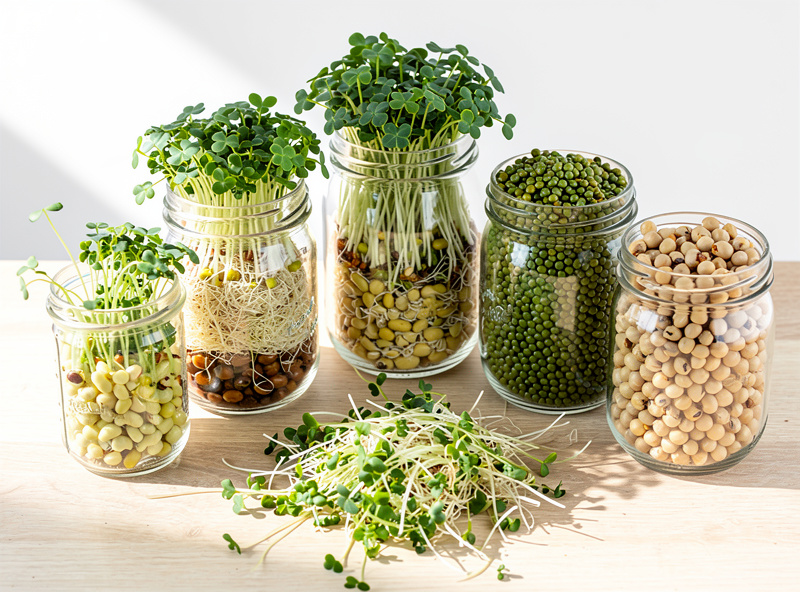
The Seeds I Keep on Rotation
You can sprout a lot of things, but three earn permanent space on my shelf: broccoli (mild, and the one with the nutrition headlines), alfalfa (the classic sandwich sprout, fluffy and forgiving), and mung beans (fat, crunchy, ready fast — the bean-sprout you know from stir-fries). Between those three I’ve always got something at harvest. Buy seed sold specifically for sprouting — organic sprouting seed is tested for the pathogens that matter when you’re eating them raw, which the bag of dried beans from the supermarket isn’t.
DIY Hack: A Free Lid From Produce Netting
Before I bought stainless lids, this is how I started, and it costs nothing. Next time you buy a mesh bag of lemons or onions, keep the netting. Cut a square, lay it over the jar mouth, and screw the metal mason ring down over it. That’s a working sprouting lid — just wash it well first. It’s not as fine as a proper screen, so it suits beans better than tiny alfalfa, but it proves the whole thing works before you spend a krona.
The Routine: Soak, Rinse, Drain, Repeat
The same simple cycle works for almost everything — lentils, mung, alfalfa, radish, broccoli. It takes me about two minutes a day, split between morning and night.
Step 1: Start clean
Run the jar and lid through the dishwasher or pour boiling water over them. You’re about to make a warm, damp environment on purpose, so you want to start with as little bacteria as possible. This one habit prevents most of the things that go wrong.
Step 2: Soak
Put in 1–2 tablespoons of small seed, or about half a cup of beans, and fill the jar with cool water. Leave it overnight, roughly 8–12 hours. If your kitchen is bright, drape a towel over it. The seeds will drink and swell to several times their dry size — that’s exactly what you want.
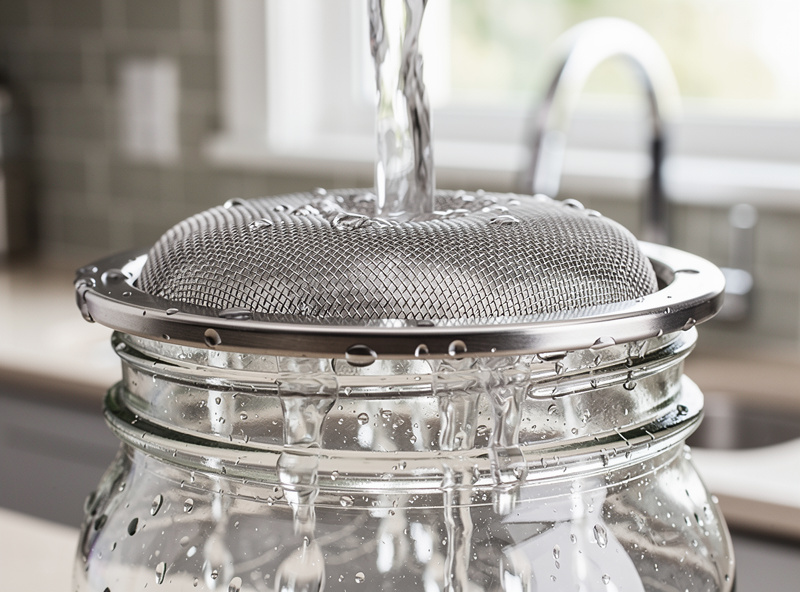
Step 3: The rinse-and-drain cycle
Morning and night, every day: fill the jar with water through the mesh, swirl it, pour it all out, and give it a firm shake to knock the water off. Then set it back mouth-down at its angle. I do mine with my morning coffee and again before bed, and that rhythm is easy to keep. The golden rule is drainage — if water pools in the bottom of the jar, the seeds sitting in it will rot. Damp is good; wet is the enemy.
Step 4: Harvest
When they look like the sprouts you’d buy in a shop — usually day three to five — they’re done. Give them a final rinse, dry them well, and eat them. If you want them greener, set the jar in indirect light for a few hours before harvest and the leaves will colour up.
Why Sprouts Are Worth the Counter Space
Beyond being fresh greens in the dead of a Nordic winter, sprouting genuinely changes what’s in the seed. Germination raises vitamin levels sharply — vitamin C in particular climbs well above the dormant seed — and several B-vitamins rise too, which is part of why sprouts get recommended in plant-based diets. Just as usefully, sprouting breaks down phytic acid and enzyme inhibitors that lock up minerals in raw seeds, so the iron, zinc, and magnesium become easier for your body to actually use. You’re not just growing food, you’re pre-digesting it a little.
Storing Your Sprouts
Sprouts spoil fast when wet, so the drying step matters as much as the growing. After the final rinse, spin them in a salad spinner or roll them in a clean towel until they’re properly dry. Move them to a container lined with a paper towel — the towel mops up the moisture that would otherwise turn them slimy — and keep them loosely packed so air can move. In the fridge they’ll hold about five to seven days for sturdy sprouts like alfalfa, a little less for delicate ones like broccoli. Check them daily and pull anything slimy or off-smelling before it spreads.
What NOT to Sprout in a Jar
A jar isn’t right for everything, and knowing the exceptions saves you a slimy mess:
- Chia, flax, arugula and other mucilaginous seeds: these form a gel when wet and turn into a solid slime brick that can’t breathe in a jar. Grow them on a clay saucer or paper towel instead — see sprouting without soil.
- Tall shoots like sunflower and pea: if you want four-inch shoots, a jar is too cramped — those want a tray.
- Very large beans like chickpeas and kidney beans: they drain poorly packed into a narrow jar. Doable, but a wider container is kinder.
Troubleshooting
- Nothing’s germinated after 48 hours.
- Usually old seed — anything past two or three years drops off in viability. Check too that your soak water was room temperature, not hot or icy. Mung beans like it slightly warm.
- A sour or fermented smell.
- That’s bacteria from water sitting in the jar or rinsing too rarely. Bin the batch, and next time rinse more often and make sure the jar drains fully within ten or fifteen minutes of inverting it.
- White fuzz on the sprouts.
- Nine times out of ten this is root hair, not mould. Mist it with water — if it collapses and lies flat, it’s harmless root hair; if it stays fuzzy and grey, that’s mould and the batch goes. My radish sprouting guide shows the difference up close.
- Seeds stuck to the lid.
- Common with tiny seed like alfalfa. Tap the lid against your palm after draining, and rotate the jar as you rinse to wash them back down.
Frequently Asked Questions
What size mason jar is best for sprouting?
A wide-mouth quart (32 oz) jar is ideal for most sprouts. It gives seeds room to expand several times their dry volume, and the wide mouth lets you remove the sprout mass without crushing it. Pint jars suit small test batches; half-gallon jars work for fluffy sprouts like alfalfa.
Do I need special lids for sprouting in mason jars?
You need a lid that drains and lets air in. Options are stainless steel mesh screens (best and reusable), plastic mesh lids, or cheesecloth under the metal ring. Avoid solid lids, which trap moisture and cause mould. Stainless screens handle both fine and coarse seed.
How often should I rinse sprouts in a mason jar?
Rinse twice a day, morning and night, with cool water, and let the jar drain completely between rinses. In hot or humid weather, rinse three times. Thorough draining matters more than anything else for preventing mould.
Why do my mason jar sprouts smell bad?
A sour or fermented smell means bacterial growth, almost always from water pooling in the jar or rinsing too rarely. Discard that batch, then keep the jar draining mouth-down at an angle and rinse at least twice daily. Healthy sprouts smell fresh and earthy.
How do I dry sprouts after rinsing at harvest?
Spin them in a salad spinner or roll them in a clean towel until dry, then store in a container lined with paper towel. Drying well before refrigerating is the single biggest factor in how long they keep.
Can I sprout any seed in a mason jar?
Most small seeds do great: alfalfa, broccoli, radish, mung beans, lentils. Avoid gel-forming seeds like chia and flax (they suffocate), tall shoots like sunflower and pea (too cramped), and very large beans like chickpeas (poor drainage). Those need trays or wider containers.
How long do mason jar sprouts last?
Stored dry in the fridge, sturdy sprouts like alfalfa keep five to seven days and delicate ones like broccoli four to five. They taste best within the first few days. Line the container with paper towel and pull any slimy sprouts before they spread.