
Hydroponic microgreens skip the soil entirely — instead of seeding into potting mix, you germinate on a coir mat, hemp pad, or rockwool slab while a shallow layer of water wicks up from below. I run two hydroponic trays alongside three soil trays on my shelf, and after a year of side-by-side comparison through Swedish winters, the hydroponic side consistently wins on cleanup time and loses on forgiveness. As an Amazon Associate I earn from qualifying purchases. The result: cleaner trays, faster harvest cycles, and a setup that handles ten trays in a kitchen as easily as one. It is also the simplest entry point into the broader world of soil-free growing systems, which commercial microgreen growers have used for over twenty years.
This guide covers how hydroponic microgreens differ from soil-grown microgreens, the home systems that actually deliver, the nutrient debate (do you need any?), and the comparison most articles skip: when hydroponics genuinely beats soil, and the situations where soil still wins.
What “Hydroponic Microgreens” Actually Means
Hydroponic microgreens are seedlings grown on an inert wicking mat with water (and optionally diluted nutrients) supplied from below. The roots anchor in the mat fibers; the seed leaves and first true leaves grow above. There is no soil, no peat, no compost — just seeds, mat, water, light.
That definition matters because three different methods get marketed as “hydroponic” and only one is genuinely hands-off. True wicking hydroponics uses a single tray with a water reservoir below and a slotted insert above holding the mat. Capillary action draws water up. Top-watering hydroponics still uses a mat but you spray-water from above (effectively soil-style watering minus the soil). Recirculating systems pump nutrient solution past the roots — this is overkill for a 10-day microgreen crop.
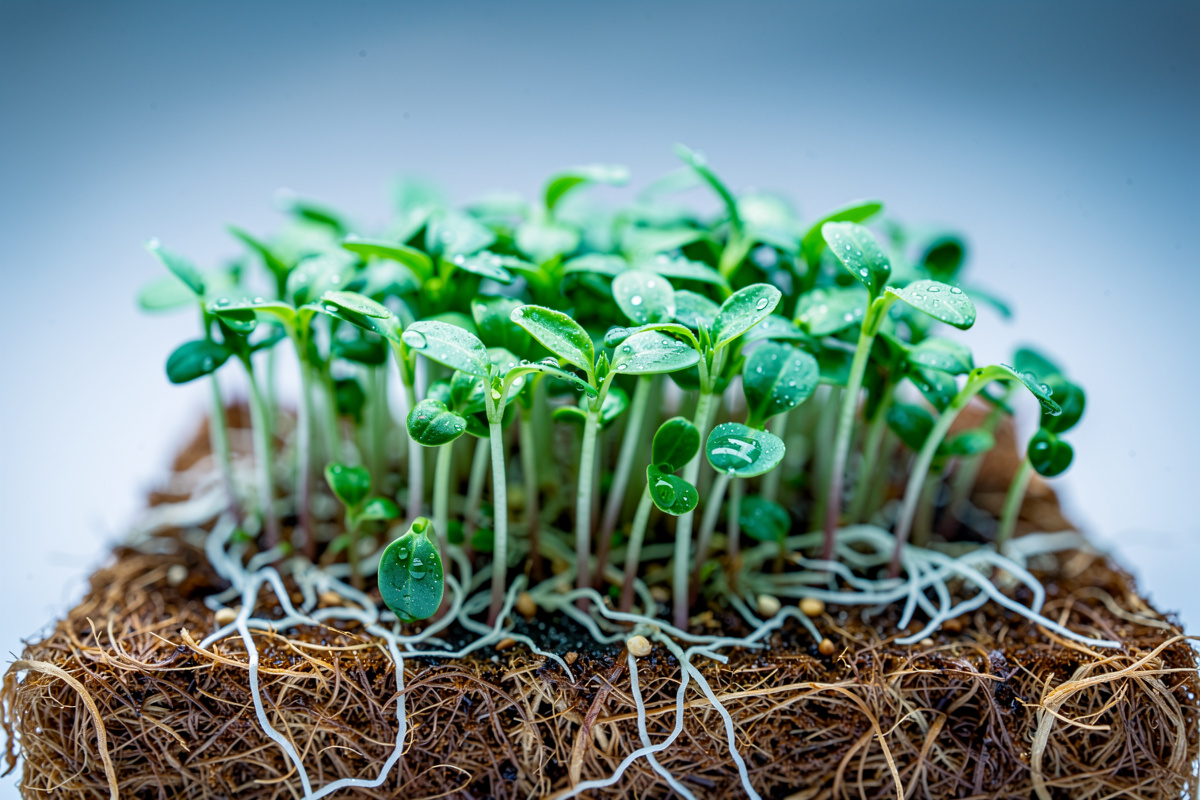
For home growers, wicking trays are the only system worth setting up. They are passive, inexpensive (around $40 for a stack of three reservoirs and inserts), and produce results identical to commercial NFT setups.
Hydroponic vs Soil Microgreens: Yield, Cost, and Time
Hydroponic microgreens harvest one to two days faster than soil and yield roughly 15–25% more per tray in my home comparisons, though it costs more upfront and grain-based varieties still want a nutrient solution. The difference is real but smaller than most YouTube channels claim.
Based on side-by-side comparisons and published extension guidance:
| Aspect | Soil Microgreens | Hydroponic Microgreens |
|---|---|---|
| Days to harvest (broccoli) | 10–12 | 9–10 |
| Yield per 10×20 tray | 8–12 oz | 10–14 oz |
| Initial setup cost | $15–30 | $40–80 |
| Per-tray growing cost | $0.80–1.20 (soil) | $0.40–0.70 (mat) |
| Cleanup time | 5–10 minutes (soil disposal) | 1–2 minutes (mat compost) |
| Mold risk | Higher (organic matter) | Lower (sterile mat) |
| Best for | Single trays, hobbyists | Volume rotation, kitchen sales |

The crossover point is roughly tray five. Below that, soil is cheaper and easier. Above it, hydroponic mats pay back the upfront cost within two months of weekly harvests. For decision logic by use case, the microgreens vs sprouts comparison covers the broader yield-vs-effort math across all three methods.
Best Hydroponic Systems for Home Microgreens
Wicking trays with hemp or coir mats handle 95% of home microgreen needs. More elaborate systems exist, but the trade-off rarely makes sense at the scale a kitchen actually uses.
The four system categories, in order of practicality for microgreens:
1. Passive wicking trays (recommended). A 10×20 lower reservoir holds water; a slotted upper insert holds the wicking mat. The wicking tray systems I use cost about $18 per two-tray stack and have run for over 50 cycles without needing replacement. Seed on top, water once at the bottom, harvest in 7–10 days. Bootstrap Farmer, Trueleaf Market, and the open-source Bootstrap kit all sell variants for $12–18 per stack. This is the system commercial micro farms run for grain-based crops.
2. Top-watering tray + mat. Identical to soil setup but with a mat instead of soil. Cheaper than wicking ($5/tray) but requires twice-daily misting. The cleanup-time advantage over soil shrinks because you still spray-water like soil.
3. Ebb-and-flow microgreen tables. Pump-driven flood-and-drain on a timer. Overkill for crops harvested in 10 days; pump and timer cost more than the entire wicking setup will produce in a year. Skip unless scaling beyond 50 trays per week.
4. NFT (nutrient film technique). The system most associated with hydroponics — a thin nutrient film flowing over root mats. Excellent for lettuce and herbs, terrible for microgreens because the film disturbs the seed bed during germination. Match the system to the crop, not the marketing.
For tray hardware specifically — drainage holes vs solid bottoms, mesh sizes, stacking — the microgreen tray guide covers the choices that matter.
Setting Up Your First Hydroponic Microgreen Tray
The full first-tray procedure runs about ten minutes from unboxing to seeded.
Step 1: Prepare the mat. Hemp and coir mats arrive compressed. I buy hemp grow mats in 10-packs — each mat costs about $1 and the bulk pack lasts me roughly two months of weekly trays. Soak in plain water (or pH-adjusted water at 6.0 if your tap reads above 7.5) for 5–10 minutes. The mat triples in thickness as it absorbs. Squeeze gently to remove excess — saturated, not dripping.
Step 2: Lay the mat flat. Place inside the slotted upper tray. Trim corners if it overlaps; even contact with the slotted floor is what enables wicking. Gaps mean dry zones in the seeded crop.
Step 3: Seed evenly. Density matters more for hydroponic than soil because there is no organic matter to buffer competing roots. For broccoli, use 1 oz seed per 10×20 tray. For pea shoots, 6–8 oz (peas are heavy seeds and need single-layer coverage). Sunflower, 3 oz. The 12 easiest microgreens guide includes seeding rates for the full beginner-friendly varieties.
Step 4: Cover for blackout. Stack a second flipped tray on top. Most seeds germinate faster in darkness with light pressure. Pea shoots need 3 days, broccoli 2 days, radish 1 day. Lift daily to mist the mat surface lightly until you see white roots gripping into the mat.
Step 5: Add reservoir water and move to light. Pour 1 cup of water into the lower reservoir. Place under a grow light running 14–16 hours. The mat wicks moisture up; you only refill the reservoir, never the surface.
For light specs — wattage, distance, and timing — the grow lights for vegetables guide applies directly to microgreens at the lower-end of its recommendations (microgreens want 100–200 µmol/m²/s, less than lettuce).
Nutrients: Do Hydroponic Microgreens Need Them?
Most microgreens don’t need added nutrients — the seed itself provides everything for the 7–14 day cycle. The exception is grain-family microgreens (wheatgrass, corn shoots) which benefit from a quarter-strength nutrient feed after day 5. This mirrors extension guidance that microgreens draw on the seed’s own reserves through their short cycle rather than the growing medium (University of Maryland Extension).
This is one of the most over-complicated topics in microgreen forums. Here is the actual rule:
- Brassicas (broccoli, kale, radish, arugula, cabbage): Plain water. The cotyledon stage uses stored seed reserves entirely. Adding nutrients changes flavor (more bitter) without increasing yield.
- Pea shoots, sunflower, beet, chard: Plain water. Same logic.
- Wheatgrass, corn shoots, sorghum: Plain water for the first 5 days, then quarter-strength balanced nutrient solution (around EC 0.4–0.6, not the EC 1.5–2.0 used for full-grown lettuce).
If you do feed grain microgreens, the hydroponic systems guide covers nutrient solution mixing across the major brands; for microgreens specifically, any general-purpose vegetable nutrient at 1/4 strength works. There is no need for a microgreen-specific product.
Tap water vs filtered water matters more than people expect. Chloraminated municipal water can slow germination by 8–12 hours and cause uneven canopy. If your tap reads above 200 ppm dissolved solids or smells of chlorine, fill containers and let them stand uncovered for 24 hours before using. Reverse osmosis is overkill for microgreens.
Light, Air, and Water Schedule
Once the seedlings emerge from blackout, the schedule is simpler than soil because reservoir wicking handles most watering decisions.
Light: 14–16 hours per day at 6–10 inches above canopy. Cool-white LED is fine — microgreens harvest before any flowering stage so red-spectrum bias does nothing useful.
Air: Gentle airflow from a small fan reduces fungal risk and produces stockier stems. A clip-on $15 fan oscillating across the trays is sufficient. Stale air is the single most common cause of mold in home hydroponic setups.
Water: Refill reservoir when it drops below 1/4 cup. For most varieties, this is once per 36–48 hours. Some growers add 1 mL of 3% hydrogen peroxide per liter as a preventive — useful in humid climates, optional otherwise.
Temperature: 65–72°F is ideal. Above 78°F you lose 1–2 days of shelf life and risk mold. Below 60°F adds 2–3 days to the cycle.
Common Hydroponic Microgreen Problems
Three problems account for most failures, and all have direct fixes.
Mold on seed coats. Looks like white fuzz; usually appears days 2–4. Often confused with healthy root hairs (which are also white but anchored to the mat, not floating above seeds). Cause: seeds clumped during seeding, creating wet pockets without airflow. Fix: rinse seeds before sowing for varieties prone to clumping (chia, basil), and seed at a single layer of coverage rather than piles.
Uneven canopy. Half the tray towers two inches; the other half stalls at half an inch. Cause: dry zones in the wicking mat (poor mat-tray contact) or inconsistent seed depth. Fix: press the mat firmly into the slotted insert before seeding; soak seeds for 4–8 hours pre-sow for varieties over 2mm (peas, sunflowers).
Yellowing instead of greening after lift. Cotyledons stay pale yellow even after 48 hours under light. Cause: insufficient PPFD or light too far from canopy. Fix: lower the light to 6 inches, run 16 hours/day for the first 48 hours of light cycle.
Harvest, Yield, and Storage
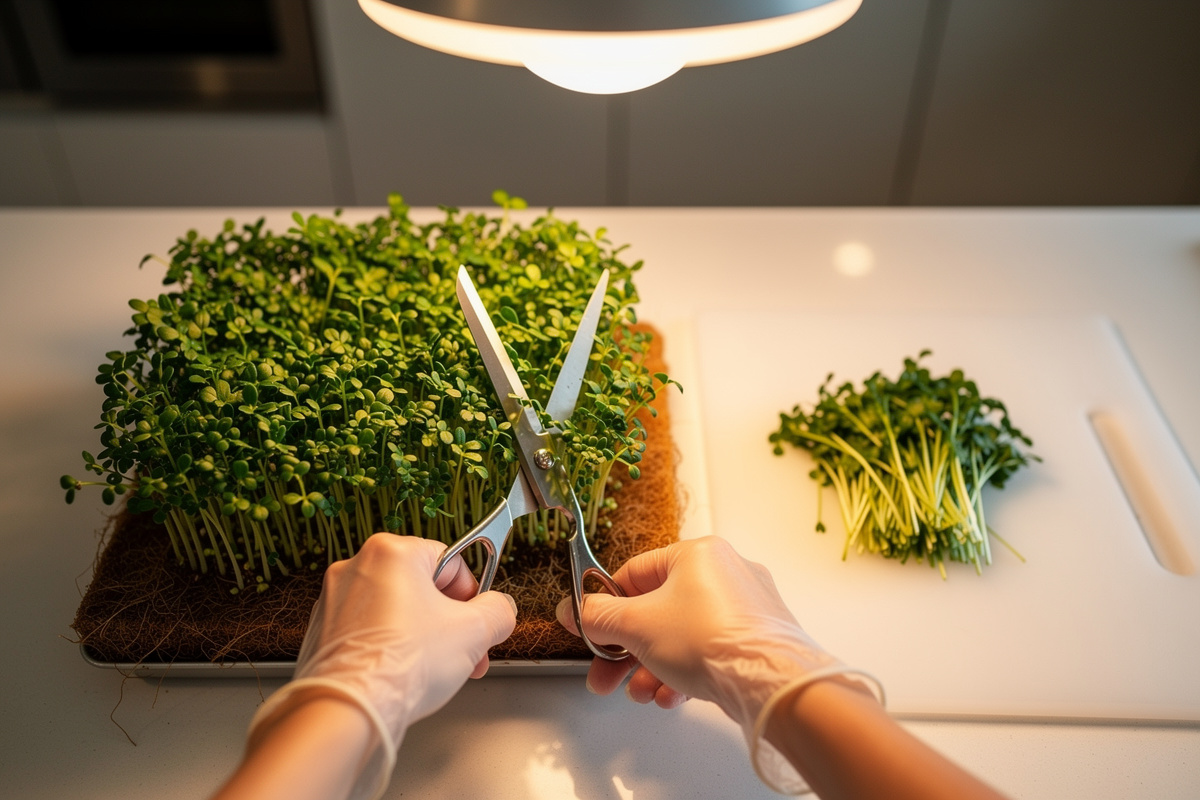
Hydroponic microgreens harvest the same way as soil — sharp scissors or knife, cut just above the mat, no roots in the harvest bag. The advantage shows up after harvest: no soil to rinse off, no grit between leaves, longer fridge shelf life (7–10 days vs 5–7 for soil-grown). Detailed cutting and storage technique is in the microgreens harvest guide.
Used mats compost beautifully — they are 100% organic by mass with no added nutrients in most home cycles. Drop into the compost bin or worm bin after harvest; no rinsing required. This is one of the under-appreciated wins of hydroponic over soil for high-rotation growers — you handle organic waste once, cleanly, instead of dealing with five pounds of spent potting mix per tray.
When Hydroponics Actually Beats Soil — and When It Doesn’t
After running both methods side by side through two winters, here is where I reach for hydroponic trays and where I default to soil. Hydroponics wins clearly in three scenarios: high-volume rotation (8+ trays per week), cleanliness-sensitive applications (kitchen production for sales, restaurant supply, food-allergic households), and small-space stacked setups (vertical racks where soil weight becomes a structural problem). The setup pays for itself within two months at that scale.
Soil still wins for: occasional growers (1–2 trays per month), mucilaginous seeds (chia, basil, cress — these gel coats love the structure of soil), and educational/kid-focused growing where the tactile experience of soil matters more than the yield curve. Soil is also more forgiving of inconsistent watering, which matters if you travel or have a variable schedule. The sprouting at home guide covers the third option for irregular schedules — sprouts need almost zero infrastructure.
The honest answer most articles avoid: for a typical home grower running 2–4 trays per month for personal salads, the difference between soil and hydroponic is modest enough that the choice should come down to which system matches your kitchen storage and rhythm. Both produce excellent microgreens. The yield advantage observed in home comparisons matters at commercial scale far more than on a per-tray basis.
Frequently Asked Questions
Is hydroponic or soil microgreens easier for beginners?
Soil is easier for the first 3-5 trays because bagged mix handles inconsistent watering and the organic matter buffers mistakes. Hydroponic wicking mats are simpler once you understand the blackout-to-light transition — the reservoir handles watering automatically and cleanup takes a minute instead of ten. Start with soil, try hydroponic once watering discipline is automatic.
Do hydroponic microgreens taste different?
Slightly. Hydroponic versions taste cleaner and milder because there is no soil microbe contribution. Soil microgreens have a faint earthy note that some chefs prefer for garnishing. The difference is small enough that most blind tasters cannot distinguish.
How long does a hydroponic microgreen tray actually last?
From seed to harvest: 7-12 days for most varieties. Reservoir water lasts 36-48 hours between refills. Wicking mats are single-use and compostable. Reusable plastic trays last 3-5 years with regular sanitation between crops.
Can I reuse hydroponic microgreen mats?
Hemp and coir mats are designed as single-use because spent root mass clogs the wicking structure. Some growers slice and compost them; commercial growers send them to worm bins. Trying to wash and reuse drops yield substantially on the second crop.
Is rockwool safe for hydroponic microgreens?
Rockwool works mechanically but raises two concerns for microgreens. First, rockwool is alkaline (pH 7-8) and needs pre-soaking in pH-adjusted water. Second, mineral fibers are not compostable and must go to landfill. Hemp and coir avoid both issues with similar yields.
Do I need a pump or fan for hydroponic microgreens?
No pump (wicking is passive). A small fan is strongly recommended in humid climates and not strictly required in dry climates. The clip-on USB fan that costs $15 prevents most mold issues across all crop varieties.
Related Articles
- Growing Microgreens: Complete Indoor Setup Guide — the cluster pillar covering all microgreen methods
- Microgreens vs Sprouts: 8 Critical Differences — when to choose each method
- Microgreens Trays: 1020s, Drainage, and Stacking — tray hardware that matters
- 12 Easiest Microgreens for Beginners — variety-by-variety seeding rates
- Microgreens Harvest: Cut, Wash, Store — post-harvest workflow