
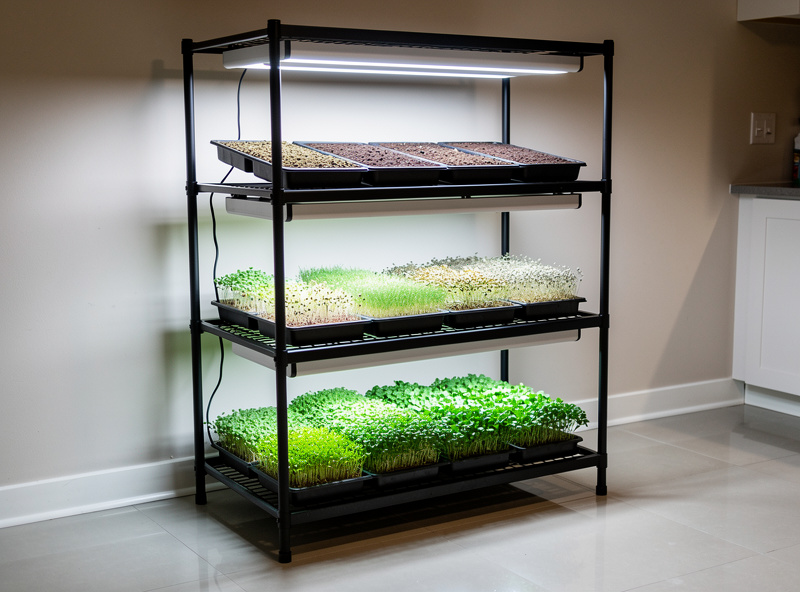
Microgreens go from seed to harvest in as little as 8 days on a kitchen counter, and a 10×20 tray yields 8 to 16 ounces of cut greens for under $3 in seed and soil — the same volume costs $7 to $12 at a grocery store. On my microgreen shelf under a full-spectrum LED bar, I keep three 1020 trays in rotation through a Swedish winter, and the rhythm is dialed in: sow Sunday night, uncover Wednesday, harvest the following weekend.
This guide covers every decision I’ve worked through: trays, soil, seeds, lighting, watering, harvesting, and the equipment matrix that separates a $40 starter kit from a $400 production setup. If you are producing enough to sell surplus, the selling microgreens as a business guide covers pricing, farmers market logistics, and chef accounts. Microgreens are also project #5 in the simple family gardening projects roundup.
What Are Microgreens?
Microgreens are vegetable, herb, and grain seedlings harvested at the first true leaf stage — typically 1 to 3 inches tall, 7 to 21 days after sowing. Unlike sprouts (eaten whole, root included, grown in water), microgreens grow in a soil or fiber medium and are cut just above the soil line at harvest.
The category was popularized by California chefs in the 1980s, but home growers now drive the market. Forty common species qualify as microgreens, ranging from fast crops like radish (8 days) to slower ones like cilantro (21 days). The flavor spectrum runs from mild and nutty (sunflower, pea shoots) to peppery (radish, arugula) to intensely spicy (mustard, wasabi arugula). That range of flavor, not just speed, is what keeps me rotating four trays instead of one — sunflower for sandwiches, radish for tacos, broccoli for everything.
Microgreens vs Sprouts vs Baby Greens
The three categories are commonly confused but differ in growing method, harvest stage, and food safety profile. Sprouts grow in standing water with no soil — a high-moisture environment linked to roughly 50 documented foodborne illness outbreaks between 1996 and 2018 (Food Safety Magazine, on FDA outbreak data). Microgreens grow in a drained soil medium and are cut, not pulled, eliminating most of that risk. Baby greens are the same plants harvested 30 to 50 days later at 4+ inch height.
| Attribute | Sprouts | Microgreens | Baby Greens |
|---|---|---|---|
| Growing medium | Water only | Soil or fiber mat | Soil |
| Days to harvest | 3 to 7 | 7 to 21 | 30 to 50 |
| Harvest method | Pull whole plant | Cut above soil | Cut above soil |
| Edible parts | Root, stem, seed leaves | Stem, cotyledons, first true leaves | Stem, full leaves |
| Light required | None or minimal | 4 to 6 days under light | Full grow cycle |
| Yield per 10×20 tray | 1 to 2 lbs (wet) | 8 to 16 oz | 4 to 8 oz |
| Foodborne illness risk | High (warm, wet) | Low | Low |
| Flavor profile | Mild, grassy | Peppery to nutty, concentrated | Mild, similar to mature plant |
For a deeper dive on the sprouting side, see the Sprouting Seeds at Home guide, which covers jar-based and bag-based methods. If you are trying to decide which path to start with, the sprouting vs microgreens comparison lays out the equipment, cost, taste, and food-safety differences side by side.
Equipment You Actually Need
A working microgreens setup has six pieces: trays, growing medium, seeds, light source, water spray bottle, and a humidity dome. Every other accessory is optional. Total cost for a single-tray setup: $35 to $60. A 4-tray rack with grow light: $120 to $200. If you’d rather buy everything pre-matched, the microgreens growing kit guide reviews bundled starter sets so you skip the piece-by-piece hunt.
Trays
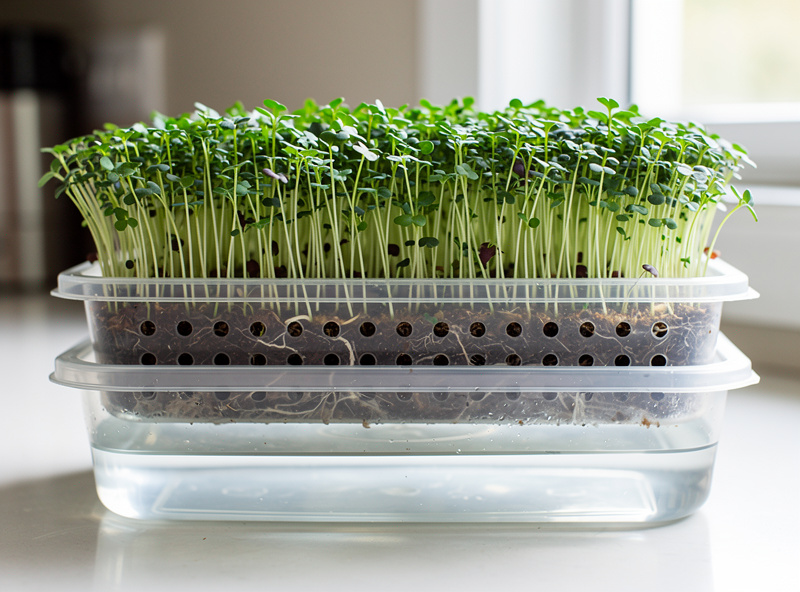
The standard is the 10-inch by 20-inch (1020) flat. Buy two per tray slot — one with drain holes (the grow tray), one solid (the watering reservoir or “bottom-watering” tray). On my shelf I run the heavy-duty injection-molded trays that Bootstrap Farmer makes — they cost $4 to $8 each and last 5+ years. The cheap nursery flats ($1 to $3) cracked on me after 6 to 8 cycles, and replacing a tray mid-grow because the corner split is a mess you do not want to deal with. As an Amazon Associate I earn from qualifying purchases. If you are putting together a first setup, I recommend starting with a set of heavy-duty 10×20 trays with drainage — get at least four so you can run staggered plantings.
Growing Medium
Three options dominate: peat-based seed starting mix, coco coir, or hemp grow mats. Peat mix is cheapest ($0.30 per tray) and most familiar, but compacts over reuses. I started with peat and switched to coco coir ($0.50 per tray) after a winter of peat trays compacting into a dense slab that roots could not penetrate — coir drains better and is renewable. Hemp mats ($1 per tray) are the cleanest option for indoor kitchens but cost more per cycle. If you go that route, the hydroponic microgreens setup guide covers the wicking-tray system that turns hemp mats into a low-maintenance kitchen production setup. For a side-by-side comparison across crop types, the best soil for microgreens guide breaks down peat, coco coir, and hemp mats by price per tray, drainage, and reusability.
Seeds
Use seeds labeled as microgreen seeds or untreated bulk seeds — never seed packets sold for outdoor garden planting (often coated with fungicide). One ounce of radish seed sows roughly 4 to 6 trays. Bulk pricing through True Leaf Market or Johnny’s Selected Seeds runs $10 to $25 per pound for common varieties. If you want to test several varieties without buying pounds of each, a microgreen seed variety pack gives you 5 to 8 types in small pouches — enough for a tray or two of each while you figure out which flavors you like.
Lighting
Microgreens need light only after germination (days 4 to 6 onward). Under the full-spectrum LED bar I run on the microgreen shelf, I target 200 micromoles per square meter per second (PPFD) at the canopy, with the bar hanging 8 to 12 inches above the trays. Run lights 12 to 16 hours per day on a cheap outlet timer. Skip the high-end horticultural lights — microgreens are short cycle and don’t need PPFD above 300. The full-spectrum LED bar lights that cost $30 to $60 cover a 10×20 footprint perfectly and the power draw is negligible on your electricity bill.
If you’re new to indoor growing in general, the Indoor Growing complete guide covers light selection, humidity, and ventilation for any indoor crop. For a deeper dive on microgreen-specific light choices, see the grow lights for microgreens guide.
Water Spray Bottle
A 32-ounce trigger sprayer is the workhorse for the first 5 days (germination phase). After that, switch to bottom-watering by pouring water into the solid tray underneath. This stops mold and damping-off, the two failure modes that kill 90% of beginner trays.
Humidity Dome
A clear plastic dome covers the tray for the first 4 days to keep humidity at 80 to 95 percent during germination. If your trays did not come with matching domes, 10×20 humidity domes are $3 to $5 each and fit standard 1020 trays. An inverted second tray works in a pinch but leaves gaps at the edges that dry out the corners.
Best Microgreens for Beginners
On my shelf, these five have earned permanent rotation spots. They germinate fast, resist disease, and tolerate the occasional skipped watering — three forgiving traits for first-time growers. For a full breakdown of twelve varieties ranked by speed, yield, and difficulty, see the 12 easiest microgreens guide.
- Radish (any variety): 8 days to harvest, peppery flavor, almost foolproof. The single best beginner crop — I still run a radish tray every week because it is bulletproof and the peppery bite wakes up any sandwich.
- Sunflower (black oil): 10 to 14 days, nutty crunchy flavor, highest yield per tray (12 to 18 oz). Requires hull removal — run your hand across the canopy on Day 6 to knock off the seed hulls before they clamp onto the leaves.
- Pea shoots: 10 to 14 days, sweet, robust seedlings. Pre-soak seeds 8 to 12 hours. They produce the most impressive-looking tray in the lineup, and a handful of pea shoots on a winter salad makes the dark months feel less dark.
- Broccoli: 10 days, mild flavor, works in everything. The most versatile microgreen I grow — mild enough for smoothies, substantial enough to be the base of a side salad.
- Mustard: 8 to 10 days, sharp wasabi-like heat, fast germination. Use sparingly — a little mustard microgreen goes a long way.
Avoid these on your first 5 trays: cilantro (slow, 18 to 21 days), basil (slow and finicky), beets (15+ days, low germination), and any allium (onion, leek — slow and easily moldy).
Step-by-Step Growing Process
The cycle has four phases: sow, germinate (covered), light (uncovered), and harvest. I run this rotation on Sunday nights so I can harvest the following weekend — the timing lines up cleanly for the fast crops and keeps the weekly rhythm predictable. The whole process takes 8 to 14 days for fast crops, 18 to 21 for slower ones.
Day 0: Sow
Fill the drain-hole tray with 1.5 inches of pre-moistened medium. Press flat with a second tray. Scatter seeds at the rate of 1 to 1.5 ounces per 1020 tray for small seeds (radish, mustard, broccoli) or 2 to 3 ounces for large seeds (sunflower, pea). Press seeds into the surface — do not bury them. Mist with water until the surface is uniformly damp. Cover with a humidity dome or weight.
Days 1 to 4: Germinate
Keep covered in the dark at 65 to 75°F. Mist twice daily if the medium dries on top. A weight on top of the dome (8 to 10 lbs for small seeds) forces roots downward and produces denser, taller stems — a technique called “blackout pressing.”
Days 4 to 6: Uncover and Light
Once seedlings reach 1 inch tall and the cotyledons (seed leaves) start opening, remove the dome and place under light. Switch to bottom-watering. Lights run 12 to 16 hours per day.
Days 7 to 21: Grow to Harvest
Bottom-water once daily — pour 1/2 to 1 cup of water into the solid tray below. Watch for the first true leaf appearing between the cotyledons. That is the harvest signal.
Lighting Setup Specifics
The most common beginner mistake is leftover-incandescent or warm-white kitchen lighting. Microgreens need photosynthetically active radiation (PAR), not just visible light. A 4-foot T5 fluorescent fixture with two bulbs ($30 to $50) works fine for a single 1020 tray. For a 4-tray vertical rack, an LED grow bar with 100 to 150 watts of actual draw covers the area at 8-inch hang height. For a full breakdown of fixture types, PPFD targets, and timer settings by crop, see the grow lights for microgreens guide.
Hours per day matter more than wattage. Twelve hours at 200 PPFD produces taller, leggier plants; 16 hours at 200 PPFD produces denser, stockier plants. For most crops, set a timer for 14 hours and ignore it.
Watering Schedule by Phase
| Day | Method | Frequency | Why |
|---|---|---|---|
| 0 (sow) | Top mist | Once, until damp | Wet seeds for germination |
| 1 to 3 | Top mist | 1 to 2x daily | Maintain humidity under dome |
| 4 | Top mist or bottom | 1x daily | Transition phase |
| 5 to 7 | Bottom water | Daily, 1/2 cup | Cotyledons open, roots reach bottom |
| 8 to harvest | Bottom water | Daily or every other day, 1 cup | Mature canopy, higher transpiration |
Bottom-watering is the single most important technique to learn and it took me three moldy trays to accept it. Wet leaves at any stage past Day 4 invite mold (typically Pythium or Rhizoctonia), and a spray bottle aimed at the canopy after the cotyledons open is how I killed my first broccoli tray. The water should sit in the bottom tray for 15 to 30 minutes — if any water remains after 30 minutes, you over-watered. Pour it out.
Harvesting and Storage
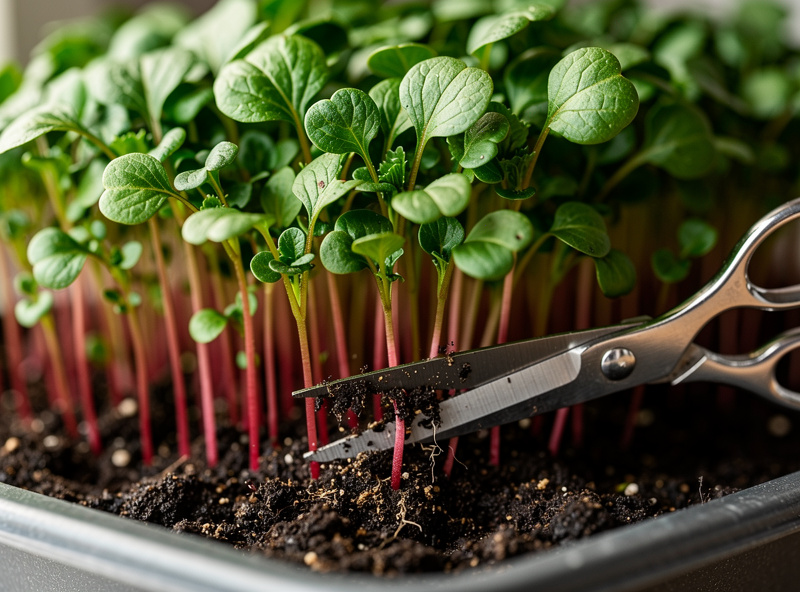
Cut microgreens with sharp scissors or a chef’s knife held parallel to the soil surface, taking the stem and cotyledons but leaving the roots in the medium. I use a pair of stainless harvest scissors with a 6-inch blade — the long blade lets you cut an entire 1020 tray in a single pass. Most crops harvest at 1.5 to 3 inches tall — sunflower and pea shoots can grow to 4 inches before they start to yellow.
For the longest shelf life, harvest dry — do not water for 8 to 12 hours before cutting. I harvest in the morning, after the lights have been on for an hour but before the day’s bottom-watering, so the leaves and stems are at their driest. Spin-dry briefly if leaves are damp. Store in a sealed container with a paper towel at the bottom (absorbs condensation) at 36 to 40°F. Properly dried radish or broccoli microgreens keep 7 to 10 days in the fridge. Sunflower and pea shoots keep 5 to 7 days. Harvesting wet cuts that to 3 days — the extra moisture in the container turns the greens to mush fast.
Building the Weekly Rhythm
Microgreens settle into a weekly cycle that is easier to maintain than it sounds from a set of instructions. The first tray is the hardest because you are learning three things at once — seeding density, watering judgment, and the blackout-to-light transition. Tray two is where the timing clicks. By tray four or five, the process is automatic and takes about 5 minutes of attention per tray per day.
On my shelf I seed on Sunday and harvest on Sunday, which means I am cutting and seeding simultaneously for about 45 minutes every weekend while the middle-day trays just get a bottom-watering top-up. The cycle works because the fastest crops (radish, mustard) are ready by the following weekend, and the slower ones (sunflower, pea) get an extra week under the bar. Having two speeds of crop in rotation means something is always ready to harvest even if a tray runs a day slow — the slow crops become the buffer, the fast crops the reliable weekly yield — the peppers of the microgreen world, if you will, buying you time while the radishes do the work.
If you miss a seeding weekend, the rotation gets lopsided — you end up with two trays maturing on the same day and a gap the following week. A spare $2 bag of radish seed and an empty tray on standby smooths the gaps. Radish takes 8 days. By the time you realise you forgot to seed last Sunday, you can still have greens by the following Monday.
Tray Cleanup and Reuse
Nobody talks about tray cleanup in microgreen guides because it is the least glamorous part of the process, but it matters. After harvest, dump the root mass and soil into a compost bucket — the root mat will have bound the medium into a dense slab that peels out of the tray in one piece. Rinse the tray, scrub with a stiff brush under warm water, and sanitize with a diluted hydrogen peroxide solution (roughly 1 part 3% peroxide to 8 parts water). Let it dry completely before reusing. Trays used for a moldy or damping-off cycle get the full sanitize-and-sun-dry, even in winter when the drying takes two days on a rack by the radiator.
I keep six drain-hole trays and six solid bottom trays and run them in matched pairs. That gives me enough spare trays that a sanitizing cycle never bottlenecks the rotation. Trays that have seen a damping-off tray get quarantined in a separate stack so they never get grabbed for the next seeding without going through the sanitize routine first.
Common Problems and Solutions
Every problem below is one I have diagnosed on my own shelf at some point. Microgreens grow fast enough that a mistake shows up within 48 hours, and the fix is rarely complicated once you know what you are looking at.
White fuzz on the soil: this is nearly always root hairs (normal, fine, fuzzy in patches around stems), not mold. Mold appears as web-like spots on leaves or stems and smells musty. If real mold appears, increase airflow, reduce watering, and replace the soil for next cycle.
Yellow seedlings: Either insufficient light (move closer or extend hours) or root rot from over-watering (too-wet medium, no drainage in bottom tray). Cut the cycle losses, sterilize the tray, restart.
Uneven germination: Old seeds (test germination by paper-toweling 10 seeds; if fewer than 7 sprout in 5 days, replace stock) or uneven soil moisture during sowing.
Damping-off (seedlings flop over and die at the soil line): Pythium fungus. I lost two full trays of sunflower shoots to this my first winter — the humidity dome stayed on a day too long and the warm, stagnant air underneath was a fungal incubator. Cut watering, increase airflow, and never reuse soil from a damping-off tray. Sanitize trays with diluted hydrogen peroxide (1:8 in water) between cycles (Purdue Extension damping-off management). Now I pull the dome exactly on Day 4 even if a few seedlings look small; the ones that are ready will catch up.
For a broader pest and contamination guide, see the Fungus Gnats in Houseplants guide — fungus gnat larvae are the second most common indoor microgreen pest after mold.
Cost: Growing vs Buying
| Source | Quantity | Cost | Per Ounce |
|---|---|---|---|
| Whole Foods (clamshell) | 1.5 oz | $5.99 | $3.99 |
| Farmers market | 2 oz | $6.00 | $3.00 |
| DIY radish (1020 tray) | 10 oz | $2.50 | $0.25 |
| DIY sunflower (1020 tray) | 14 oz | $3.20 | $0.23 |
| DIY broccoli (1020 tray) | 9 oz | $3.80 | $0.42 |
The startup cost (rack, lights, trays, dome) is $80 to $200, recouped in 6 to 12 weeks of weekly trays for a household that eats 3 to 5 ounces per week. Beyond that, the marginal cost is just seeds and soil.
Running Microgreens Through a Nordic Winter
Growing microgreens through a Swedish winter taught me more than any summer run ever did. The apartment sits at 20 to 22°C (68 to 72°F) year-round, so temperature is not the variable — light and humidity are. In December and January, the ambient daylight through the windows drops to roughly 4 usable hours, and the indoor air humidity crashes to 25 to 35 percent once the radiators kick on.
The grow lights handle the light deficit without drama — 14 hours on a timer, same as summer. The real winter adjustment is the humidity dome. Where a 4-day dome period works in summer when ambient humidity is 50 to 60 percent, I extend it to 5 or even 6 days in deep winter to keep the germination zone moist. The trade-off is a slightly higher mold risk, so I run a small clip-on fan across the trays for 30 minutes twice a day starting on Day 3, even while the dome is on.
The other winter-specific tweak: seed density. In low light, seedlings stretch looking for more. Dropping seed density by 20 percent — from 1.5 ounces per 1020 tray to 1.2 ounces for small seeds — gives each seedling enough room that they stay stocky. You lose a few grams of yield per tray but gain a harvest that actually looks like microgreens, not an etiolated tangle.
The payoff of winter growing is real: fresh greens in January from a shelf that takes up 2 square feet, with zero plastic clamshells in the trash. That alone keeps the microgreen shelf running from November through March.
Where to Set Up
Microgreens tolerate 60 to 80°F and don’t need direct sunlight (they need grow lights). A kitchen counter, basement shelving, garage in mild climates, or a closet with a fan all work. They need good airflow — a small clip-on fan running 2 to 3 hours per day substantially reduces mold risk.
For apartment renters with limited space, see the Grow Lettuce Inside guide — the same tabletop setup works for microgreens at a smaller footprint.
Scaling Up
Once two trays per week becomes routine, the next step is a 4-tier rack with timed lights and a watering schedule. A typical home production setup at this scale yields 2 to 3 lbs of microgreens per week — enough to supply a household plus sell or trade extras. When I scaled from one tray to four, the bottleneck was not the grow process but the seeding and harvest cycle — a single Sunday-morning seed-and-harvest session now takes about 45 minutes for four trays, and I harvest whatever is ready while seeding the next round. If you want to skip the piece-by-piece assembly, a complete microgreens growing kit bundles trays, medium, seeds, and a light into one box and gets you to your first harvest faster than shopping each component separately.
Selling microgreens to local restaurants, farmers markets, and CSA shareholders is a viable side business at $20 to $40 per pound wholesale. The legal angle (cottage food laws, food handler permits, sales tax) varies by state — check your state’s department of agriculture website before selling.
Frequently Asked Questions
How long do microgreens take to grow?
Most microgreens harvest in 7 to 14 days. Radish is the fastest at 8 days. Sunflower and pea shoots take 10 to 14. Cilantro and basil are slowest at 18 to 21 days. Speed depends on temperature, light hours, and seed freshness.
Can you regrow microgreens after cutting?
No. Microgreens are harvested at the first true leaf stage and lack the leaf surface to regrow. Pea shoots are the one exception — they may produce a smaller second flush 7 to 10 days after the first cut, but yield drops by roughly half.
Do microgreens need sunlight?
They need light, not necessarily sunlight. A south-facing window provides enough for slow growth, but most home growers use T5 fluorescent or LED grow lights running 12 to 16 hours daily for consistent yields and color. Microgreens require light only after Day 4.
What are the easiest microgreens to grow?
Radish is the easiest — 8 days to harvest, consistently high germination, tolerates over- and under-watering. Sunflower, pea shoots, broccoli, and mustard are the next four most beginner-friendly. Avoid cilantro, basil, and onion family until comfortable with the basics.
What do microgreens taste like?
The flavor spectrum is wide. Sunflower shoots are nutty and crunchy, pea shoots are sweet and grassy, radish is peppery and sharp, mustard brings wasabi-like heat, and broccoli is mild and versatile. Basil and cilantro microgreens carry the concentrated flavor of the mature herb in a tiny package. Mixing varieties in one tray creates a custom salad blend.
What is the difference between microgreens and sprouts?
Sprouts grow in water with no soil and are eaten whole including roots, harvested at 3 to 7 days. Microgreens grow in soil or fiber, are cut above the soil line at 7 to 21 days, and only the stem and leaves are eaten. Microgreens have a much lower foodborne-illness risk.
Can you grow microgreens without soil?
Yes. Hemp mats, jute mats, coco coir, and hydroponic pads all work as soil-free media. They cost more per cycle ($1 to $2 per tray vs $0.30 to $0.50 for soil) but produce cleaner harvests and are easier to dispose of.
Microgreens Deep-Dive Cluster
For specific topics in depth, the four pillar articles in this cluster cover the questions home growers ask after their first tray:
- Microgreens vs Sprouts: 8 Critical Differences — growing method, food safety, cost, and flavor compared head-to-head.
- Microgreens Trays: 1020s, Drainage, and Stacking — why heavy-duty trays last 5+ years and cheap nursery flats don’t.
- 12 Best Microgreens to Grow at Home — ranked by speed, yield, difficulty, and flavor with the recommended first-three-trays starter set.
- Microgreens Harvest: Cut, Wash, Store — the 8-12 hour pre-harvest dry, cut height per species, and the 36-40°F storage that gets you 7-10 days of shelf life.