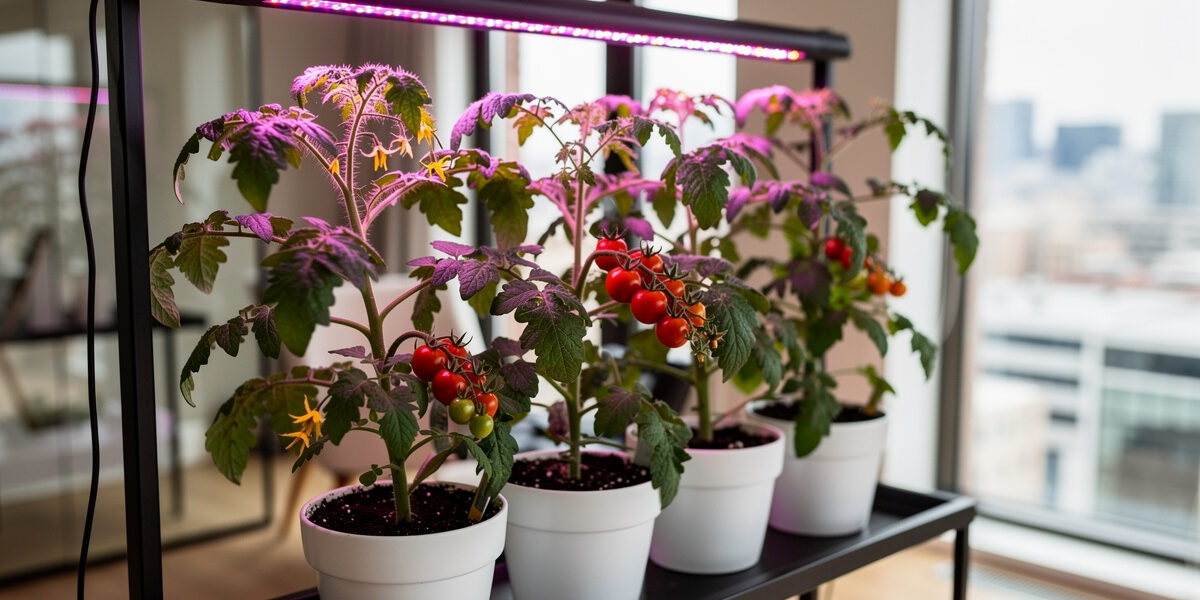
For half the year my windowsill is useless for tomatoes — a Swedish winter gives maybe three or four hours of weak, low-angle light when a tomato wants ten to twelve. Grow lights are how I get tomatoes indoors at all through the dark months, and how anyone in an apartment can grow them year-round whichever way the windows face. Tomatoes need 10–12 hours of strong light to fruit, and most windowsills deliver barely half of that. Here’s exactly how I choose, set up, and run grow lights for tomatoes — wattage, spectrum, distance, and the indoor-pollination trick that actually works.
As an Amazon Associate I earn from qualifying purchases.
Tomatoes are one of several fruiting crops that thrive under the same grow light setup — peppers, cucumbers, and strawberries share similar intensity requirements. My LED lights for growing plants indoors guide covers every fixture type across the full spectrum, while my best light for growing plants indoors guide compares every option. If you’re also growing peppers under lights, I’ve put together a full grow lights for peppers guide with the same PPFD-and-distance approach.
Why Tomatoes Need Grow Lights Indoors
Tomatoes are sun-hungry plants. In outdoor gardens they thrive in full sun — 8 or more hours of direct light per day. Move them indoors and they face three problems that grow lights fix:
- Insufficient duration: Most indoor spaces get 3-5 hours of direct light through windows, far below the 10-12 hours tomatoes need for flowering and fruiting
- Low intensity: Window glass filters 30-50% of light energy, and distance from the window drops intensity further
- Wrong spectrum: North-facing windows deliver mostly indirect blue light, lacking the red wavelengths that drive flowering and fruit development
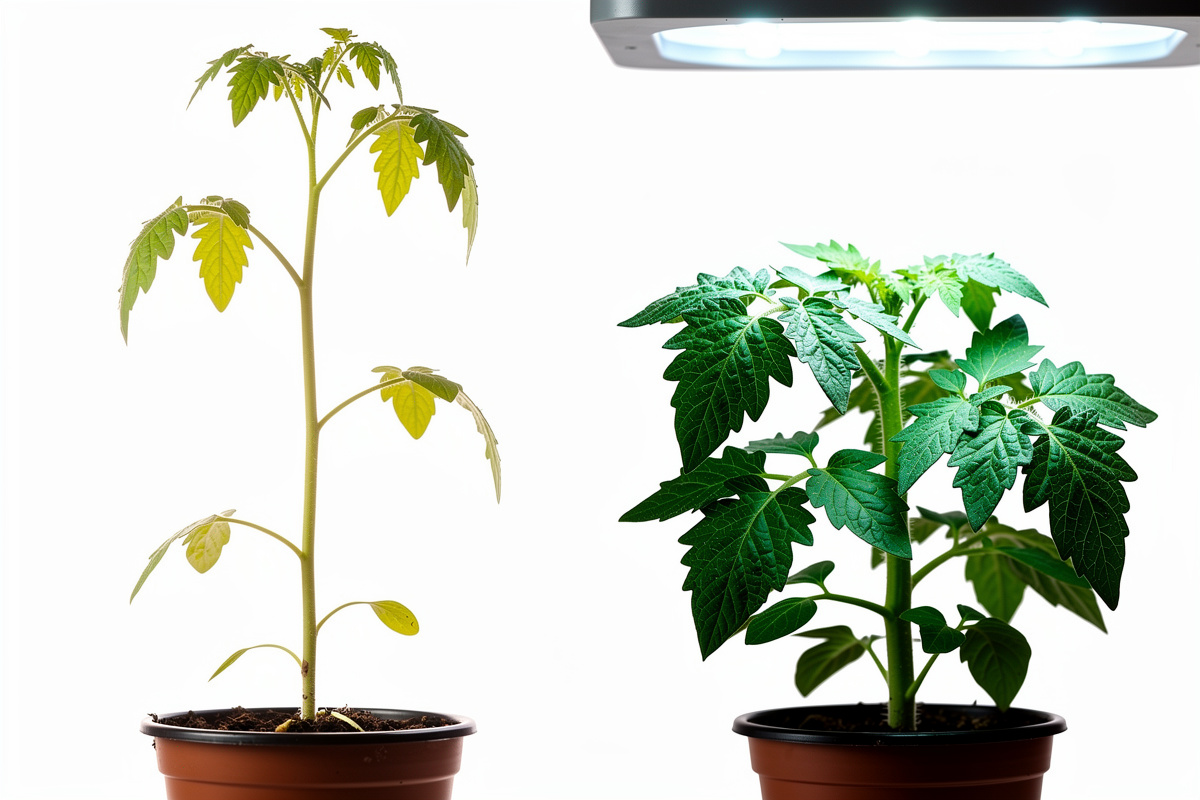
Without adequate light, tomato plants grow tall and thin (leggy), produce few flowers, and drop existing fruit. Grow lights provide the intensity, duration, and spectrum that indoor tomatoes need — regardless of your window situation or season.
Types of Grow Lights for Tomatoes
Three types of grow lights work for tomatoes. Each has clear trade-offs in cost, efficiency, and heat output.
LED Grow Lights (Recommended)
LED panels are the best choice for most indoor tomato growers. They run cool, use 40-60% less electricity than older technologies, and last 50,000+ hours. Modern full-spectrum LEDs provide both the blue light tomatoes need for vegetative growth and the red light required for flowering.
Best for: All stages of tomato growing — seedlings through harvest
Wattage needed: 30-50 actual watts per plant
Cost: $30-80 for a panel covering 2-4 plants
Lifespan: 5-10 years of daily use
Fluorescent Grow Lights (T5/T8)
Fluorescent tubes are affordable and widely available. T5 high-output tubes work well for seedlings and young plants but lack the intensity for fruiting. They run cool enough to place close to plants — useful for seed starting.
Best for: Seed starting and young seedlings only
Wattage needed: 40-60 watts per plant
Cost: $20-50 for a 2-tube fixture
Lifespan: 1-2 years (tubes lose output over time)
HID Grow Lights (HPS/MH)
High-intensity discharge lights are powerful but produce significant heat and use more electricity. HPS (high-pressure sodium) lights are excellent for flowering and fruiting but require ventilation and are overkill for small home setups.
Best for: Dedicated grow rooms with ventilation
Wattage needed: 250-400 watts per 4-6 plants
Cost: $80-200+ including ballast
Lifespan: 1-2 years (bulb replacement needed)
Quick Comparison Table
| Feature | LED | Fluorescent (T5) | HID (HPS) |
|---|---|---|---|
| Electricity cost | Low | Medium | High |
| Heat output | Low | Low | High |
| Good for fruiting | Yes | Limited | Yes |
| Setup complexity | Simple | Simple | Complex |
| Best use case | Home growers | Seedlings only | Grow rooms |
Recommendation: For most home growers, a full-spectrum LED panel in the 30-50W range is the clear winner. It handles every tomato growth stage, keeps electric bills low, and requires no special ventilation or cooling.
How to Choose the Right Grow Light
Selecting a grow light for tomatoes comes down to four factors:
1. Light Spectrum
Tomatoes need different light wavelengths at different growth stages:
- Blue light (400-500nm): Drives vegetative growth — strong stems, healthy leaves, compact plants
- Red light (600-700nm): Triggers flowering and fruit development — essential for tomato production
- Full spectrum (white): Combines all wavelengths — simplest option, works for all stages
Choose a full-spectrum LED rather than red/blue-only “blurple” lights. Full-spectrum panels grow healthier plants and make it easier to spot problems like nutrient deficiencies or pests since you can see true leaf color. The University of Maryland Extension notes that full-spectrum grow lights produce thicker stems than cool-white tubes and are needed for flowering on indoor plants — a useful primer whatever fixture you end up buying.
2. Light Intensity (PPFD)
PPFD (Photosynthetic Photon Flux Density) measures how much usable light reaches your plants. Tomatoes need:
- Seedlings: 200-400 PPFD
- Vegetative growth: 400-600 PPFD
- Flowering and fruiting: 600-900 PPFD
Most LED panels list PPFD values at specific distances. A quality 30-50W panel delivers 400-600 PPFD at 12-18 inches — sufficient for growing tomatoes through harvest.
3. Coverage Area
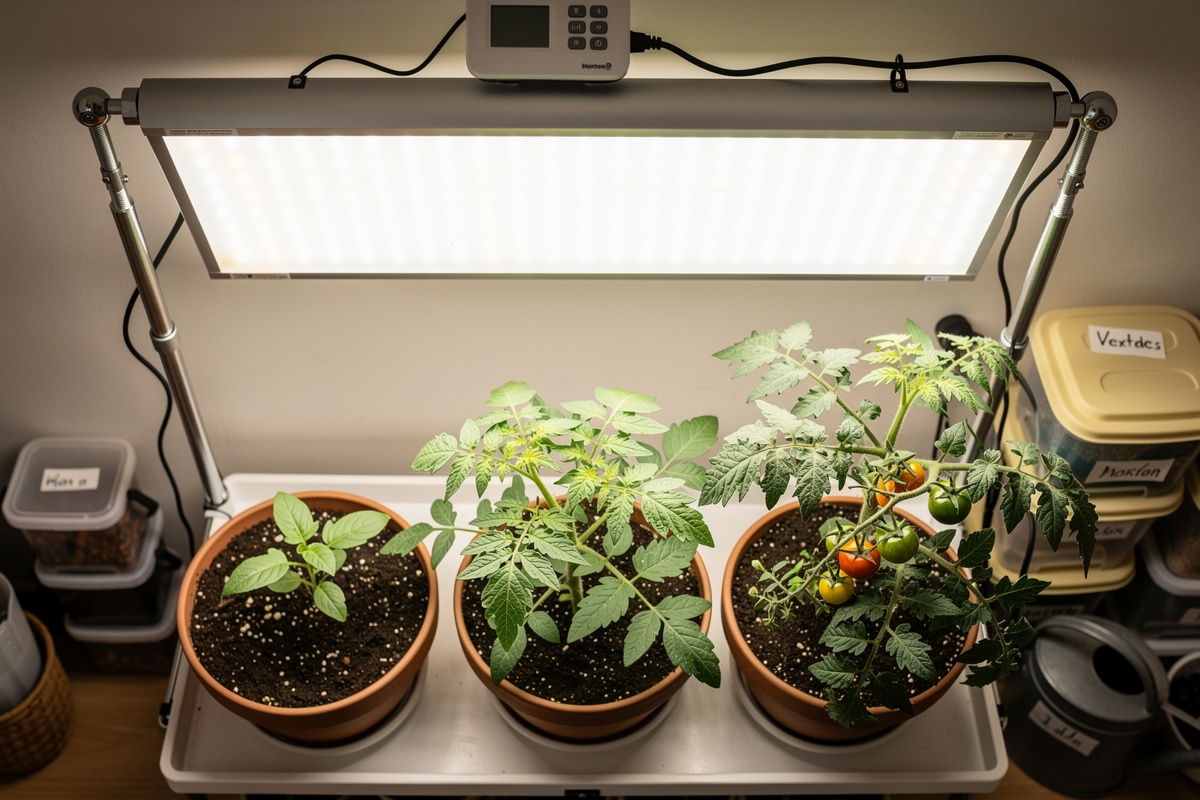
Match your light to your growing space. A single LED panel typically covers a 2×2 foot area effectively. For each tomato plant, plan on roughly 2 square feet of lit area. Growing 4 plants? You need coverage for at least a 2×4 foot space.
4. Adjustable Height
Tomato plants grow fast — a seedling at 3 inches can become a 4-foot plant. Your light setup needs height adjustability. Hanging kits with adjustable ratchet hangers cost $5-10 and let you raise the light as plants grow.
Setting Up Grow Lights for Tomatoes
Proper setup maximizes light efficiency and plant health. Follow these steps:
Height Above Plants
Light distance matters more than most growers realize. Too close burns leaves; too far produces weak, leggy growth.
- Seedlings: 24-30 inches above (lower intensity prevents burning tender leaves)
- Vegetative stage: 18-24 inches above
- Flowering/fruiting: 12-18 inches above (maximum intensity for fruit production)
Watch your plants for feedback. If leaves curl upward or show bleached spots, raise the light. If stems stretch and lean toward the light, lower it.
Light Duration (Photoperiod)
Tomatoes are not photoperiod-sensitive like some plants — they do not require specific dark periods to flower. However, they still need rest. The optimal schedule:
- Seedlings: 14-16 hours on, 8-10 hours off
- Vegetative and fruiting plants: 12-14 hours on, 10-12 hours off
Use a timer. A simple mechanical outlet timer ensures consistent light cycles. Inconsistent lighting stresses plants and reduces yields. Set it once and forget it.
Positioning and Reflectivity
Maximize the light your plants receive:
- Center the light directly above plants, not angled
- Place reflective material (white poster board, mylar, or aluminum foil with the matte side out) around plants to bounce stray light back
- Rotate plants a quarter turn every 2-3 days for even growth
- Keep the light panel clean — dust reduces output by 10-20%
Grow Light Schedules by Tomato Growth Stage
Tomatoes pass through distinct stages, each with different light needs. Adjust your setup as plants develop.
Stage 1: Seed Starting (Weeks 1-3)
Seeds germinate in darkness, but once the first green sprout appears, light becomes critical immediately. Seedlings without adequate light become leggy within 48 hours.
- Light: 14-16 hours daily
- Distance: 24-30 inches (fluorescent) or 24 inches (LED)
- Intensity: Low-medium — avoid burning fragile cotyledons
- Tip: Start the light timer the day you see the first sprout break the soil surface
Stage 2: Vegetative Growth (Weeks 4-8)
Once seedlings develop their first true leaves (the serrated ones, not the smooth seed leaves), increase light intensity to build strong stems and dense foliage.
- Light: 14-16 hours daily
- Distance: 18-24 inches
- Intensity: Medium-high
- Tip: If stems are thicker than a pencil with short internodes (gaps between leaves), your light is dialed in perfectly
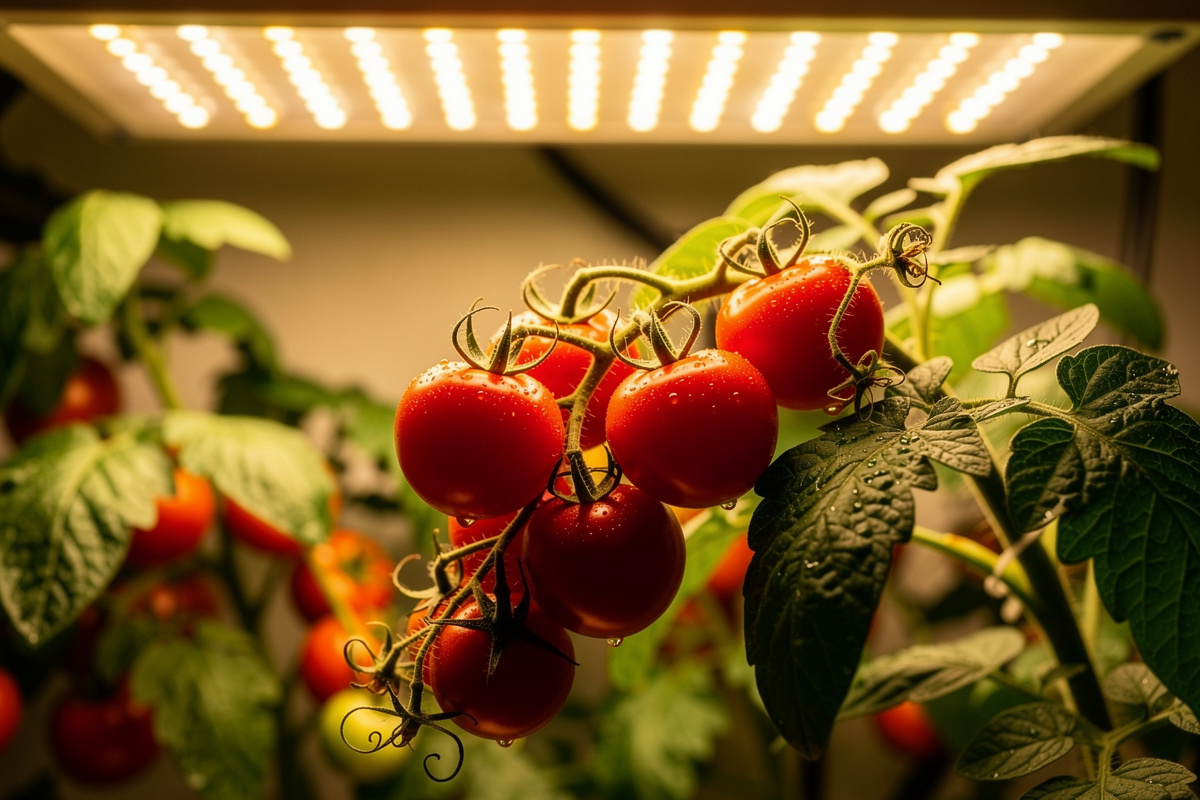
Stage 3: Flowering and Fruiting (Weeks 8+)
When yellow flowers appear, your tomato plant is ready to produce fruit. This is when light intensity matters most — insufficient light at this stage means flowers drop without setting fruit.
- Light: 12-14 hours daily
- Distance: 12-18 inches
- Intensity: High — maximize PPFD
- Tip: Gently shake flowering plants daily or use a small fan to simulate wind — this helps pollination since there are no bees indoors
Best Tomato Varieties for Grow Lights
Not all tomatoes perform equally under grow lights. Compact, determinate varieties produce the best results indoors:
- Red Robin: Ultra-compact (12 inches tall), perfect for windowsill grow light setups, produces sweet cherry tomatoes
- Tiny Tim: Dwarf variety reaching 12-18 inches, prolific producer of small red tomatoes
- Tumbling Tom: Trailing habit ideal for hanging baskets under lights, continuous cherry tomato production
- Micro Tom: The smallest tomato variety at 6-8 inches — fits under any grow light
- Patio Choice Yellow: Compact bush (18-24 inches) with sweet yellow cherry tomatoes
- Window Box Roma: Determinate paste tomato staying under 18 inches — great for cooking
Avoid large indeterminate varieties like Brandywine or Cherokee Purple under grow lights — they grow 6+ feet tall and need more light than most home setups provide. Stick with varieties bred for containers and compact spaces.
The Indoor Pollination Problem (and How to Solve It)
Outdoor tomatoes rely on wind and insects for pollination. Indoors, neither exists. Without pollination, your tomato plants will produce flowers but no fruit—a common frustration for indoor growers.
Why Indoor Tomatoes Struggle to Pollinate
Tomato flowers are self-fertile, meaning each flower contains both male and female parts. Outdoors, vibration from wind or bees shakes pollen loose onto the stigma. Indoors, the air is still and no insects visit your plants. The pollen simply sits in the anthers without reaching the stigma.
Hand Pollination Methods That Work
Electric Toothbrush Method: The most effective technique. Touch the back of a vibrating electric toothbrush to the flower stem for 2-3 seconds. The vibration mimics bee buzz pollination and releases pollen. Do this every 2-3 days when flowers are open.
Manual Shaking: Gently shake each flowering plant for 5-10 seconds daily during flowering. Tap the main stem lightly to create vibration. This works but is less effective than the toothbrush method.
Small Paintbrush Method: Use a clean, soft paintbrush to gently swirl inside each open flower for 2-3 seconds. This physically transfers pollen within the flower. More labor-intensive but very effective for small setups.
Mini Fan Method: Place a small oscillating fan near your plants on low setting. The gentle airflow simulates outdoor wind and helps with natural pollination. Set it to run 2-4 hours daily during flowering.
When to Start Pollinating
Begin hand pollination as soon as the first flowers open. Yellow flowers with reflexed (curved back) petals are ready. Flowers that haven’t fully opened won’t produce viable pollen yet. Pollinate every 2-3 days throughout the flowering period for maximum fruit set.
Container Selection for Indoor Tomatoes
Container choice directly impacts tomato health indoors. Unlike outdoor plants with unlimited soil volume, indoor tomatoes depend entirely on their container for root space, moisture, and nutrients.
Minimum Container Size
Cherry and determinate varieties need a minimum 3-gallon container. Indeterminate (vining) varieties need 5 gallons or more. Larger containers mean more stable moisture levels and better nutrient availability. In my setup a 7-gallon container clearly outproduces a 3-gallon pot of the same variety — more root room translates into more fruit over the season, without the moisture swings that trigger blossom end rot.
Best Container Types for Indoor Growing
Fabric Grow Bags: Excellent air pruning prevents root circling. Lightweight and inexpensive. They dry out faster than plastic, so monitor moisture carefully indoors.
Self-Watering Containers: Ideal for indoor growing. The reservoir provides consistent moisture, reducing the risk of blossom end rot from irregular watering. Best for busy growers or those who travel.
Plastic Pots with Saucers: Most common option. Retain moisture well but ensure drainage holes. Use saucers to catch runoff—indoor surfaces need protection.
5-Gallon Buckets: Budget-friendly and effective. Drill 8-10 drainage holes in the bottom. Food-grade buckets are safest for growing edibles.
Temperature and Humidity Control Indoors
Tomatoes have specific temperature and humidity requirements that indoor environments don’t always meet naturally.
Ideal Temperature Range
Daytime: 70-80°F (21-27°C). Nighttime: 60-65°F (15-18°C). Temperatures above 85°F cause pollen sterility—flowers drop without setting fruit. Below 55°F, growth slows dramatically. Iowa State Extension confirms that daytime highs above 85°F and nighttime lows below 55°F are the primary triggers for tomato blossom drop, and that cherry types set fruit over a wider range than large-fruited ones — see their blossom-drop FAQ. Most homes maintain suitable temperatures, but watch for cold drafts near windows in winter and heat buildup under grow lights in summer.
Humidity Management
Tomatoes prefer 40-70% relative humidity. Most homes run 30-50% in winter (too dry) and 50-70% in summer (ideal). Low humidity causes blossom drop and poor pollination. High humidity above 70% encourages fungal diseases. Use a hygrometer to monitor. A small humidifier helps in dry winter months; a fan prevents excess humidity buildup.
Watering and Feeding Indoor Tomatoes
Indoor tomato watering differs significantly from outdoor growing. Without rain, wind, or natural drainage, you control every drop.
Watering Schedule
Water when the top 1-2 inches of soil feel dry. Under grow lights, most 5-gallon containers need watering every 2-3 days. Self-watering containers may go 4-5 days between refills. Overwatering is the #1 killer of indoor tomatoes—root rot develops quickly in containers without natural drainage. Always check soil moisture before watering.
Feeding Schedule for Indoor Tomatoes
Indoor tomatoes need regular feeding since nutrients wash out with each watering. Use a balanced liquid fertilizer (10-10-10) at half strength every 1-2 weeks during vegetative growth. Switch to a bloom fertilizer (higher phosphorus, like 5-10-10) once flowers appear. My fertilizing tomatoes guide has the full stage-by-stage schedule. Add calcium supplement (crushed eggshells or calcium nitrate) to prevent blossom end rot, which is common in container-grown tomatoes.
Timeline: From Seed to Harvest Under Grow Lights
Understanding the timeline helps you plan and set realistic expectations for indoor tomato growing.
Week 1-2: Germination
Seeds sprout in 5-10 days under grow lights at 70-80°F. Keep soil consistently moist but not waterlogged. Position lights 2-3 inches above seedlings.
Week 3-5: Seedling Stage
True leaves develop. Transplant into individual 3-4 inch pots. Begin weak liquid fertilizer at 1/4 strength. Lights should be 3-4 inches above plants.
Week 6-8: Vegetative Growth
Plants grow rapidly. Transplant into final containers (5+ gallons). Begin regular feeding schedule. Increase light height to 6-12 inches above canopy.
Week 9-11: Flowering
First flowers appear. Begin hand pollination every 2-3 days. Switch to bloom fertilizer. Ensure temperatures stay below 85°F for proper fruit set.
Week 12-14: Fruit Development
Green tomatoes form and grow. Maintain consistent watering to prevent blossom end rot. Continue feeding every 1-2 weeks.
Week 14-18: Harvest
Cherry tomatoes ripen first (70-80 days from seed). Larger varieties take 80-100 days. Harvest when fully colored for best flavor. Indeterminate varieties continue producing for months under lights.
Common Grow Light Mistakes with Tomatoes
Avoid these errors that waste electricity and harm plants:
1. Running Lights 24/7
Tomatoes need darkness for cellular respiration and recovery. Continuous light causes leaf curling, chlorosis (yellowing), and reduced yields. Always provide 8-12 hours of darkness.
2. Lights Too Far Away
Light intensity drops dramatically with distance — doubling the distance reduces intensity by 75%. A grow light 3 feet above plants delivers only 25% of the light it provides at 18 inches. Keep lights close and adjust as plants grow.
3. Ignoring Light Burn Signs
If top leaves show white or yellow bleaching, brown crispy edges, or curl upward — your light is too close or too intense. Raise it 2-4 inches and monitor for 48 hours.
4. Using the Wrong Spectrum
Red/blue-only “blurple” lights from a few years ago are outdated. They lack the green and far-red wavelengths that support full photosynthetic efficiency. Upgrade to full-spectrum white LEDs for better growth and easier plant inspection.
5. Forgetting to Adjust Height
Tomatoes can grow 2-3 inches per week during vegetative stage. Check and raise your light weekly to maintain proper distance. A light that was 18 inches away on Monday can be touching leaves by Friday.
Supplementing Natural Light vs Full Artificial
Your approach depends on your window situation:
Supplemental Setup (You Have a Sunny Window)
If your window provides 4-6 hours of direct sunlight, a grow light fills the gap. Run the light for 6-8 hours during morning or evening to reach the 12-14 hour total. This is the most energy-efficient approach.
- Place plants in the window during peak sun hours
- Run the grow light before sunrise or after sunset
- A smaller, less powerful light works since it only supplements
Full Artificial Setup (No Usable Sunlight)
Apartments with north-facing windows, basements, or interior rooms need full artificial lighting. This works perfectly well — commercial tomato greenhouses use supplemental lighting extensively.
- Run lights for the full 12-16 hours depending on growth stage
- Use higher-wattage panels (40-50W per plant minimum)
- Reflective surroundings become more important to maximize every photon
Electricity Costs: What Grow Lights Actually Cost to Run
One concern with grow lights is the electricity bill. Here is the reality:
A 40-watt LED panel running 14 hours per day consumes:
- Daily: 0.56 kWh
- Monthly: 16.8 kWh
- Monthly cost: $2.00-2.50 (at the US average of $0.12-0.15/kWh)
Even running 4 lights for a small indoor garden costs under $10/month in electricity. Compare that to buying organic tomatoes at $4-6 per pound — a single productive plant pays for its lighting within weeks of harvest.
Troubleshooting Tomatoes Under Grow Lights
| Symptom | Likely Cause | Fix |
|---|---|---|
| Leggy, thin stems | Light too far or too weak | Lower light to 12-18 inches, increase wattage |
| Leaf edges curling up | Light too close (heat/intensity) | Raise light 3-4 inches |
| White/bleached top leaves | Light burn | Raise light immediately, remove damaged leaves |
| Flowers dropping | Insufficient light at fruiting stage | Lower light to 12-14 inches, run 12-14 hrs |
| Slow growth, pale leaves | Not enough total light hours | Increase to 14-16 hrs daily |
| Purple stems/leaf undersides | Phosphorus lockout from cold temps near lights | Ensure temps stay 65-80F at plant level |
| Yellowing lower leaves | Normal shedding OR nitrogen deficiency | Feed with balanced fertilizer if widespread |
Dwarf Tomato Varieties for Indoor Shelves
The open-pollinated Dwarf Tomato Project has done more for indoor growers than any expensive tent kit — it gave us a whole class of short, stocky plants that fruit happily under a single LED bar. Micro Tom (the smallest, at roughly 6-8 inches), Red Robin, and Tiny Tim all stay well under 18 inches, need no staking, and pump out cherry tomatoes in a 2-gallon container under the same light I run for microgreens. These determinate dwarfs skip the pruning and trellising that indeterminates demand — just consistent light and regular feeding. If floor space is the constraint, this dwarf class is the honest answer rather than wrestling a six-foot indeterminate under a clip-on.
How many hours of grow light do tomatoes need?
Tomato seedlings need 14-16 hours of grow light daily. Mature flowering and fruiting plants do best with 12-14 hours. Always provide at least 8 hours of darkness for plant recovery — running lights 24/7 harms tomatoes.
Can you grow tomatoes indoors with just grow lights?
Yes. Tomatoes grow and produce fruit entirely under artificial grow lights with no sunlight needed. Use a full-spectrum LED panel providing 400-900 PPFD, keep it 12-18 inches above plants, and choose compact determinate varieties like Red Robin or Tiny Tim.
What wattage grow light for tomatoes?
Plan for 30-50 actual watts of LED grow light per tomato plant. A 40W full-spectrum LED panel is sufficient for 1-2 plants from seedling through harvest. For 4 plants, use two panels or a single 80-100W unit.
How far should grow lights be from tomato plants?
Keep LED grow lights 24-30 inches from seedlings, 18-24 inches during vegetative growth, and 12-18 inches during flowering and fruiting. If leaves curl upward or bleach white, the light is too close. If stems stretch and get leggy, move the light closer.
Are LED grow lights better than fluorescent for tomatoes?
LED grow lights are better for tomatoes in nearly every way. They use 40-60% less electricity, last 5-10 times longer, produce less heat, and provide enough intensity for fruiting — something fluorescent T5 tubes struggle with.
Your Grow Light Tomato Setup Checklist
Use this checklist to get started this week:
- Buy a full-spectrum LED panel — 30-50W per plant, with adjustable hanging hardware
- Get a mechanical outlet timer — set 14-16 hours for seedlings, 12-14 for mature plants
- Choose compact tomato varieties — Red Robin, Tiny Tim, or Tumbling Tom
- Set up reflective surfaces — white walls, poster board, or mylar around your growing area
- Start seeds or buy seedlings — use quality potting mix in 5-gallon containers
- Position light 24 inches above seedlings — lower gradually as plants grow
- Monitor daily — check for leggy growth (light too far) or leaf burn (light too close)
- Hand-pollinate flowers — gently shake plants or use a fan when blooms appear
Growing tomatoes under grow lights is straightforward once your setup is dialed in. The initial investment of $30-80 for an LED panel pays for itself with your first few harvests — and you get vine-ripened tomatoes year-round regardless of season or window direction.
Related Articles
- LED Lights for Growing Plants Indoors — The complete hub guide covering every fixture, spectrum, and setup
- Grow Lights for Peppers — PPFD and distance tuned for flowering pepper plants
- Grow Lights for Vegetables — Indoor lighting for the full vegetable garden
- Growing Plants Indoors: Complete Guide — The full indoor gardening overview
- Best Light for Growing Plants Indoors — Windowsill, LED, and everything between
- How to Start Urban Gardening: Complete Beginner Guide
- 15 Best Vegetables for Urban Gardens