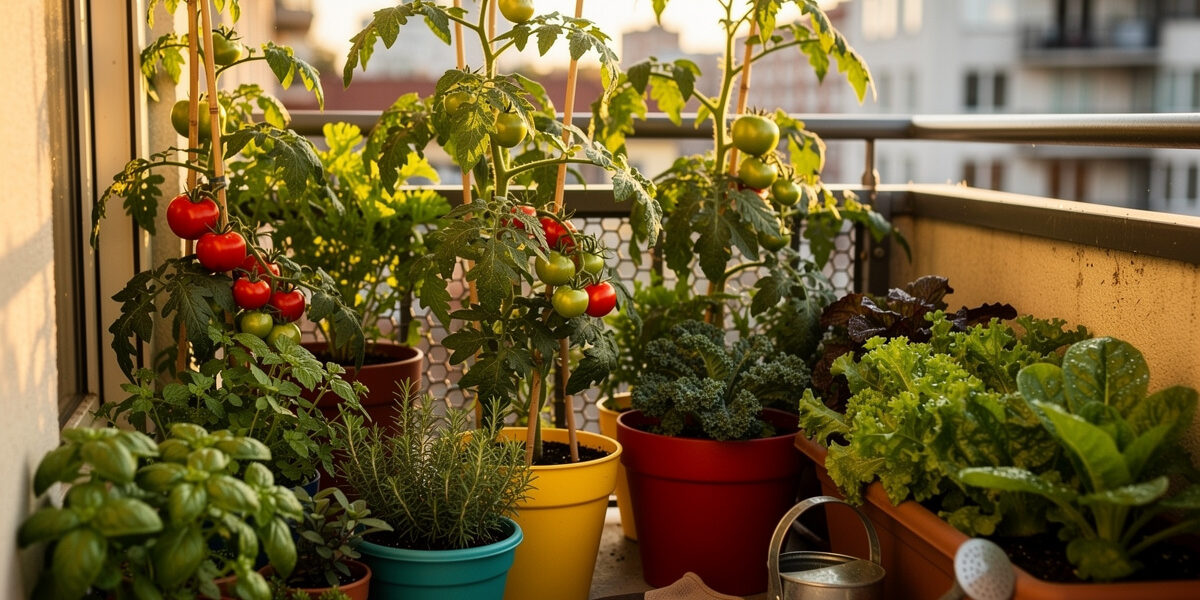
Gardening for beginners at home starts with a single plant in a single container — total cost under $25. Plenty of households already grow some of their own food, and most of it happens in containers on balconies, windowsills, and patios rather than in backyards. This guide takes you from zero experience to your first harvest in eight weeks, with step-by-step instructions, cost breakdowns, and the exact starter setup that turns any small space — apartment, balcony, or rooftop — into a productive garden.
I grow food on a Swedish apartment balcony and kitchen windowsill, where the season is short, the winter is long, and most of the gardening advice written for warmer places quietly fails. What follows is the setup that works when January gives you four usable daylight hours, the balcony frost holds until May, and weight limits mean every container choice matters. Gardening with kids? See our simple family gardening projects for 10 kid-friendly indoor and balcony ideas. For the 8-step workflow specifically, see our how to start a garden guide. For the verb-driven roadmap from week 1 to year 1, see our grow a garden in the city guide. For 15 specific layouts ready to copy this weekend, see our small space garden ideas guide.
What Is Urban Gardening?
Urban gardening refers to growing plants — especially food — in city environments where traditional garden space is limited or nonexistent. Unlike rural gardening that relies on large plots of land, urban gardening adapts to small spaces using creative solutions:
- Container gardening: Growing in pots, buckets, and fabric bags on balconies, patios, and windowsills
- Vertical gardening: Using walls, trellises, and vertical systems to grow upward instead of outward
- Indoor growing: Utilizing windowsills, grow lights, and hydroponic systems inside apartments
- Rooftop gardens: Converting unused roof space into productive growing areas
- Community gardens: Shared plots where urban residents can grow food collectively
- Windowsill herb gardens: Compact setups perfect for small-scale production
The defining characteristic of urban gardening is adaptation — working within space, light, and resource constraints to produce food where conventional agriculture seems impossible.
Why Start an Urban Garden?
The benefits of urban gardening extend far beyond fresh produce. Understanding these benefits will motivate you through the learning curve every beginner faces.
Fresh, Healthy Food
Homegrown produce is fresher than anything that has sat in a supply chain. Vegetables begin losing quality within hours of harvest, and store-bought produce may be days or weeks old by the time it reaches you. When you grow your own, you can harvest and eat within minutes — at peak flavor and crunch.
Significant Cost Savings
A well-planned urban garden can reduce grocery bills by $50-100 per month during the growing season. Herbs are particularly cost-effective — growing your own basil, parsley, and cilantro can save $200-400 annually. A single cherry tomato plant produces $40-80 worth of fruit over a season from a $3 seedling.
Mental Health and Wellbeing
Many gardeners will tell you the daily check on the plants becomes the calmest part of their day — a reason to step outside, slow down, and watch something grow on its own schedule. For city dwellers who spend most of the week indoors and on screens, that small daily ritual is a genuinely restorative break. I am not going to dress it up in medical language; I will just say that the ten minutes I spend watering and inspecting each morning is the part of the day I look forward to most.
Environmental Impact
Urban gardening reduces food transportation miles, packaging waste, and carbon emissions. A tomato grown on your balcony has zero transportation footprint versus one shipped 1,500 miles from a commercial farm. Urban plants also help reduce the heat island effect, improve air quality, and support pollinators like bees and butterflies.
Food Security and a Bit of Independence
Recent years have shown how fragile long food supply chains can be. Urban gardening provides a small buffer against disruptions, price spikes, and empty shelves. Even a balcony that supplies just some of your fresh herbs and greens shifts a little of your food back under your own roof — and that feels different from buying it.
Gardening for Beginners at Home: Your 30-Minute Setup
Beginners can start gardening at home with one container, one bag of potting mix, and one transplant — total cost under $25. The biggest mistake first-timers make is buying too much gear before growing anything. Start with a single plant, learn its rhythm, then scale up.
This section is your shortcut. If you read nothing else on this page, follow these five steps and you will have a living, productive garden by the weekend.
Step 1: Pick One Plant You Actually Eat
Do not grow what looks pretty in catalogs — grow what is already on your shopping list. Basil, cherry tomatoes, lettuce, mint, and chives are the five most forgiving starter plants for beginners. Each one survives missed waterings, mediocre light, and rookie mistakes. A single basil plant produces about $30 of leaves over a summer; a cherry tomato in a 5-gallon container yields 40-80 fruit. For first-year gardeners, picking one plant from this list is the difference between a quick win and an abandoned project by July.
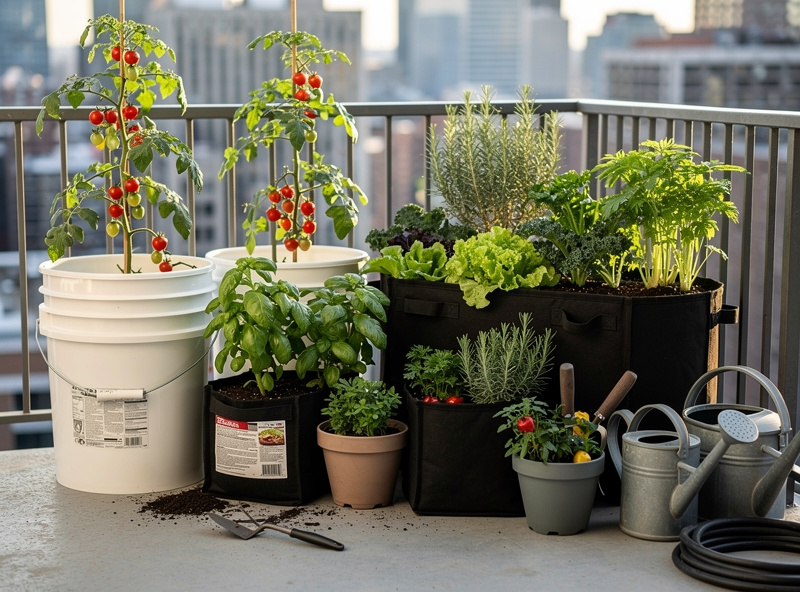
Step 2: Choose a Container That Fits Your Space
The container is your garden bed. For one herb plant, a 6-inch pot works. For one vegetable, you need at least a 5-gallon container (about 12 inches across and 12 deep). Fabric grow bags cost $4-6 each, breathe better than plastic, and fold flat in winter — the highest-ROI starter container for beginner gardeners. Whatever you choose, it must have drainage holes. No drainage equals dead roots in two weeks. Plastic, terracotta, and fabric all work; reused 5-gallon buckets with three drilled holes are the cheapest option of all.
Step 3: Use Quality Potting Mix, Not Garden Soil
This is the single biggest beginner mistake — I have killed more seedlings in compacted garden soil than I care to count. Garden soil suffocates roots in containers and brings diseases you do not want indoors. I mix my own container soil from equal parts coco coir, compost, and perlite — it drains fast, stays light on the balcony, and costs about 40-60% less than bagged mixes. If you prefer a bagged option, a quality peat-free container mix works too; one cubic foot fills two 5-gallon containers at roughly $15-20. A handful of worm castings on top after planting provides slow-release nutrients. Avoid generic topsoil at any price — it is the most common reason beginner gardens fail in the first month, regardless of plant choice or sun exposure.
Step 4: Find the Sunniest Spot You Have
Track sunlight on the day you plan to plant. Most edible plants need 6+ hours of direct sun (tomatoes, peppers, basil); leafy greens (lettuce, spinach, mint) tolerate 3-4 hours. South-facing balconies and windowsills get the most light in the Northern Hemisphere. In my Swedish apartment, the south-facing kitchen window turns out to be the only reliable growing real estate from October through March — three herbs and a tray of microgreens fit there, and that is everything until spring. If you have less than 3 hours of direct sun, a $25 LED grow light is the single piece of gear that unlocks indoor gardening year-round. See our indoor gardening essentials guide for the full 12-item indoor setup. Apartment dwellers without any outdoor space build complete kitchen gardens this way for under $80 in total equipment.
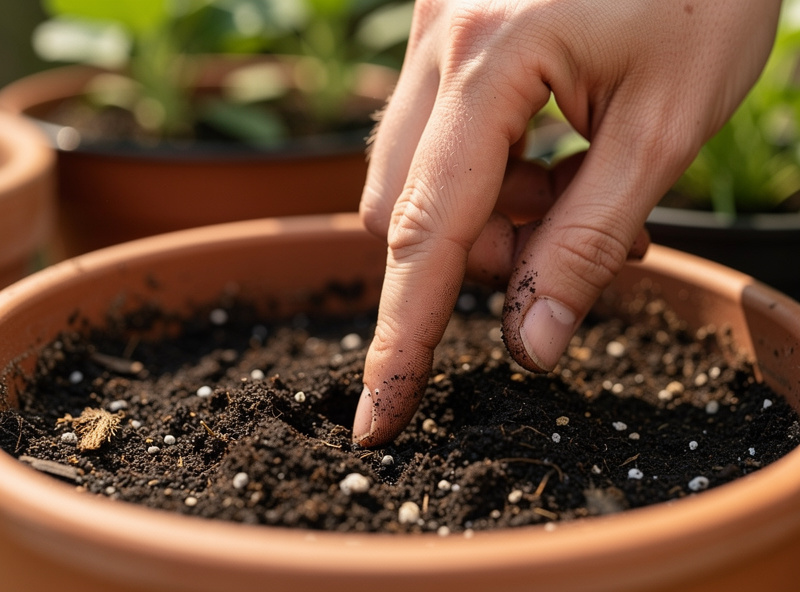
Step 5: Water Until It Drains, Then Wait
Push your finger one knuckle into the soil. If it is dry, water until liquid runs out the drainage holes; if it is damp, wait. Most beginner plants die from over-watering, not under-watering. In summer, expect to water small containers daily and 5-gallon containers every 2-3 days. A $12 timer-and-dripper kit removes the guesswork entirely. Set a phone reminder for the first two weeks until checking the soil becomes automatic.
Once these five steps feel routine — usually after 3-4 weeks — add a second plant. Then a third. This is exactly how I built my balcony garden: one fabric grow bag became three, then five, and by midsummer I was running eight containers across the railing with a drip-irrigation setup I had not planned for in April. Beginner gardeners who scale this way reach a 6-10 plant home garden by the end of their first season, producing $150-300 of fresh food on under $80 of upfront cost.
Urban Gardening Methods Compared
Choosing the right method is your first critical decision. Each approach has distinct advantages, costs, and space requirements. Here’s how they compare:
| Method | Space Needed | Startup Cost | Best For | Year-Round? |
|---|---|---|---|---|
| Container Gardening | Balcony or patio | $30-75 | Beginners, vegetables | Seasonal |
| Vertical Gardening | Wall or railing | $40-100 | Small spaces, climbers | Seasonal |
| Indoor Growing | Windowsill or shelf | $20-60 | Herbs, microgreens | Yes |
| Hydroponics | Indoor shelf | $50-200 | Fast-growing greens | Yes |
| Community Garden | Shared plot | $25-50/year | Full-size vegetables | Seasonal |
| Rooftop Garden | Building roof | $100-500 | Large-scale growing | Seasonal |
Most successful urban gardeners combine multiple methods. Start with container gardening on a balcony or patio, add vertical growing for space efficiency, and maintain a small indoor herb garden for year-round production. For soil-free growing, hydroponic systems can produce lettuce in as little as 30 days using a fraction of the water that soil-based growing needs.
Getting Started: Essential Steps
Success in urban gardening comes from methodical planning and gradual expansion. Follow these steps to build a productive garden that matches your space and lifestyle.
Step 1: Assess Your Space Honestly
Before buying anything, evaluate what you actually have to work with. Grab a notebook and spend a day observing your space:
Light Assessment:
- How many hours of direct sunlight does your space receive?
- When does sun hit your balcony or windowsill? (Morning sun is cooler; afternoon sun is more intense)
- Are there shadows from buildings, trees, or awnings?
- Track sunlight across different seasons — summer sun patterns differ from winter
Most vegetables need 6-8 hours of direct sun, but many leafy greens thrive with just 4 hours. Be honest about your light conditions — they determine what you can successfully grow.
Space Evaluation:
- Measure your available floor space (balcony, patio, windowsill)
- Identify vertical space (walls, railings, fences)
- Check weight limits for balconies and rooftops — soil and water are heavy (wet soil weighs 8-10 pounds per gallon)
- Consider access for watering, harvesting, and maintenance
Water Access:
- How far is your nearest water source?
- Will you need to carry water, or can you use a hose?
- Consider drainage — where will excess water go?
Step 2: Start Small and Scale Gradually
The biggest mistake new urban gardeners make is starting too big. Five thriving containers produce more food than twenty neglected ones. Begin with 3-5 containers and expand as you gain experience and confidence.
Best Beginner Plants:
- Herbs: Basil, mint, parsley, chives, cilantro — fast-growing, compact, and expensive to buy
- Salad greens: Lettuce, spinach, arugula — harvest in 30-45 days, tolerate partial shade
- Easy vegetables: Cherry tomatoes, peppers, radishes — productive and forgiving
- Green onions: Regrow from grocery store scraps indefinitely
Master these before attempting challenging crops like cauliflower, melons, or artichokes. For a detailed breakdown of which vegetables perform best in containers, see our guide to the best vegetables for urban gardens.
Step 3: Choose the Right Containers
Container selection is critical for urban gardening success. The right container provides adequate space for roots, proper drainage, and manageable weight.
Container Size Guidelines:
- Herbs and greens: 1-2 gallon containers minimum
- Peppers and bush beans: 3-5 gallon containers
- Tomatoes and cucumbers: 5-10 gallon containers
- Root vegetables: 8-12 inch deep containers
Container Types:
- Food-grade buckets: Inexpensive, durable, available at hardware stores (free from bakeries)
- Fabric grow bags: Excellent drainage, air-prune roots, store flat when not in use
- Plastic pots: Lightweight, affordable, widely available in many sizes
- Self-watering containers: Good for busy gardeners, but learn basic watering first
Critical Requirements:
- Drainage holes are mandatory — standing water kills plants
- Food-safe materials only — avoid containers that held chemicals
- Consider weight when watered — a full 5-gallon container weighs 40-50 pounds
Step 4: Use Quality Potting Mix
Never use garden soil in containers — it compacts, drains poorly, and introduces weed seeds and pests. Invest in quality potting mix designed specifically for containers; the University of Wisconsin Extension’s guide to growing vegetables in containers is a solid free reference on media and drainage.
What to Look For:
- Lightweight ingredients like peat moss, coco coir, or compost
- Drainage amendments like perlite or vermiculite
- No “garden soil” or “topsoil” labels
- Organic options available if preferred
Cost-Saving Tip: Make your own potting mix by combining equal parts peat moss (or coco coir), compost, and perlite. This costs 40-60% less than bagged mix and performs excellently. For a complete breakdown of essential tools and materials, see our urban gardening equipment guide.
Step 5: Understand Watering Basics
Watering is where most beginners struggle. Both overwatering and underwatering kill plants, but overwatering is far more common.
The Finger Test: Insert your finger 2 inches into the soil. If it feels moist, don’t water. If dry, water thoroughly until it drains from the bottom. This simple test prevents most watering mistakes before they start.
Watering Guidelines:
- Water deeply and less frequently — shallow watering encourages shallow roots
- Container plants need daily watering in hot weather (above 85°F), every 2-3 days in cool weather
- Water in the morning to reduce evaporation and fungal issues
- Mulch soil surface with straw or wood chips to retain moisture
Step 6: Feed Your Plants
Container plants rely entirely on you for nutrients — there’s no soil ecosystem to provide ongoing nutrition. Plan to fertilize regularly.
Fertilizer Options:
- Slow-release granular: Mix into soil at planting, feeds for 3-4 months
- Liquid fertilizers: Apply every 1-2 weeks during growing season
- Organic options: Compost tea, fish emulsion, seaweed extract
- DIY fertilizers: Banana peel tea (potassium), eggshell calcium, coffee grounds
Container Comparison Table
| Container Type | Cost | Weight (wet) | Best For | Durability |
|---|---|---|---|---|
| Food-Grade Bucket | Free-$5 | Heavy (40-50 lbs) | Tomatoes, peppers | 5-10 years |
| Fabric Grow Bag | $5-15 | Light (flexible) | All vegetables | 2-4 seasons |
| Plastic Pot | $3-20 | Medium | Herbs, greens | 3-5 years |
| Self-Watering | $15-40 | Medium-Heavy | Busy gardeners | 5-8 years |
| Raised Bed | $30-100 | Very Heavy | Rooftops, patios | 10-20 years |
Planning Your First Season
Successful urban gardening requires planning around your local climate and growing season.
Know Your Growing Season
Find your area’s last frost date (spring) and first frost date (fall). This defines your outdoor growing season. In temperate climates, this is typically May through September, but varies by location. Check your USDA Plant Hardiness Zone for specific guidance.
Start Seeds or Buy Seedlings?
Seedlings (transplants): Buy from nurseries for instant gratification and faster harvests. Best for beginners and slow-growing plants like peppers and tomatoes. Cost: $3-5 per plant.
Seeds: More economical and variety options, but require 4-8 weeks of indoor growing before transplanting. Direct sow fast-growing crops like lettuce, radishes, and beans. Cost: $2-4 per packet (20-100 seeds).
Succession Planting
Don’t plant everything at once. Stagger plantings every 2-3 weeks for continuous harvests. When your first lettuce crop finishes, have seedlings ready to replace them. This technique keeps a steady supply coming from the same containers all season.
Light Requirements by Plant Type
| Plant Type | Min Sun Hours | Ideal Sun Hours | Tolerates Shade | Days to Harvest |
|---|---|---|---|---|
| Lettuce/Greens | 3-4 hrs | 4-6 hrs | Yes | 30-45 days |
| Herbs | 4-5 hrs | 6+ hrs | Partial | 21-60 days |
| Radishes | 4-5 hrs | 6+ hrs | Partial | 25-30 days |
| Tomatoes | 6 hrs | 8+ hrs | No | 60-80 days |
| Peppers | 6 hrs | 8+ hrs | No | 60-90 days |
Indoor vs Outdoor Urban Gardening
One of the first decisions every urban gardener faces is where to grow. Both approaches have distinct advantages and challenges. Your choice depends on available space, climate, budget, and what you want to grow.
Outdoor container gardening is generally easier for beginners because plants get natural sunlight, better air circulation, and more forgiving conditions. Start outdoors if you have any balcony or windowsill with direct sun.
Indoor growing requires managing light, humidity, and airflow artificially, but enables year-round production. A basic LED grow light setup for herbs and leafy greens costs $20-40 and dramatically expands what you can grow inside.
Many successful urban gardeners combine both approaches — growing vegetables outdoors in summer while maintaining herbs indoors year-round. For a detailed comparison of costs, plant choices, and hybrid strategies, read our indoor vs outdoor urban gardening guide.
Essential Equipment for Urban Gardeners
You don’t need a shed full of tools to grow food in the city. In fact, most urban gardeners use the same five tools for everything: a hand trowel ($5-15), watering can ($8-20), pruning shears ($10-25), gloves ($5-15), and a soil moisture meter ($8-15, optional). A complete toolkit costs $30-50.
Focus on quality over quantity — a sturdy stainless steel trowel will last for years and make every gardening task easier. Skip expensive raised beds, automated irrigation, and premium tool sets until you’ve proven your commitment. For a complete breakdown of what to buy and what to skip, see our urban gardening equipment guide. If you have patio or rooftop space, raised beds and planters offer a more permanent growing solution with better soil volume and drainage.
Budget Urban Gardening
You don’t need a big budget to start growing your own food. A basic container garden with a $10 bucket, $15 potting mix, $5 seeds, and $10 basic tools totals just $40. Focus on fast-growing crops like lettuce, radishes, and herbs that produce within 30 days and provide the fastest return on investment.
A well-planned $50 container garden can produce $200-400 worth of fresh produce annually. Herbs alone save $30-50 per month. For detailed strategies on starting for under $50, read our urban gardening on a budget guide. You can also boost your harvest by sprouting seeds at home — a $10 mason jar setup produces fresh sprouts in just 3-7 days year-round, adding $20-30 monthly in fresh greens to your diet.
Common Beginner Mistakes to Avoid
Learn from others’ mistakes to accelerate your success. The seven errors that kill more plants than pests, weather, and disease combined are:
- Overwatering: The #1 plant killer. Use the finger test and wait for soil to dry between waterings. Most container plants need watering once daily in summer, not multiple times.
- Containers too small: Cramped roots mean stunted, unproductive plants. A tomato in a 10-gallon container produces noticeably more fruit than the same variety cramped into a 5-gallon pot.
- Wrong light conditions: Growing sun-loving plants in shade guarantees disappointment. Match plants to your actual light conditions.
- Using garden soil: Compacts in containers and kills plants. Always use potting mix.
- Ignoring drainage: Every container needs drainage holes. No exceptions.
- Starting too big: Overwhelming yourself leads to neglect. Start with 3-5 containers.
- Giving up too soon: plenty of beginners walk away after the first plant dies. Persist through early failures — the second season is always easier than the first.
For detailed explanations of each mistake and how to fix them, see our guide to 7 urban gardening mistakes that kill your plants.
Scaling Up: From Beginner to Intermediate
Once you have successfully grown your first season — and tasted a tomato you grew yourself — the urge to expand is hard to resist. Here are the strategies I used to scale from a few balcony containers to something that feeds the kitchen year-round:
Vertical Growing
Maximize limited space by growing upward. Use trellises for tomatoes and cucumbers, wall-mounted pocket planters for herbs and greens, or tiered shelving for multiple container levels. Vertical growing can double your productive area without increasing your footprint. For detailed techniques, see our vertical gardening guide.
Season Extension
Push your growing season earlier and later with cold frames, row covers, or by moving containers indoors during light frosts. Many leafy greens survive winter with minimal protection.
Seed Saving
Save seeds from your best plants to reduce costs and develop varieties adapted to your specific conditions. Start with easy-to-save crops like tomatoes, peppers, and beans.
Composting
Turn kitchen scraps into garden gold with a small worm bin or bokashi system — mine lives under the kitchen sink, and the worm castings it produces replace every bagged amendment I used to buy. See our complete home composting guide for step-by-step setup. Homemade compost steadily improves the soil in every container and cuts what I spend on bagged fertilizer.
Troubleshooting Common Problems
Even with perfect planning, challenges arise. Here’s how to identify and solve the most common urban gardening problems:
Yellowing Leaves
Yellow leaves indicate stress, but the cause varies by pattern:
- Lower leaves yellowing: Usually nitrogen deficiency — feed with balanced fertilizer
- Upper leaves yellowing: Often micronutrient deficiency or pH imbalance
- All leaves pale yellow: Could be overwatering, underwatering, or root damage
- Yellow with brown spots: Possible fungal disease — improve air circulation
Pest Management
Urban gardens face fewer pests than rural ones, but indoor and balcony gardens lack natural predators. Common urban pests include:
Aphids: Tiny green, black, or white insects clustering on new growth. Spray with water or mild soap solution (1 teaspoon dish soap per quart of water).
Spider Mites: Cause stippling on leaves and fine webbing. Increase humidity and spray plants regularly with water.
Fungus Gnats: Small flies around soil surface. Let soil dry between waterings; use yellow sticky traps. For persistent infestations, see our guide to getting rid of fungus gnats in houseplants.
Prevention is key: Inspect new plants before bringing them home, maintain plant health, and avoid overwatering that creates pest-friendly conditions.
Poor Growth or Leggy Plants
Leggy, stretched stems indicate insufficient light. Move plants to a sunnier location or supplement with grow lights. Slow growth can result from:
- Root-bound plants needing larger containers
- Nutrient deficiency — fertilize regularly
- Wrong season for the crop (cool-weather crops struggle in summer heat)
- Overwatering reducing oxygen to roots
Harvesting and Enjoying Your Produce
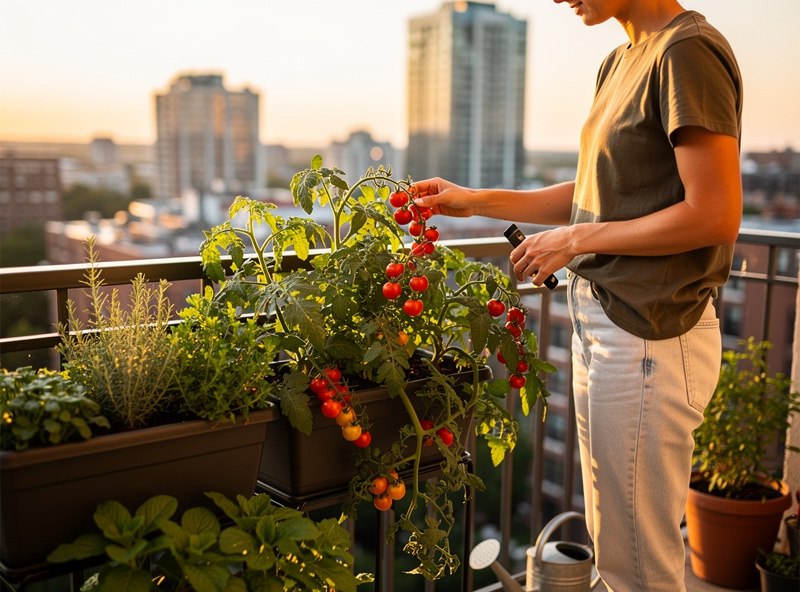
The reward for your efforts is fresh, homegrown food — and the difference between a cherry tomato still warm from the afternoon sun and one shipped across a continent is something you have to taste to understand. Maximize your harvests with these techniques:
Harvest Timing
Pick produce at peak ripeness for best flavor and nutrition:
- Lettuce and greens: Harvest outer leaves early and often; cut-and-come-again varieties produce for 6-8 weeks
- Herbs: Pick before flowering for best flavor; frequent harvesting encourages bushiness
- Tomatoes: Let ripen fully on the vine for maximum sweetness
- Peppers: Can harvest green or wait for color change (sweeter when fully colored)
- Radishes: Don’t wait too long — they become woody and bitter when oversized
Preserving Your Harvest
When production exceeds immediate needs, preserve the bounty:
- Herbs: Dry hanging upside down, or freeze in oil in ice cube trays
- Tomatoes: Freeze whole, make sauce, or slow-roast and store in oil
- Peppers: Freeze chopped, pickle, or dry into flakes
- Greens: Blanch and freeze for cooking later
Building a Sustainable Practice
As you gain experience, focus on sustainability — reducing costs, waste, and environmental impact while increasing productivity:
Closed-Loop Systems
Create cycles that minimize inputs and waste:
- Compost kitchen scraps and spent plants into soil amendments
- Collect rainwater for irrigation where permitted
- Save seeds from successful plants for next season
- Regrow vegetables from scraps (green onions, lettuce, celery)
Community Connections
Urban gardening doesn’t have to be solitary:
- Join seed swaps to diversify your varieties at no cost
- Share surplus produce with neighbors
- Exchange knowledge with other urban gardeners online or locally
- Participate in community garden programs if available
Your Three-Year Urban Gardening Journey
Urban gardening skills compound over time. Here’s what to expect:
Year One: Learning and Experimentation
Focus on fundamentals — watering, light management, and basic plant care. Expect some failures. Success means keeping most plants alive and harvesting something edible. Budget $50-100 for supplies.
Year Two: Refinement and Expansion
Apply lessons learned. Try new crops, experiment with vertical growing, and start composting. Success means consistent harvests and reduced grocery bills ($50-100/month savings). Budget $25-50 for expansion.
Year Three: Mastery and Sustainability
Grow primarily from saved seeds, maintain a composting system, and mentor new gardeners. Success means a self-sustaining garden that costs little while producing abundantly ($200-400/year in produce value).
Your First Week Action Plan
Don’t overthink — start this week with these concrete steps:
Day 1-2: Observe and Plan
- Map your sunlight patterns throughout the day
- Measure your available space (length × width × height)
- Decide on 3-4 plants to start with
Day 3-4: Gather Supplies
- Buy 3-5 containers with drainage holes (5-gallon buckets work perfectly)
- Get quality potting mix (2 cubic feet minimum)
- Purchase one hand trowel and watering can
Day 5-6: Get Plants
- Buy seedlings from a local nursery (faster than starting seeds)
- Choose basil, lettuce, cherry tomato, and one pepper plant
Day 7: Plant
- Fill containers with potting mix, leaving 1 inch at the top
- Plant seedlings at the same depth they were growing
- Water thoroughly until drainage appears
- Place in your sunniest location
Grants and Subsidies: What Your City May Already Offer
Before you spend anything, check what your local municipality already offers. Many cities and towns run sustainability or waste-management programs that include free or subsidized compost bins, community-garden plots with nominal fees, seed libraries hosted by public libraries, and occasional small grants for new gardeners. These vary widely by place and year and are almost always under-publicized, so they receive far fewer applicants than you would expect. Start with your local council or city sustainability office and ask specifically about compost-bin subsidies and community-garden plot availability — a single phone call can cover a meaningful chunk of your setup costs.
How much does it cost to start an urban garden?
You can start a basic urban garden for $30-50 using food-grade buckets, potting mix, and seedlings from a nursery. A more complete setup with quality containers, tools, and fertilizer runs $75-150. Many urban gardeners start with free or repurposed containers and scale up as they gain experience.
Can I grow vegetables on a north-facing balcony?
Yes, but your options are limited to shade-tolerant crops. Leafy greens like lettuce, spinach, and arugula can produce with just 3-4 hours of indirect light. Herbs like mint and parsley also tolerate lower light. Fruiting vegetables like tomatoes and peppers will not produce without direct sunlight. Consider supplementing with LED grow lights for better results.
How often should I water container plants in summer?
Most container plants need watering once daily in moderate summer weather and twice daily during heat waves (above 85°F/30°C). Use the finger test: insert your finger 2 inches into the soil. If it feels dry, water thoroughly until it drains from the bottom. Morning watering is best to reduce evaporation and fungal issues.
What are the easiest vegetables for beginners to grow?
The easiest vegetables for urban gardening beginners are: lettuce and salad greens (harvest in 30 days), radishes (ready in 3-4 weeks), green onions (regrow from scraps indefinitely), cherry tomatoes (highly productive), and herbs like basil and mint. These tolerate beginner mistakes and provide quick harvests to build confidence.
Can I use regular garden soil in my containers?
No, never use garden soil in containers. It compacts, drains poorly, and introduces weed seeds and diseases. Always use potting mix specifically formulated for containers, which contains lightweight ingredients like peat moss, perlite, and compost that maintain the loose, well-draining structure containers require.
How much food can I grow in a small urban garden?
A well-planned 4-container garden (two 5-gallon, two 3-gallon) can produce 15-25 pounds of vegetables and herbs per month during peak season. This includes 2-3 tomato plants yielding 10-15 lbs, herbs worth $30-50 monthly, and continuous lettuce harvests. Most urban gardeners save $50-100 on groceries monthly.
What is the best time of year to start urban gardening?
Spring is ideal — start seeds indoors 6-8 weeks before your last frost date, then transplant outdoors after danger of frost passes. In warm climates (zones 8-10), you can start in fall for winter harvests. Indoor growing works year-round regardless of climate. Check your local extension office for specific planting dates.
Related Articles
Deepen your knowledge and expand your urban garden with these comprehensive guides:
- Urban Gardening Equipment Guide — Essential tools and what you can skip to save money
- 15 Best Vegetables for Urban Gardens — Space-efficient vegetables ranked by ease and productivity
- Indoor vs Outdoor Urban Gardening — Which approach fits your space and lifestyle
- Urban Gardening on a Budget — Start growing food for under $50
- 7 Urban Gardening Mistakes to Avoid — Learn from common errors and save your plants