Building a DIY vertical garden costs a fraction of commercial systems and lets you customize every detail for your space. This guide walks through five proven builds — pallet planters, PVC pipe towers, rain gutter gardens, A-frame trellises, and bucket stacking systems — with material lists, step-by-step instructions, and real cost breakdowns so you can start growing upward this weekend. I have built all five of these on my own Swedish balcony over the years, and the pallet planter and PVC tower are the two I still rebuild every spring because they keep earning their wall space through a short Nordic season.
For a complete overview of all methods and options, see our complete vertical gardening guide.
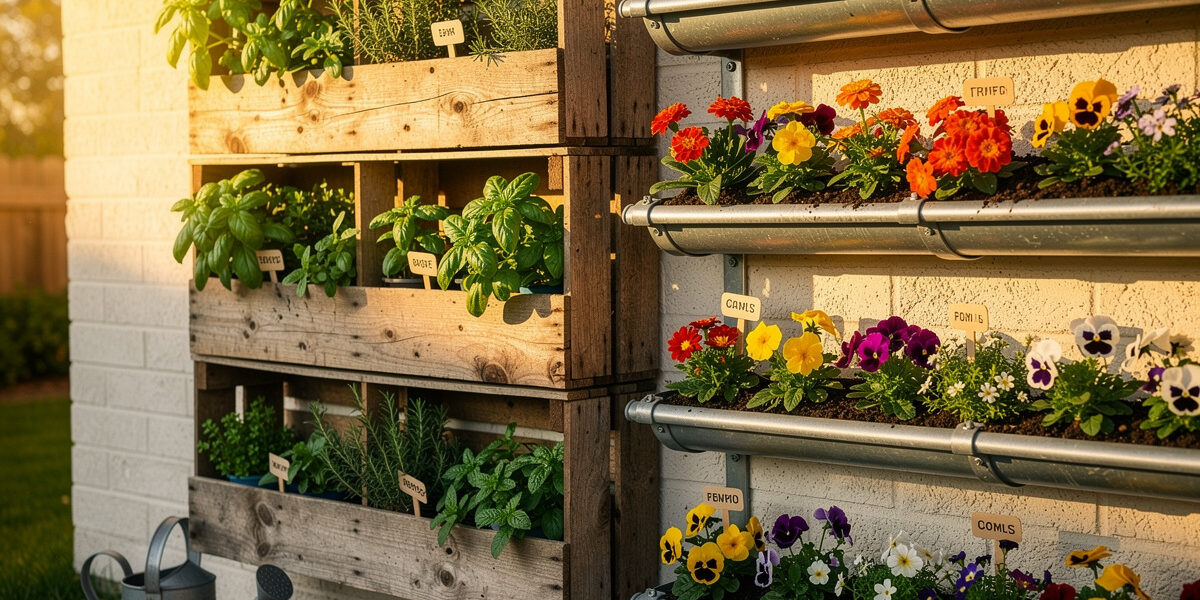
Project 1: Pallet Vertical Planter ($0–$25)
A wooden pallet stood on end and lined with landscape fabric creates an instant vertical planter with 8–12 growing slots. This is the cheapest DIY vertical garden you can build — the pallet is free from local businesses, and the only purchases are landscape fabric and potting mix.
Materials
| Item | Quantity | Cost |
|---|---|---|
| Wooden pallet (HT-stamped) | 1 | Free |
| Landscape fabric (weed barrier) | 2 m² | $3–$5 |
| Staple gun + staples | 1 (reusable) | $8–$12 |
| Potting mix (coco coir + perlite) | 40 L | $8–$12 |
| L-bracket + screws (wall anchor) | 2 | $3–$5 |
Build Steps
- Check the pallet stamp. Only use pallets stamped “HT” (heat treated). Avoid “MB” (methyl bromide — toxic) or unstamped pallets of unknown origin. For food growing, safety comes first.
- Sand rough edges. Run sandpaper over all exposed surfaces to remove splinters. If the wood is rough, a quick pass with 80-grit paper is enough.
- Line the back and bottom. Lay the pallet face-down. Staple landscape fabric across the entire back surface and along the bottom, creating pouches between the slats that will hold soil.
- Fill with soil. Flip the pallet face-up (still lying flat). Pour potting mix between each slat row, pressing it firmly into the fabric-lined pockets. Overfill slightly — soil compresses after the first watering.
- Plant seedlings. Push herb or lettuce seedlings through the gaps between slats into the soil. Plant one seedling per 15–20 cm of row space.
- Water and wait. Soak thoroughly and leave the pallet lying flat for 2–3 weeks. This lets roots establish and grip the soil before gravity pulls on them.
- Stand upright. Lean the pallet against a wall or fence at 10–15 degrees from vertical. Secure the top with L-brackets screwed into the wall to prevent tipping in wind.
Best crops: Herbs (basil, cilantro, thyme, mint), lettuce, strawberries, succulents. Avoid heavy fruiters — the shallow soil pockets cannot support tomato or pepper root systems.
Project 2: PVC Pipe Strawberry Tower ($15–$30)
A large-diameter PVC pipe with holes cut along its length becomes a vertical tower that holds 15–20 strawberry plants or herbs in under 0.2 square meters of floor space. This is one of the most space-efficient DIY builds for small balconies.
As an Amazon Associate I earn from qualifying purchases.
Materials
| Item | Quantity | Cost |
|---|---|---|
| PVC pipe (150 mm / 6-inch diameter) | 1.5 m length | $8–$12 |
| PVC pipe (25 mm / 1-inch, for watering core) | 1.5 m length | $2–$3 |
| PVC end cap (150 mm) | 1 | $2–$3 |
| Hole saw (50 mm / 2-inch) | 1 (reusable) | $5–$8 |
| Potting mix | 30 L | $6–$10 |
| Landscape fabric scraps | Small pieces | $0–$2 |
Build Steps
- Mark hole positions. Starting 15 cm from the bottom, mark 50 mm circles every 15 cm along the pipe in a spiral pattern (rotate 90 degrees between each row). This gives 15–20 planting holes depending on pipe length.
- Cut holes. Use a hole saw on a drill to cut each circle. Angle the cut slightly downward so water does not pool inside the pocket and rot roots.
- Prepare the watering core. Drill 3 mm holes every 5 cm along the 25 mm PVC pipe. Wrap it loosely in landscape fabric to prevent soil from clogging the holes. This inner pipe distributes water evenly from top to bottom.
- Assemble. Glue or friction-fit the end cap onto the bottom of the large pipe. Place the watering core pipe inside, centered. Fill around it with potting mix, pausing at each planting hole level to insert a seedling with roots pointing inward.
- Secure upright. Set the tower in a large pot filled with gravel for stability, or attach it to a fence post with pipe clamps.
- Water through the core. Pour water slowly into the top of the inner pipe. It seeps out through the drilled holes and moistens soil at every level evenly.
Best crops: Strawberries, herbs, lettuce, spinach. The 50 mm holes limit root ball size, so stick to small plants.
Project 3: Rain Gutter Garden ($20–$45)
Vinyl rain gutters mounted horizontally on a fence or wall in stacked rows create long, shallow planting troughs perfect for salad greens and herbs. Each gutter holds a row of plants, and you can stack 3–5 rows vertically to multiply your growing space.

Materials (per 3-tier setup)
| Item | Quantity | Cost |
|---|---|---|
| Vinyl rain gutter (3 m / 10 ft) | 3 lengths | $12–$18 |
| End caps | 6 (2 per gutter) | $6–$9 |
| Gutter brackets/hangers | 9 (3 per gutter) | $6–$9 |
| Potting mix | 20 L | $5–$8 |
| Drill + screws | — | Already owned |
Build Steps
- Drill drainage holes. Flip each gutter upside down and drill 6 mm holes every 15 cm along the bottom. Without drainage, roots sit in standing water and rot within days — Illinois Extension’s container drainage guide explains the soil-physics of why drainage holes (not a gravel layer) are what actually keep roots alive.
- Attach end caps. Snap or glue end caps onto both ends of each gutter section to contain soil.
- Mount brackets. Screw gutter brackets into the fence or wall at 30–40 cm vertical spacing between rows. Ensure the top row gets the most direct sunlight. Angle each gutter very slightly (1–2 degrees) toward one end so excess water drains out rather than pooling.
- Fill with soil. Add lightweight potting mix to each gutter, filling to 2 cm below the rim.
- Plant. Space lettuce seedlings 15 cm apart, herbs 20 cm apart. Press firmly into soil and water gently to settle roots.
Best crops: Lettuce, spinach, radishes, herbs, microgreens, and strawberry runners. The shallow depth (10 cm) limits options to shallow-rooted crops only.
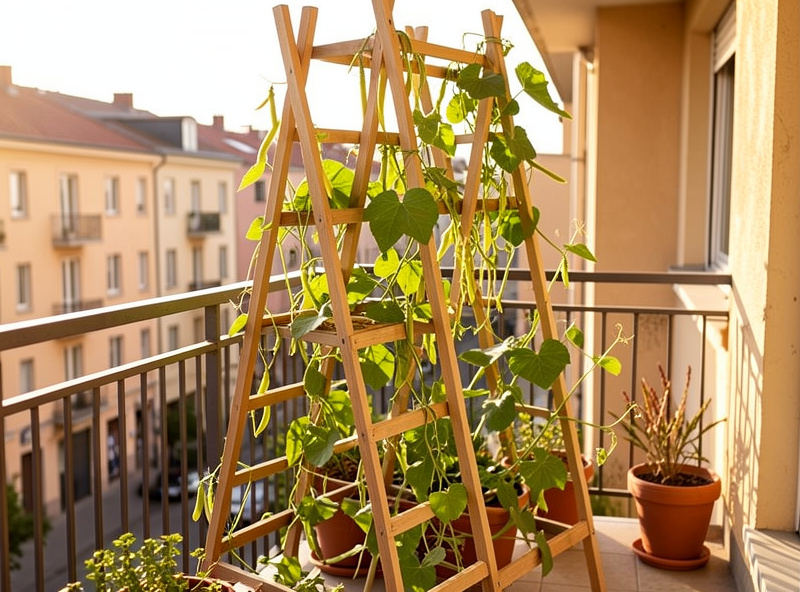
Project 4: A-Frame Trellis ($25–$50)
An A-frame trellis is the strongest DIY vertical garden structure and the only one that supports heavy fruiting crops like cucumbers, melons, and indeterminate tomatoes. Two panels lean together like a tent, and climbers grow up both sides while shade-tolerant crops grow underneath.
Materials
| Item | Quantity | Cost |
|---|---|---|
| Cattle panel (16 ft × 50 in) | 1 | $25–$35 |
| T-posts (6 ft) | 4 | $8–$16 |
| Wire ties or zip ties | 12 | $2–$3 |
Build Steps
- Drive T-posts. Set 2 T-posts 1.2 m apart on each side of your bed, creating two parallel rows about 1 m apart. Drive posts 30 cm into the ground using a post driver or heavy mallet.
- Bend the cattle panel. Stand the panel between the two rows and bend it into an arch or A-shape. The rigid wire naturally curves when pressed between the post pairs.
- Secure to posts. Tie the panel to each T-post at 3–4 points using heavy wire ties. The structure should resist 20+ kg of vine and fruit weight without flexing.
- Plant climbers. Sow or transplant cucumbers, beans, or peas at the base of each side. As vines grow, guide them onto the panel with soft twine ties every 20 cm until tendrils grip on their own.
- Plant underneath. Sow lettuce or spinach in the shaded center beneath the arch. These cool-season crops thrive in the dappled light that filters through the climbing foliage above.
Best crops: Cucumbers, pole beans, peas, indeterminate tomatoes, small melons (with fruit slings). Underneath: lettuce, spinach, cilantro, parsley.
Project 5: DIY Bucket Stack Tower ($10–$25)
Stack 5-gallon buckets vertically using a central support rod, and you have a tiered planting tower that holds 10–15 plants in a circle barely 30 cm across. Each bucket is a self-contained growing compartment with full root depth — a major advantage over shallow pockets and gutters.
Build Steps
- Collect 4–5 five-gallon buckets. Free from bakeries, restaurants, and hardware stores. Ensure they held food-safe contents (not chemicals or paint).
- Cut planting holes. Cut 3–4 holes (8 cm diameter) around the sides of each bucket, spaced evenly. Leave the bottom bucket uncut — it serves as the base reservoir.
- Drill drainage holes. Drill 6 mm holes in the bottom of each bucket except the base.
- Drive a central rebar stake. Push a 1.5 m rebar rod or wooden dowel through the center of all buckets. This holds the stack stable and prevents toppling.
- Stack and fill. Place each bucket onto the stack, rotating 45 degrees so holes do not align vertically (this distributes weight evenly). Fill with potting mix and plant one seedling per hole.
Cost: $0 for buckets (free) + $5 rebar + $5–$20 soil = $10–$25 total.
DIY Vertical Garden Cost Comparison
| Project | Total Cost | Plant Capacity | Difficulty | Time to Build |
|---|---|---|---|---|
| Pallet Planter | $0–$25 | 8–12 plants | Easy | 1–2 hours |
| PVC Strawberry Tower | $15–$30 | 15–20 plants | Medium | 2–3 hours |
| Rain Gutter Garden (3-tier) | $20–$45 | 20–30 plants | Easy | 1–2 hours |
| A-Frame Trellis | $25–$50 | 6–12 climbers + understory | Medium | 1–2 hours |
| Bucket Stack Tower | $10–$25 | 10–15 plants | Easy | 1 hour |
Tips for All DIY Vertical Garden Builds
- Always use lightweight potting mix — never garden soil. A 60/30/10 blend of coco coir, perlite, and worm castings drains well, retains moisture, and keeps wall-mounted builds from overloading their brackets. The University of Wisconsin Extension’s guide to growing vegetables in containers covers the same media fundamentals I use across every build here.
- Waterproof the wall behind — any vertical garden attached to a wall will drip. Use plastic sheeting or a waterproof membrane between the planter and the wall surface to prevent water damage and mold growth.
- Start small — build one project first and run it for a full season before scaling up. You will learn your local watering rhythm, sun patterns, and which crops perform best before investing more time and money.
- Add drip irrigation early — manual watering works for a single pallet planter, but once you have 3+ vertical structures, a drip irrigation system with a battery timer saves hours per week and waters more consistently than you can by hand.
- Check structural anchors monthly — soil absorbs water and gets heavier. A planter that weighed 5 kg when planted may weigh 12 kg after a rain. Tighten screws and verify wall anchors before they fail under increased load.
Maintaining Your DIY Vertical Garden
Feed every 10–14 days with liquid fertilizer after the first month. Small containers deplete nutrients quickly — more so than ground beds. A balanced 10-10-10 feed works for herbs and greens. Switch to a 5-10-10 (higher phosphorus and potassium) formula for flowering and fruiting crops like strawberries and peppers.
Replace potting mix annually. Unlike ground soil that self-renews with decomposing organic matter, container mix breaks down over one season. Compacted, exhausted mix drains poorly and holds fewer nutrients. Dump old mix into compost, wash containers, and refill with fresh mix each spring.
Inspect wood annually for rot. Pallet gardens and wooden trellises in contact with moist soil degrade over 2–3 seasons. Replace rotted slats before the structure weakens. Applying a food-safe wood sealer (like raw linseed oil) at the start of each season extends lifespan by 1–2 years.
Watch for pest buildup in tight spaces. Vertical gardens pack plants close together, which means aphids, whiteflies, and fungus gnats can spread quickly between neighbors. Inspect weekly and treat early with a neem oil spray (5 ml per liter of water) before small infestations become full outbreaks. Good airflow is your first line of defense — prune overcrowded foliage and space plants according to the guidelines for each build above. Healthy spacing prevents the stagnant humid conditions that pests and fungal diseases thrive in.
What is the cheapest DIY vertical garden?
A pallet wall garden costs $0-20 if you source a free pallet. Stand it upright, add landscape fabric, fill with potting mix, and plant through the slat openings for 12-18 planting pockets.
How do you build a vertical garden for beginners?
Start with a simple A-frame trellis built from 2×2 lumber and wooden lattice. It provides 8-12 square feet of growing surface in a 2×4 foot footprint. Construction takes 1-2 hours with basic tools.
Can you make a vertical garden without drilling?
Yes. Freestanding A-frame trellises, pallet gardens, and stackable container towers require no drilling or wall mounting. These are ideal for renters who need to remove the garden when they move.
What materials do you need for a DIY vertical garden?
Basic materials include: lumber or PVC pipes for frame, landscape fabric or mesh for pockets, potting mix, seeds or seedlings, and a watering system. Total cost: $20-60 depending on size and materials chosen.
How long do DIY vertical gardens last?
Wood-based vertical gardens last 3-5 years before needing replacement. PVC structures last 5-10 years. Metal trellises and cattle panels last 10+ years. Felt pocket planters need replacement every 1-2 seasons.